introduction
Not too long ago, I toyed with a Android root detection bypass. In a similar scenario, I was poking at a iOS application that also had some root detection built in. For very much the same purpose, I suppose the application has its own ~reasons~ for the jailbreak detection. Of course, this makes the testing I actually wanted to do impossible as I’d very much like to dig under the hood :)
So, its was time to try and bypass the jailbreak detection of the application.
All I had to work with was a .ipa. Similar to the android .apk file, the .ipa is also just a zipped up archive of the actual application files. To test with, I had a iPad mini. The iPad was running the latest iOS (8.1.2 at the time of this post) and was also jailbroken. If I remember correctly the jailbreak tool used was called TaiG. Anyways, inside the applications .ipa archive was a whole bunch of resource files and what not, including the compiled application executable. This executable is what is of interest.
understanding the behavior
I installed the app onto my iPad, and started to inspect its behavior. When the application starts, it would immediately throw a security related error, notifying the user that it has detected the environment as one that is jailbroken. This happens pretty fast too. Once the jailbreak detection error shows, the application refuses to continue to run. Restarting the application simply continues this loop.
I studied some iOS jailbreak detection methods online which revealed many of them as being pretty obvious. From detecting the presence of /bin/bash or Cydia.app, to examining the exit status if fork(). There are some more advanced methods as well such as checking the existence of certain known dylib’s too (which apparently is the hardest to circumvent). For the purpose of this post, the jailbreak detection was pretty weak and did not have any of the more advanced methods implemented. In fact, I am pretty sure there won’t be that many apps out there that will be this easy to bypass.
discovering the implementation
Armed with some knowledge of how its typically done in the iOS world, I proceeded to take a look at the actual application binary:
leonjza@laptop » file myApplication
myApplication: Mach-O executable arm
Compiled as a Mach-O executable from Objective-C, I loaded up the binary from the extracted .ipa into the Hopper disassembler to help me get an idea of what is happening. Hopper has some nice features such as generating pseudo code etc, so I quite like using it for these types of excursions. To start off, I searched around for strings that were related to the word jailbreak within the app. Class definitions, methods or any strings related to the term jailbreak was ok. I just wanted to get something to start off with. I found nothing.
Of course this had me thinking that I may have missed the plot entirely. I continued to search for other things related to jailbreaking, and got a hit immediately for the term /bin/bash in the string section:

In fact, there are quite a few other jailbreak related strings in this section. From within Hopper, one can check where these strings are referenced from. So, I followed this and landed up in a function that does what I would have expected a jailbreak detection function to do, but with a completely unexpected class/method name. -[MobileDisplay isRetinaDisplay]:. Very sneaky :) So we are working with the isRetinaDisplay method which is the one doing the jailbreak detection:
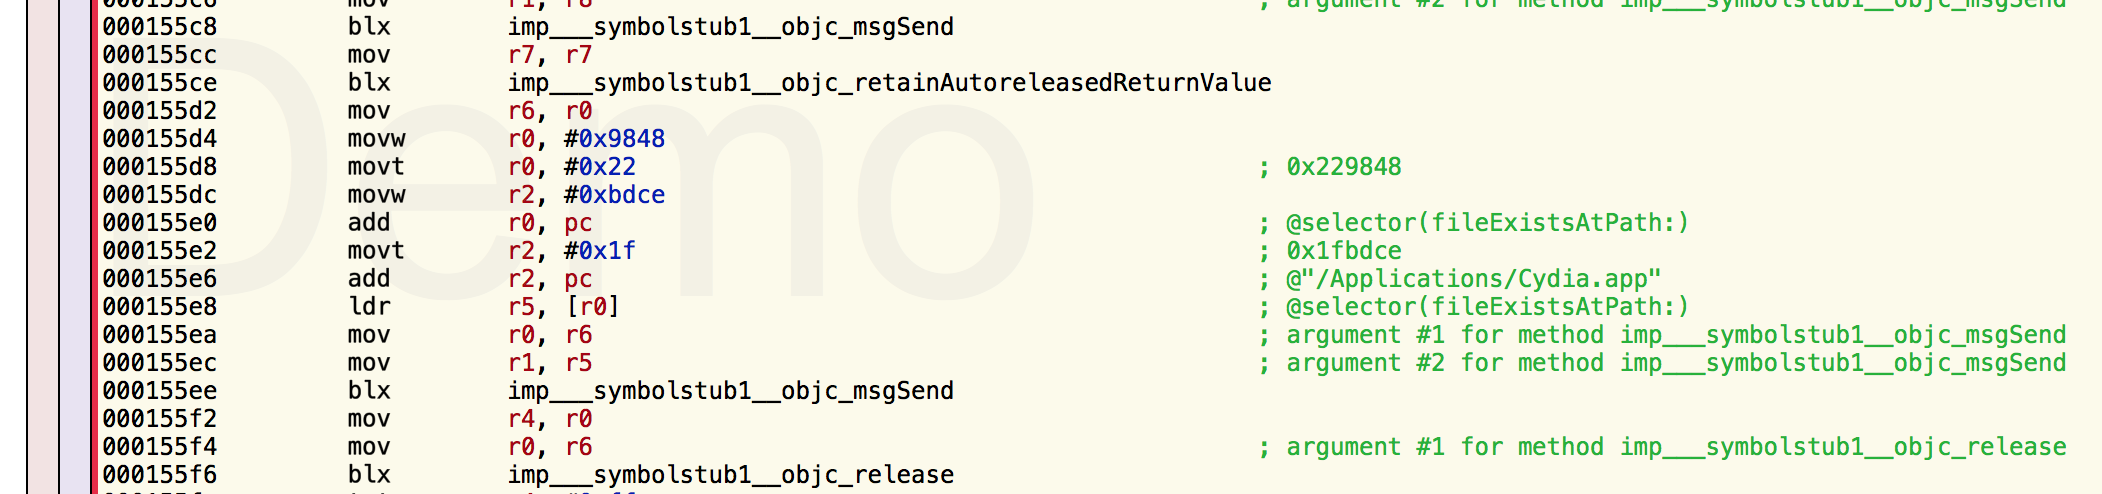
As can be seen in the above screenshot, the fileExistsAtPath for /Applications/Cydia.app is hardly something I would have expected in a isRetinaDisplay implementation :P
planning an attack
At this stage, I was fairly certain that I had found the code I was looking for. From the method name isRetinaDisplay, I reasoned a little and guessed that this was actually supposed to say isJailBroken. I want this method to return false. My mind went straight to getting cycript ready for some method swizzling. I started to set things up and played around a little, when I realized that I don’t think I will be able to manipulate the runtime fast enough for this to work. Remember, the first thing the app does is check the jailbreak status.
A bit of thinking, a few coffees, special alone time with Google and lots of reading, I come to realize that even if I was able to get this method swizzling to work, I’d have to do this every time the application starts up. This was not going to work for me. It was time to rethink my strategy.
Considering how the jailbreak detection works, most of the ways that I saw in the application were related to file existence checks. There was also an attempt to write to /private/jailbreak.txt, as well as open a cydia:// url. I realized that I could probably just change these strings to things that will inherently fail and cause the method to not return true for any of the checks.
in 1992 we had hex editors too
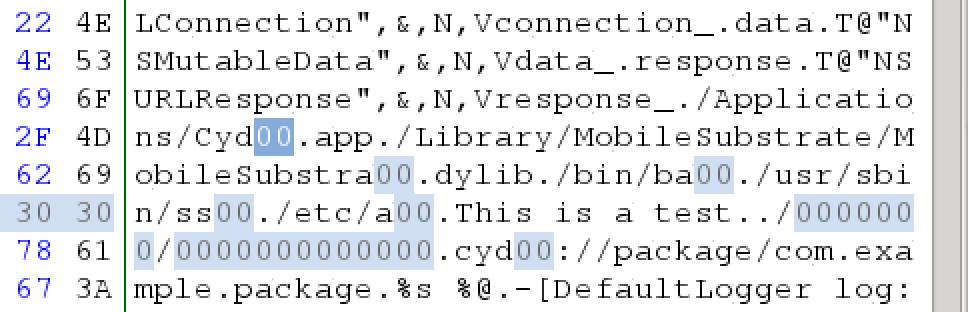
I ssh’d into my iPad and located the applications installed directory. Once I had found this, I scp’d the compiled binary to my kali linux install, and opened it in a hex editor. I realized later I could have probably just used the binary I already had locally :P
Referencing the disassembly of isRetinaDisplay, I searched for the strings it used using a Hex editor. Each string I would replace a few characters with 0 ensuring that I keep the original string length intact. For eg: /bin/bash was replaced with /bin/ba00.
I ended up editing the following strings using the hex editor:
- /Applications/Cydia.app -> /Applications/Cyd00.app
- /Library/MobileSubstrate/MobileSubstrate.dylib -> /Library/MobileSubstrate/MobileSubstra00.dylib
- /bin/bash -> /bin/ba00
- /usr/sbin/sshd -> /usr/sbin/ss00
- /etc/apt -> /etc/a00
- /private/jailbreak.txt -> /0000000/0000000000000
- cydia://package/com.example.package -> cyd00://package/com.example.package
I saved the modifications that I had done, and scp’d the binary back to my iPad to the folder where it was installed. I literally just overwrote the existing binary. At this stage I figured I will most certainly have some form of signing related problem as the binary has been tampered with. Well, this was not the case. Instead, I no longer was greeted with the lame jailbreak security error :P
summary
In the end, it was pretty easy to find the jailbreak detection code. Deducing a few things based on the disassembly made it easy to find the method responsible for the checks, regardless of the attempt to hide it via a name change. Furthermore, using something as simple as a hex editor, a trivial implementation such as this was very easily bypassed :)